Model an Isothermal Actuation System
Model Schematic
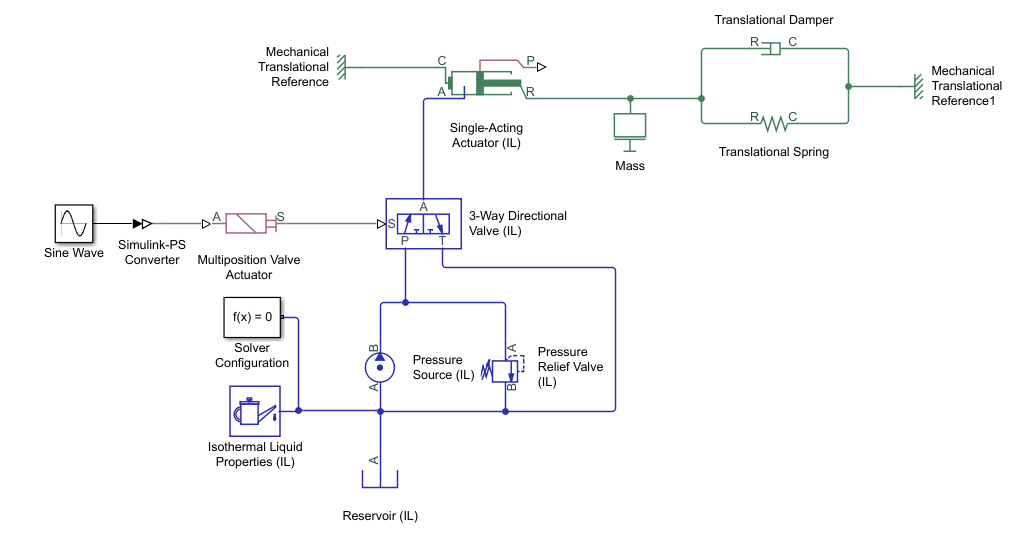
This tutorial shows how to model an isothermal actuation system using Simscape™ Fluids™ blocks. The system consists of a pump, which is modeled by an idealized pressure source, a control unit, a flow regulation valve, and a mechanical load.
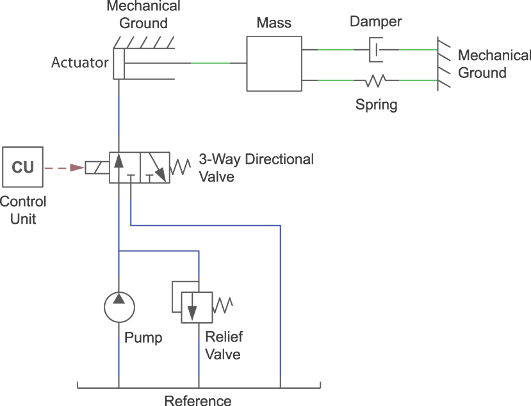
The control unit represents an incoming signal for actuation. The three-way valve represents flow regulation into the actuator. Depending on the position received from the control unit, the three-way valve allows fluid to enter the actuator chamber or redirects it to the environment ("Reference"). In the 3-Way Directional Valve (IL) block, there is a single spool that adjusts the two valve positions - a flow path between ports P and A and a flow path between ports A and T. A change in spool position results in a change in flow path through the valve.
Directional Valve Positions

Start a New Model
At the MATLAB® command prompt, enter
sscnew. MATLAB opens the Simscape model template. This template provides a starting point for your Simscape Fluids model. You will use blocks from both the Simscape Foundation and Simscape Fluids product libraries.From the Simulation tab, click on the Library Browser. From the Simscape > Foundation Library > Isothermal Liquid > Utilities library, drag an Isothermal Liquid Properties (IL) block to the model canvas. Use this block to define the physical properties of the network fluid, including its density, viscosity, and bulk modulus. Use the Isothermal Liquid Predefined Properties (IL) block from the Fluids > Isothermal Liquid > Utilities library to select a fluid with these properties already defined.
Connect the Solver Configuration block to the Isothermal Liquid Properties (IL) block as shown in the figure. The Solver Configuration block provides Simscape solver settings for your model. See Setting Up Solvers for Physical Models for more information on solver selection.
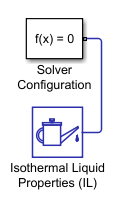
Each topologically distinct physical network requires a solver block.
Model the Actuator Subsystem
From the Simscape > Foundation Library, drag these blocks to the model canvas.
Block Sublibrary Pressure Source (IL) Isothermal Liquid > Sources Reservoir (IL) Isothermal Liquid > Elements Alternatively, double-click on the model canvas and type the block name. Click on the block name in the drop-down list that appears to add the block to the canvas.
Specify the model configuration in each block dialog box by double-clicking on the block icon:
A pressure source represents a constant-pressure pump. In the Pressure Source (IL) block dialog box, set Source type to
Constant. Input10e5Pa for Pressure differential.A reservoir sets the environmental boundary conditions. In the Reservoir (IL) block, set Reservoir pressure specification to
Specified
                     pressure
and Reservoir pressure to0.2MPa.From the Simscape > Fluids library, drag these blocks to the model canvas.
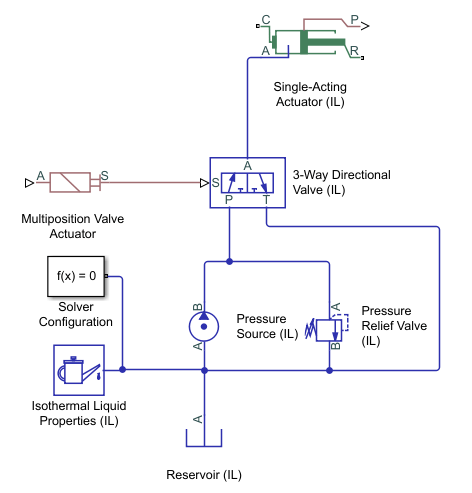
Block Sublibrary Single-Acting Actuator (IL) Isothermal Liquid > Actuators 3-Way Directional Valve (IL) Isothermal Liquid > Valves & Orifices > Directional Control Valves Multiposition Valve Actuator Isothermal Liquid > Valve Actuators Pressure Relief Valve (IL) Isothermal Liquid > Valves & Orifices > Pressure Control Valves The actuator converts the power generated by the pressure source into a translating force. The directional valve and valve actuator regulate the flow to the actuator.
Connect the blocks as shown in the figure. Note that the 3-Way Directional Valve (IL), Pressure Source (IL), and Pressure Relief Valve (IL) blocks are grounded by their connection to the Reservoir (IL) block.
Set the operating pressures of the Pressure Relief Valve (IL). In the Set pressure differential parameter, enter
50e5Pa. This is the pressure at which the valve begins to open. In the Pressure regulation range parameter, which describes the operational range of the valve, enter5e5Pa. The relief valve maximum pressure is the sum of the set pressure and the regulation range.In the 3-Way Directional Valve (IL) block dialog box, on the P-A Orifice tab, set Spool position at maximum P-A orifice area to
0.01m. This is the position of the valve spool when the P-A flow path is fully open. On the A-T Orifice tab, set Spool position at maximum A-T orifice area to0m.The Spool travel between closed and open orifice parameter on the Model parameterization tab sets the distance over which both orifices open and close. At this value, both orifices are closed.
In the Single-Acting Actuator (IL) block, set the Piston cross-sectional area to
0.001m2.From the Simscape > Foundation Library > Mechanical > Translational Elements library, add a Mechanical Translational Reference block and connect it as shown in the figure.
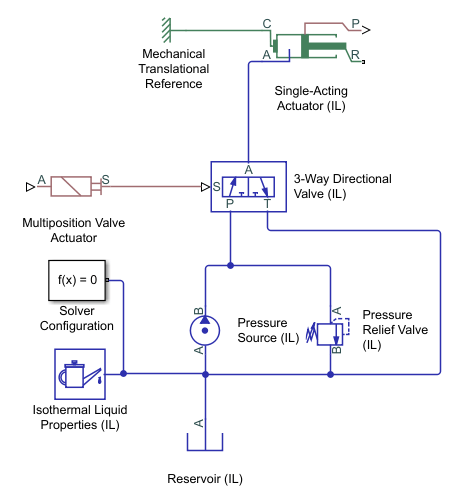
This fixes the mechanical casing of the Single-Acting Actuator (IL), which is represented by port C. The actuator shaft, represented by port R, moves relative to this reference.
Add a Load Model
From the Simscape > Foundation Library > Mechanical > Translational Elements library, drag these blocks to the model canvas:
Connect the blocks as shown in the figure.

The mass, spring, and damper elements provide a basic model of a load with forcing, inertia, and damping.
Add a Control System and Monitoring
From the Simulink > Sources library, drag a Sine Wave to the canvas. This represents a varying signal to the control system, which in turn regulates the flow received by the actuator.
From the Simscape > Utilities library, drag one PS-Simulink Converter block. To convert between Simscape physical signals, which are bidirectional, and Simulink® signals, which are unidirectional, you will need to use a Simulink-PS Converter or PS-Simulink Converter block.
Connect the Sine Wave block, the Simulink-PS Converter block that is already on the canvas, and Multiposition Valve Actuator block in series, as shown in the figure.
In the Sine Wave block dialog box, set the Amplitude parameter to
24. This value corresponds to the default nominal signal value of the Multiposition Valve Actuator block.Drag a Scope block from the Simulink Sources library. The Scope block allows you to quickly inspect model results.
Connect the Single-Acting Actuator (IL) block, a PS-Simulink Converter block, and a Scope block in series, as shown in the figure.
Connect the output side of the Multiposition Valve Actuator block, the other PS-Simulink Converter block, and a Scope block in series, as shown in the figure.
-
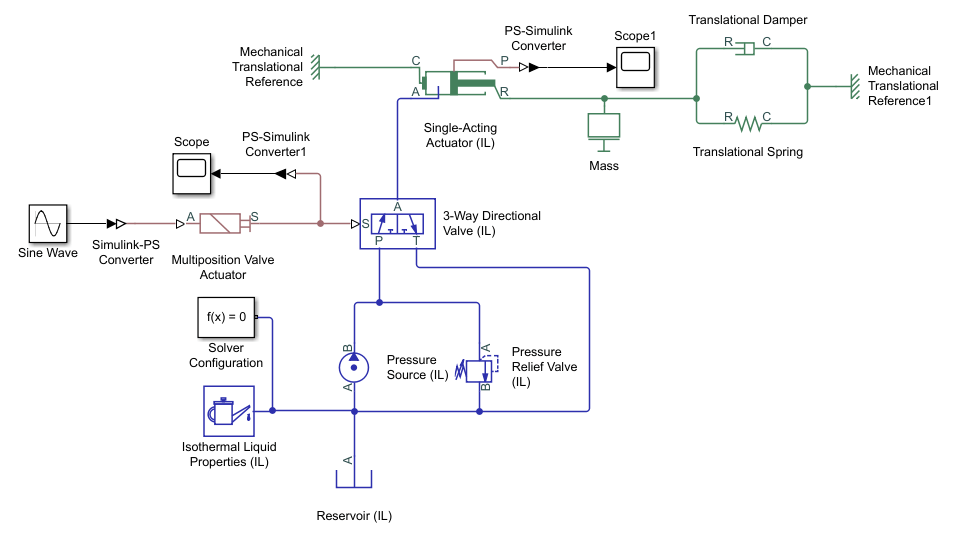
Port P of the Single-Acting Actuator (IL) block outputs a physical signal of the actuator shaft position, relative to the Piston initial displacement.
The Multiposition Valve Actuator block outputs a physical signal of the valve opening distance, relative to the Initial position and the Push-pin stroke.
Run the Simulation
When you run the model, the Simscape software evaluates the model, determines the simulation initial conditions, and simulates the model. To learn more about this process, see How Simscape Simulation Works.
Click on any block in the model, for example the 3-Way Directional Valve (IL) block. In the Simscape Block tab, click Log Data and select Log all Simscape data. This enables you to explore the simulation variable values in the Results Explorer.
Click Run.
In the Debug tab, select Simscape > Variable Viewer. The Variable Viewer shows the initialization values and priorities of all of the model variables. You can set variable targets and priorities during initialization for blocks with a Variables tab in the block dialog box. Verify that the status of all variables is green.
You can inspect simulation results in multiple ways. For a quick assessment of the model, use Scope blocks.
Double-click on the Scope block connected to the Multiposition Valve Actuator. This shows the valve spool position, which is set by the Multiposition Valve Actuator signal.
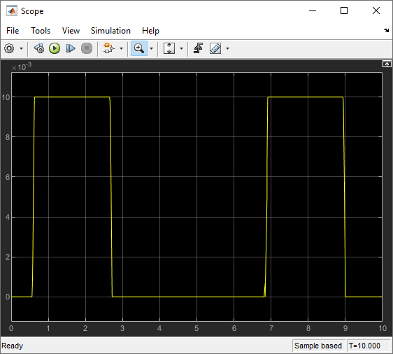
Zooming in, there is a small spike in the signal at the beginning of the second peak.
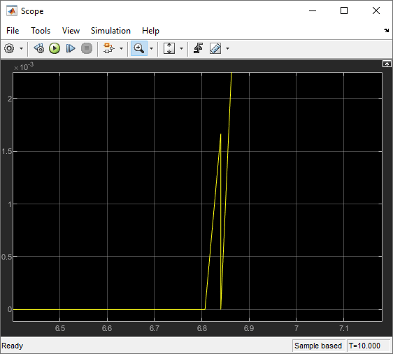
This can be resolved by limiting the size of the solver time step:
Open Configuration Parameters. On the Modeling tab, select Model Settings > Model Settings and click Solver in the left-hand pane.
Expand the Solver details option.
Change Max step size from
autoto0.01.Click OK.
This configuration will be used the next time you run the model.
Double-click on the Scope block connected to the Single-Acting Actuator (IL) block. The Scope plot shows the shaft position as a function of the pressure in the actuator chamber.
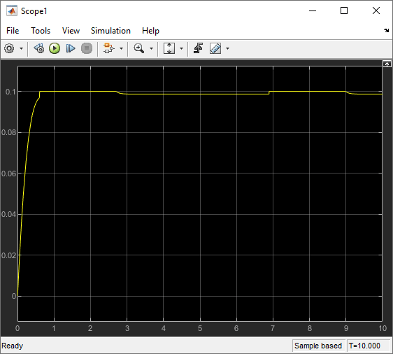
It appears that the actuator is not fully responding to the signal received from the control unit.
The environmental pressure is specified in three locations: in the Isothermal Liquid Properties (IL) block, in the Reservoir (IL) block, and in the Single-Acting Actuator (IL) block. In the model, the Reservoir (IL) block is set to 0.2 MPa and the other two are set to 0.101 MPa. In the Single-Acting Actuator (IL) block, set the Environment pressure specification to
Specified pressureand set Environment pressure to0.2MPa.Run the model.
Check the results with the Results Explorer by clicking on any block, such as the Multiposition Valve Actuator block, and selecting Results Explorer in the Simscape Block tab.
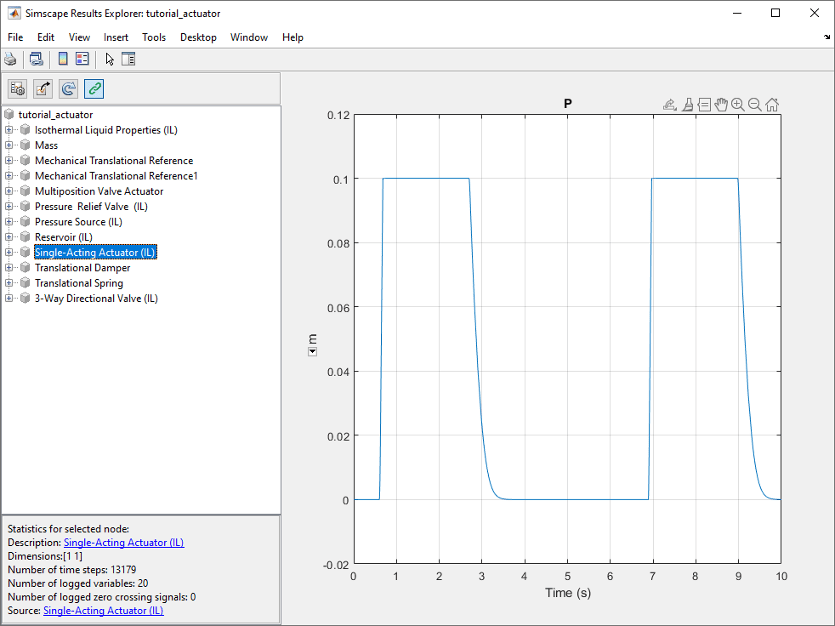
The Results Explorer shows every variable in the model, including internal variables, which cannot be reported by a Scope block. Click on the Single-Acting Actuator (IL) option in the left-hand pane. This shows a plot of the physical signal at port P, or the position of the actuator shaft. Click the plus next to the option to see the variables logged for the Single-Acting Actuator (IL) block.
The plot shows the shaft position for the last 3.5 seconds of the simulation. To see the shaft position over the entire simulation, turn data log limiting off:
Open Configuration Parameters. On the Modeling tab in the Simulink toolstrip, select Model Settings > Model Settings and click Simscape in the left-hand pane.
Clear Limit data points.
Run the model.
The actuator shaft position now follows the control signal.
See Also
Essential Steps for Constructing a Physical Model | Essential Physical Modeling Techniques