Multimodel Control Design
Typically, the dynamics of a system are not known exactly and may vary. For example, system dynamics can vary because of:
Parameter value variations caused by manufacturing tolerances — For example, the resistance value of a resistor is typically within a range about the nominal value, 5 Ω +/– 5%.
Operating conditions — For example, aircraft dynamics change based on altitude and speed.
Any controller you design for such a system must satisfy the design requirements for all potential system dynamics.
Control Design Overview
To design a controller for a system with varying dynamics:
Sample the variations.
Create an LTI model for each sample.
Create an array of sampled LTI models.
Design a controller for a nominal representative model from the array.
Analyze the controller design for all models in the array.
If the controller design does not satisfy the requirements for all the models, specify a different nominal model and redesign the controller.
Model Arrays
In Control System Designer, you can specify multiple models for any plant or sensor in the current control architecture using an array of LTI models (see Model Arrays). If you specify model arrays for more than one plant or sensor, the lengths of the arrays must match.
Create Model Arrays
To create arrays for multimodel control design, you can:
Create multiple LTI models using the
tf,ss,zpk, orfrdcommands.% Specify model parameters. m = 3; b = 0.5; k = 8:1:10; T = 0.1:.05:.2; % Create an array of LTI models. for ct = 1:length(k); G(:,:,ct) = tf(1,[m,b,k(ct)]); end
Create an array of LTI models using the
stackcommand.% Create individual LTI models. G1 = tf(1, [1 1 8]); G2 = tf(1, [1 1 9]); G3 = tf(1, [1 1 10]); % Combine models in an array. G = stack(1,G1,G2,G3);
Perform batch linearizations at multiple operating points. Then export the computed LTI models to create an array of LTI models. See the example Reference Tracking of DC Motor with Parameter Variations (Simulink Control Design).
Sample an uncertain state-space (
uss) model usingusample(Robust Control Toolbox).Compute a
ussmodel from a Simulink® model. Then useusubs(Robust Control Toolbox) orusample(Robust Control Toolbox) to create an array of LTI models. See Obtain Uncertain State-Space Model from Simulink Model (Robust Control Toolbox).Specify a core Simulink block to linearize to a
uss(Robust Control Toolbox) orufrd(Robust Control Toolbox) model. See Specify Uncertain Linearization for Core or Custom Simulink Blocks (Robust Control Toolbox).
Import Model Arrays to Control System Designer
To import models as arrays, you can pass them as input arguments when opening Control System Designer from the MATLAB® command line. For more information, see Control System Designer.
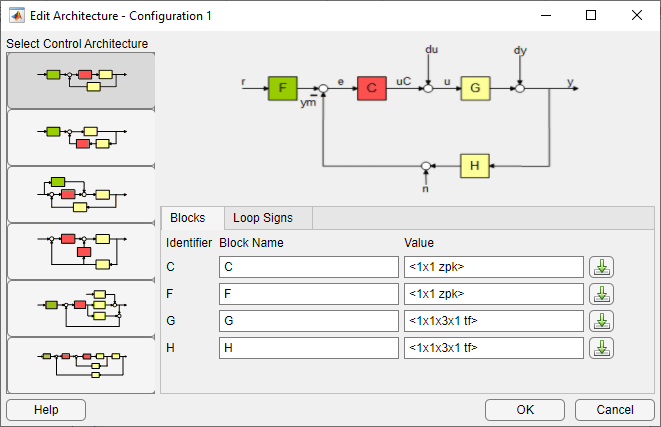
You can also import model arrays into Control System Designer when configuring the control architecture. In the Edit Architecture dialog box:
In the Value text box, specify the name of an LTI model from the MATLAB workspace.
To import block data from the MATLAB workspace or from a MAT-file in your current working directory, click
 .
.

Nominal Model
What Is a Nominal Model?
The nominal model is a representative model in the array of LTI models that you use to design the controller in Control System Designer. Use the editor and analysis plots to visualize and analyze the effect of the controller on the remaining plants in the array.
You can select any model in the array as your nominal model. For example, you can choose a model that:
Represents the expected nominal operating point of your system.
Is an average of the models in the array.
Represents a worst-case plant.
Lies closest to the stability point.
Tip
You can plot and analyze the open-loop dynamics of the system on a Bode plot to determine which model to choose as nominal.
Specify Nominal Model
To select a nominal model from the array of LTI models, in Control System
Designer, click Multimodel Configuration. Then,
in the Multimodel Configuration dialog box, select a Nominal model
index. The default index is 1.
For each plant or sensor that is defined as a model array, the app selects the model at the specified index as the nominal model. Otherwise, the app uses scalar expansion to apply the single LTI model for all model indices.
For example, for the following control architecture:

if G and H are both three-element arrays
and the nominal model index is 2, the software uses the
second element in both the arrays to compute the nominal model:

The nominal response from r to y is:
The app also computes and plots the responses showing the effect of C on the remaining pairs of plant and sensor models — G1H1 and G3H3.
If only G is an array of LTI models, and the specified nominal model is 2, then the control architecture for nominal response is:

In this case, the nominal response from r to y is:
The app also computes and plots the responses showing the effect of C on the remaining pairs of plant and sensor model — G1H and G3H.
Frequency Grid
The frequency response of a system is computed at a series of frequency values, called a frequency grid. By default, Control System Designer computes a logarithmically equally spaced grid based on the dynamic range of each model in the array.
Specify a custom frequency grid when:
The automatic grid has more points than you require. To improve computational efficiency, specify a less dense grid spacing.
The automatic grid is not sufficiently dense within a particular frequency range. For example, if the response does not capture the resonant peak dynamics of an underdamped system, specify a more dense grid around the corner frequency.
You are only interested in the response within specific frequency ranges. To improve computational efficiency, specify a grid that covers only the frequency ranges of interest.
For more information on specifying logarithmically spaced vectors, see logspace.
Note
Modifying the frequency grid does not affect the frequency response computation for the nominal model. The app always uses the Auto select option to compute the nominal model frequency response.
Design Controller for Multiple Plant Models
This example shows how to design a compensator for a set of plant models using Control System Designer.
Create Array of Plant Models
Create an array of LTI plant models using the
stackcommand.% Create an array of LTI models to model plant (G) variations. G1 = tf(1,[1 1 8]); G2 = tf(1,[1 1 9]); G3 = tf(1,[1 1 10]); G = stack(1,G1,G2,G3);Create Array of Sensor Models
Similarly, create an array of sensor models.
H1 = tf(1,[1/0.1,1]);
H2 = tf(1,[1/0.15,1]);
H3 = tf(1,[1/0.2,1]);
H = stack(1,H1,H2,H3);
Open Control System Designer
Open Control System Designer, and import the plant and sensor model arrays.
controlSystemDesigner(G,1,H)

The app opens and imports the plant and sensor model arrays.
Configure Analysis Plot
To view the closed-loop step response in a larger plot, in Control System Designer, click on the small dropdown arrow on the IOTransfer_r2y: step plot and then select
Maximize.
By default the step response shows only the nominal response. To display the individual responses for the other model indices, right-click the plot area, and select Multimodel Display > Individual Responses.

Note
To view an envelope of all model responses, right-click the plot area, and select Multimodel Display > Bounds
The plot updates to display the responses for the other models.

Select Nominal Model
On the Control System tab, click Multimodel Configuration.
In the Multimodel Configuration dialog box, specify a Nominal Model Index of
2.
Click Apply, then Close.

The selected nominal model corresponds to the average system response.
Design Compensator
To design a compensator using the nominal model, you can use any of the supported Control System Designer Tuning Methods.
For this example, use the Compensator Editor to manually specify the compensator dynamics. Add an integrator to the compensator and set the compensator gain to
0.4. For more information, see Edit Compensator Dynamics in Control System Designer.
Analyze Results
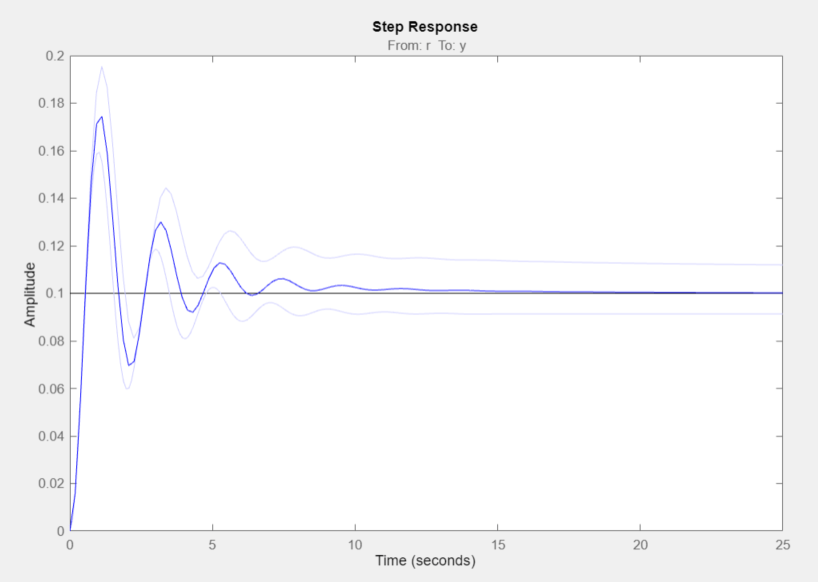
The tuned controller produces a step response with minimal overshoot for the nominal models and a worst-case overshoot less than 10%.
