Feature Selection and Feature Transformation Using Classification Learner App
Investigate Features in the Scatter Plot
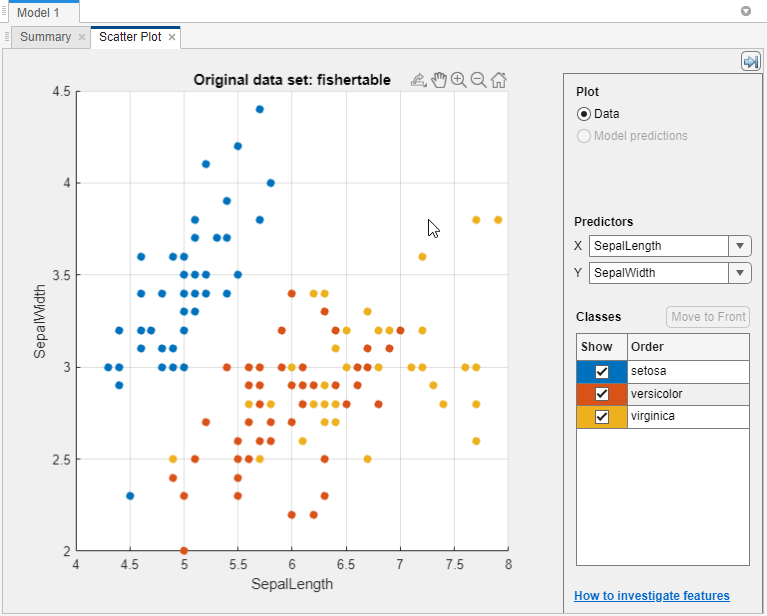
In Classification Learner, try to identify predictors that separate classes well by plotting different pairs of predictors on the scatter plot. The plot can help you investigate features to include or exclude. You can visualize training data and misclassified points on the scatter plot.
Before you train a classifier, the scatter plot shows the data. If you have trained a classifier, the scatter plot shows model prediction results. Switch to plotting only the data by selecting Data in the Plot controls.
Choose features to plot using the X and Y lists under Predictors.
Look for predictors that separate classes well. For example, plotting the
fisheririsdata, you can see that sepal length and sepal width separate one of the classes well (setosa). You need to plot other predictors to see if you can separate the other two classes.
Show or hide specific classes using the check boxes under Show.
Change the stacking order of the plotted classes by selecting a class under Classes and then clicking Move to Front.
Investigate finer details by zooming in and out and panning across the plot. To enable zooming or panning, hover the mouse over the scatter plot and click the corresponding button on the toolbar that appears above the top right of the plot.
If you identify predictors that are not useful for separating out classes, then try using Feature Selection to remove them and train classifiers including only the most useful predictors. See Select Features to Include.
After you train a classifier, the scatter plot shows model prediction results. You can show or hide correct or incorrect results and visualize the results by class. See Plot Classifier Results.
You can export the scatter plots you create in the app to figures. See Export Plots in Classification Learner App.
Select Features to Include
In Classification Learner, you can specify different features (or predictors) to include in the model. See if you can improve models by removing features with low predictive power. If data collection is expensive or difficult, you might prefer a model that performs satisfactorily without some predictors.
You can determine which important predictors to include by using different feature
ranking algorithms. After you select a feature ranking algorithm, the app displays a
plot of the sorted feature importance scores, where larger scores (including
Infs) indicate greater feature importance. The app also
displays the ranked features and their scores in a table.
To use feature ranking algorithms in Classification Learner, click Feature Selection in the Options section of the Learn tab. The app opens a Default Feature Selection tab, where you can choose a feature ranking algorithm.
| Feature Ranking Algorithm | Supported Data Types | Description |
|---|---|---|
| MRMR | Categorical and continuous features | Rank features sequentially using the Minimum Redundancy Maximum Relevance (MRMR) Algorithm. For more information, see |
| Chi2 | Categorical and continuous features | Examine whether each predictor variable is independent of the response variable by using individual chi-square tests, and then rank features using the p-values of the chi-square test statistics. Scores correspond to –log(p). For more information, see
|
| ReliefF | Either all categorical features or all continuous features. ReliefF is not supported when either of the following is true:
| Rank features using the ReliefF algorithm with 10 nearest neighbors. This algorithm works best for estimating feature importance for distance-based supervised models that use pairwise distances between observations to predict the response. For more
information, see |
| ANOVA | Categorical and continuous features | Perform one-way analysis of variance for each predictor variable, grouped by class, and then rank features using the p-values. For each predictor variable, the app tests the hypothesis that the predictor values grouped by the response classes are drawn from populations with the same mean against the alternative hypothesis that the population means are not all the same. Scores correspond to –log(p). For more information, see
|
| Kruskal Wallis | Categorical and continuous features | Rank features using the p-values returned by the Kruskal-Wallis Test. For each predictor variable, the app tests the hypothesis that the predictor values grouped by the response classes are drawn from populations with the same median against the alternative hypothesis that the population medians are not all the same. Scores correspond to –log(p). For more information, see
|
Note
The app calculates feature importance scores using predictor z-score values
(see normalize) instead of the actual predictor values.
Choose between selecting the highest ranked features and selecting individual features.
Choose Select highest ranked features to avoid bias in validation metrics. For example, if you use a cross-validation scheme, then for each training fold, the app performs feature selection before training a model. Different folds can select different predictors as the highest ranked features.
Choose Select individual features to include specific features in model training. If you use a cross-validation scheme, then the app uses the same features across all training folds.
When you are done selecting features, click Save and Apply. Your selections affect all draft models in the Models pane and will be applied to new draft models that you create using the gallery in the Models section of the Learn tab.
To select features for a single draft model, open and edit the model summary. Click the model in the Models pane, and then click the model Summary tab (if necessary). The Summary tab includes an editable Feature Selection section.
After you train a model, the Feature Selection section of the model Summary tab lists the features used to train the full model (that is, the model trained using training and validation data). To learn more about how Classification Learner applies feature selection to your data, generate code for your trained classifier. For more information, see Generate MATLAB Code to Train Model with New Data.
For an example using feature selection, see Train Decision Trees Using Classification Learner App.
Transform Features with PCA in Classification Learner
Use principal component analysis (PCA) to reduce the dimensionality of the predictor space. Reducing the dimensionality can create classification models in Classification Learner that help prevent overfitting. PCA linearly transforms predictors in order to remove redundant dimensions, and generates a new set of variables called principal components.
On the Learn tab, in the Options section, select PCA.
In the Default PCA Options dialog box, select the Enable PCA check box, and then click Save and Apply.
The app applies the changes to all existing draft models in the Models pane and to new draft models that you create using the gallery in the Models section of the Learn tab.
When you next train a model using the Train All button, the
pcafunction transforms your selected features before training the classifier.By default, PCA keeps only the components that explain 95% of the variance. In the Default PCA Options dialog box, you can change the percentage of variance to explain by selecting the Explained variance value. A higher value risks overfitting, while a lower value risks removing useful dimensions.
If you want to limit the number of PCA components manually, select
Specify number of componentsin the Component reduction criterion list. Select the Number of numeric components value. The number of components cannot be larger than the number of numeric predictors. PCA is not applied to categorical predictors.
You can check PCA options for trained models in the PCA section of the Summary tab. Click a trained model in the Models pane, and then click the model Summary tab (if necessary). For example:
PCA is keeping enough components to explain 95% variance.
After training, 2 components were kept.
Explained variance per component (in order): 92.5%, 5.3%, 1.7%, 0.5%
To learn more about how Classification Learner applies PCA to your data, generate
code for your trained classifier. For more information on PCA, see the pca function.
Investigate Features in the Parallel Coordinates Plot
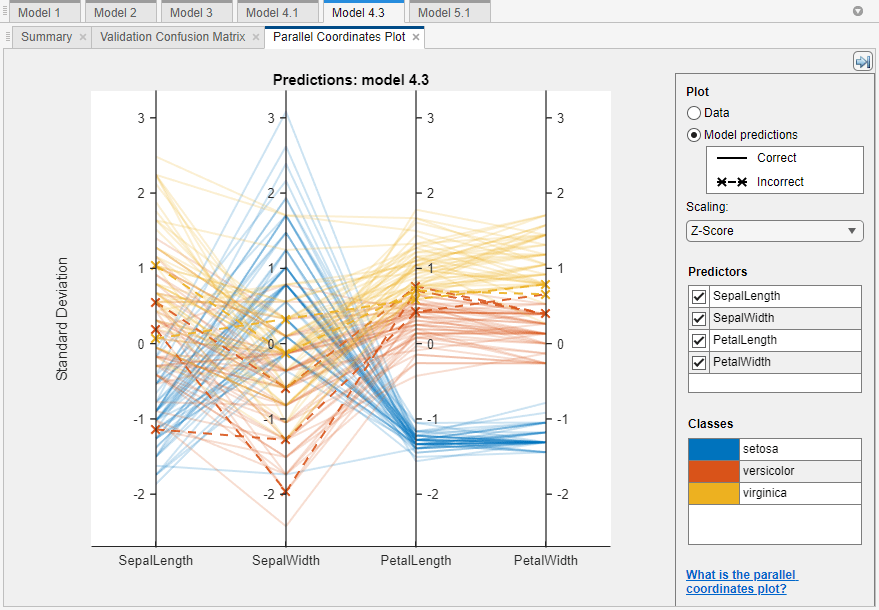
To investigate features to include or exclude, use the parallel coordinates plot. You can visualize high-dimensional data on a single plot to see 2-D patterns. The plot can help you understand relationships between features and identify useful predictors for separating classes. You can visualize training data and misclassified points on the parallel coordinates plot. When you plot classifier results, misclassified points have dashed lines.
On the Learn tab, in the Plots and Results section, click the arrow to open the gallery, and then click Parallel Coordinates in the Validation Results group.
On the plot, drag the X tick labels to reorder the predictors. Changing the order can help you identify predictors that separate classes well.
To specify which predictors to plot, use the Predictors check boxes. A good practice is to plot a few predictors at a time. If your data has many predictors, the plot shows the first 10 predictors by default.
If the predictors have significantly different scales, scale the data for easier visualization. Try different options in the Scaling list:
Nonedisplays raw data along coordinate rulers that have the same minimum and maximum limits.Rangedisplays raw data along coordinate rulers that have independent minimum and maximum limits.Z-Scoredisplays z-scores (with a mean of 0 and a standard deviation of 1) along each coordinate ruler.Zero Meandisplays data centered to have a mean of 0 along each coordinate ruler.Unit Variancedisplays values scaled by standard deviation along each coordinate ruler.L2 Normdisplays 2-norm values along each coordinate ruler.
If you identify predictors that are not useful for separating out classes, use Feature Selection to remove them and train classifiers including only the most useful predictors. See Select Features to Include.
The plot of the fisheriris data shows the petal
length and petal width features separate the classes best.

For more information, see parallelplot.
You can export the parallel coordinates plots you create in the app to figures. See Export Plots in Classification Learner App.