Deep Network Designer
Design and visualize deep learning networks
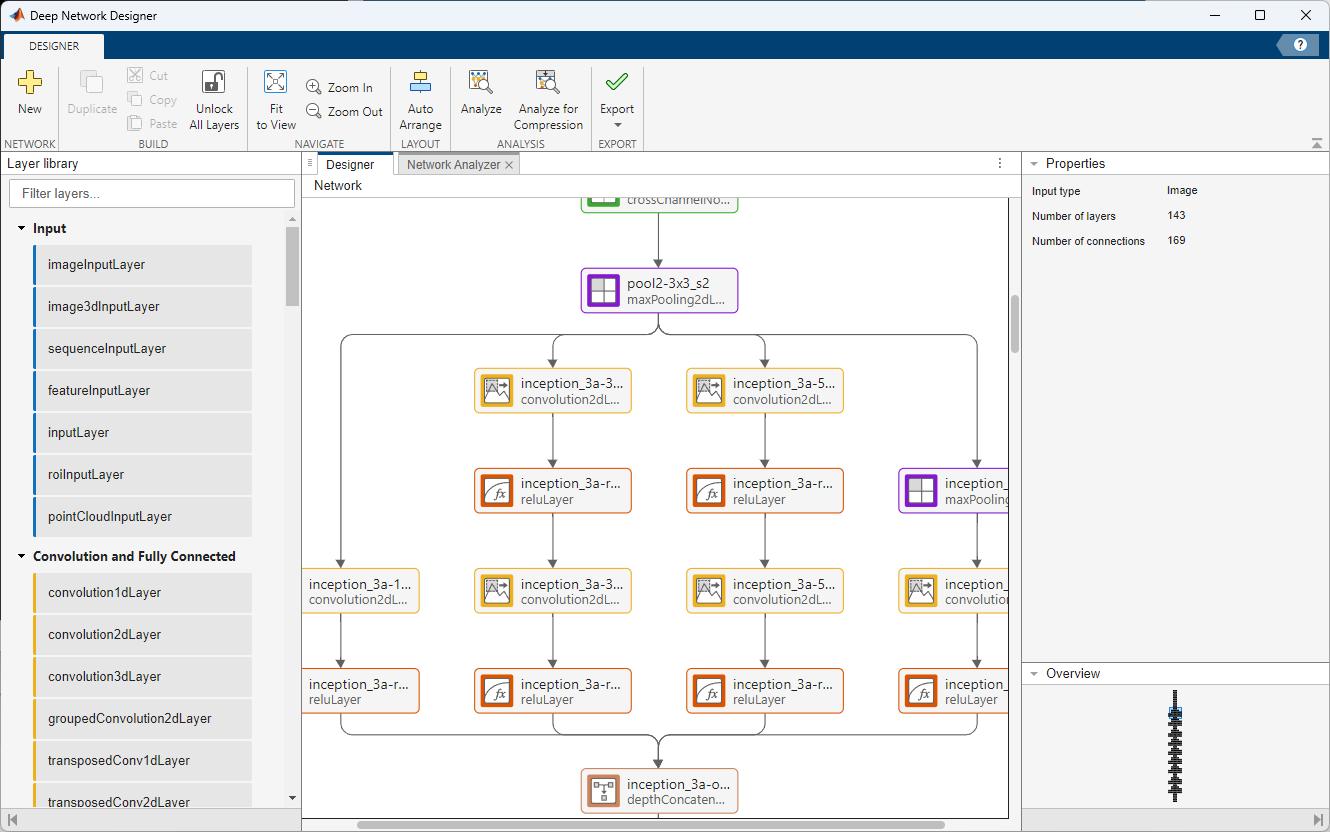
Description
The Deep Network Designer app lets you import, build, visualize, and edit deep learning networks. Using this app, you can:
Build, edit, and combine networks.
Load pretrained networks and edit them for transfer learning.
Import networks from PyTorch® and TensorFlow™.
Analyze networks to ensure that the architecture is defined correctly.
Analyze networks for memory reduction using compression techniques.
Export networks to Simulink®.
Generate MATLAB® code for building networks.
Open the Deep Network Designer App
MATLAB Toolstrip: On the Apps tab, under Machine Learning and Deep Learning, click the app icon.
MATLAB command prompt: Enter
deepNetworkDesigner.
Examples
Create a classification network for numeric feature data.
Open Deep Network Designer.
deepNetworkDesigner
To create a blank network, pause on Blank Network and click New. The app opens a blank canvas where you can drag and drop layers.
From the Layer Library, drag a featureInputLayer onto the canvas. You can use the Layer Library filter to help you find layers. Select the layer. In the Properties pane, set Normalization to "zscore" and InputSize to the number of features in your data. Next, drag a fullyConnectedLayer onto the canvas. To connect the layers, pause on the featureInputLayer and click the out port. Drag the arrow to the in port of the fullyConnectedLayer.

Add a layerNormalizationLayer followed by a reluLayer to the canvas and connect them sequentially.

Finally, add a fullyConnectedLayer followed by a softmaxLayer and connect them. For the last fullyConnectedLayer, select the layer and set the OutputSize to the number of classes in your data.
To automatically align the layers, click Auto Arrange.

To check that the network is ready for training, select Analyze. The Deep Learning Network Analyzer shows that the network has zero warnings or errors.

To export the network to the workspace, click Export. To generate code to recreate the network, click Export > Generate Network Code Without Parameters.
Prepare a network for transfer learning by editing it in Deep Network Designer.
Transfer learning is the process of taking a pretrained deep learning network and fine-tuning it to learn a new task. You can quickly transfer learned features to a new task using a smaller number of training images. Transfer learning is therefore often faster and easier than training a network from scratch. To use a pretrained network for transfer learning, you must change the number of classes to match your new data set.
Deep Network Designer provides a selection of pretrained image and audio networks. To explore the pretrained networks, open Deep Network Designer.
deepNetworkDesigner

For this example, pause on SqueezeNet and click Open.

To prepare the network for transfer learning:
Set the Number of classes to the new number of classes. This sets the
NumFiltersproperty in the last learnable layer. TheNumFiltersproperty defines the number of classes for classification problems.Increase the Learning rate in the last learnable layer so that learning is faster in the last learnable layer than in the transferred layers. This sets the
WeightLearnRateFactorandBiasLearnRateFactorproperties of the last learnable layer.Click Import.
Before R2025b: To adapt the network to the new data, you must click the last learnable layer in Designer pane, click Unlock Layer, set its NumFilters property to the number of classes in the new data, and increase its WeightLearnRateFactor and BiasLearnRateFactor properties.

Check your network by clicking Analyze. The network is ready for training if Deep Learning Network Analyzer reports zero errors. To export the prepared network to the workspace, click Export. To generate MATLAB code to create the network, click Generate Network Code.
For an example showing how to train a network to classify new images, see Prepare Network for Transfer Learning Using Deep Network Designer.
Import a neural network from PyTorch® or TensorFlow™.
For this example, import the MNASNet (Copyright© Soumith Chintala 2016) PyTorch model. Download the mnasnet1_0 file, which is approximately 17 MB in size, from the MathWorks website.
modelfile = matlab.internal.examples.downloadSupportFile("nnet", ...
    "data/PyTorchModels/mnasnet1_0.pt");
To import a network from an external platform, use Deep Network Designer.
deepNetworkDesigner
You can import models from PyTorch® or TensorFlow™.

For PyTorch® models, click the From PyTorch icon. In the Import PyTorch Model dialog box, copy the location of the model file and then click Import.

When importing PyTorch networks using Deep Network Designer, you have the option to specify the input sizes of the network. This option is only available when specifying the input sizes might make the import more successful, for example, by reducing the number of custom layers.
The app imports the network and generates an Import Report. The Import Report displays any issues with the network that require attention before you use the network for training or inference. For example, the report shows a warning if the app is unable to infer the input sizes or if you need to complete any placeholder layers.

For an example that shows how to import a PyTorch® network into Deep Network Designer and fix any issues, see Import PyTorch Model Using Deep Network Designer.
Export a trained network from Deep Network Designer to Simulink®.
Open Deep Network Designer.
deepNetworkDesigner
The app has two types of Simulink export:
Export to a single network block, for example, a Predict block
Export to multiple layer blocks
For small networks with all layers supported as layer blocks, exporting to layer blocks is recommended. For large networks or networks with layers not supported as layer blocks, exporting to a single network block is recommended. If your network has layers that are not supported as layer blocks, then you will see a warning.
Export as Layer Blocks
For this example, pause on LSTM and click Open. To export the network to Simulink, select Export > Export to Simulink. In the Export to Simulink dialog, select Export as to be Multiple Layer Blocks. Select a location to save the Simulink file with the network parameters and then click Export. During export, if the network is not initialized, then the app attempts to initialize it.
The app creates a Simulink model.

Click inside my_model_1 to see the individual layer blocks.

For a list of layers supported as layer blocks, see List of Deep Learning Layer Blocks and Subsystems.
Export as Network Block
You can also export your model as a single network block. In Deep Network Designer, select Export as to be Single Network Block. In this example, the app exports the network as a Stateful Predict block.
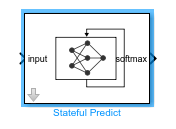
For stateful neural networks, the exported model uses a discrete solver with a fixed time step. Ensure that the step time that you specify in the Stateful Predict block or local solver matches the times used to train the model.
The Deep Network Designer app enables you to generate MATLAB® code that recreates the network architecture.
To recreate the layers in your network, including any initial parameters, select Export > Generate Network Code. The app creates a live script and a MAT file containing the initial parameters (weights and biases) from your network. Run the script to recreate the network layers, including the learnable parameters from the MAT file. Use this option to preserve the weights if you want to perform transfer learning.
To recreate only the layers in your network, select Export > Generate Network Code Without Parameters. This network does not contain initial parameters, such as pretrained weights.
Running the generated script returns the network architecture as a dlnetwork object. For an example of training a network exported from Deep Network Designer, see Get Started with Deep Network Designer. To learn more about generating code, see Generate MATLAB Code from Deep Network Designer.
Related Examples
Programmatic Use
Tips
To interactively build and train deep learning neural networks for time series tasks, use the Time Series Modeler app. For more information, see Get Started with Time Series Forecasting.