Get Started with the Video Labeler
The Video Labeler app provides an easy way to mark axis-aligned and rotated rectangular regions of interest (ROI) labels, projected cuboid ROI labels, line ROI labels, polygon ROI labels, point ROI labels, pixel ROI labels, and scene labels in a video or image sequence.
You can use labeled data to validate or train algorithms such as image classifiers, object detectors, and semantic and instance segmentation networks. Consider your application when choosing a labeling drawing tool to create ROI labels. For more details on how to select the right label type and drawing tool for your application, see ROI Labels, Sublabels, and Attributes.
This example gets you started using the app by showing you how to:
Manually label an image frame from a video.
Automatically label across image frames using an automation algorithm.
Export the labeled ground truth data.
ROI and Scene Label Definitions
An ROI label corresponds to either an axis-aligned or rotated rectangular, point, line, projected cuboid, polygon, or pixel region of interest. These labels contain two components: the label name, such as "cars," and the region you create.
A Scene label describes the nature of a scene, such as "sunny." You can associate this label with a frame.
Load Unlabeled Data
Programmatically open the app and load a video. Videos must be in a file format readable
by VideoReader.
videoLabeler('visiontraffic.avi')Explore the video. Click the Play button ![]() to play the entire video, or use the slider
to play the entire video, or use the slider
![]() to navigate between frames.
to navigate between frames.
To load an image sequence with corresponding timestamps, select Import > Image Sequence. The app supports all image file formats supported by imread. To read additional file formats, you can create an imageDatastore and use the ReadFcn property.
To load a custom data source that cannot be read by VideoReader or imread, see Use Custom Image Source Reader for Labeling.
Create Label Definitions
Define the labels you intend to draw. In this example, you define labels directly within
the app. To define labels from the MATLAB® command line instead, use the labelDefinitionCreator.
Set Time Interval
You can label the entire video or start with a portion of the video. In this example, you label a five-second time range within the loaded video. In the text boxes below the video, enter these times in seconds:
In the Current Time box, type
5and press Enter.In the Start Time box, type
5so that the slider is at the start of the time range.In the End Time box, type
10.
![]()
Optionally, to make adjustments to the time range, click and drag the red interval flags.
![]()
The entire app is now set up to focus on this specific time range. The video plays only within this interval, and labeling and automation algorithms apply only to this interval. You can change the interval at any time by moving the flags.
To expand the time range to fill the entire playback section, click Zoom in Time Range.
Create ROI Label
An ROI label is a label that corresponds to a region of interest (ROI) in an image. You can define these ROI label types.
Rectangle— Draw 2-D rectangular bounding box labels around objects in an image, such as vehicles, boats, buildings. Use the Segment Anything tool to automatically generate rectangle ROI labels by clicking or bounding object regions.Rotated Rectangle— Draw 2-D rotated-rectangular bounding box labels around objects in an image, such as vehicles, boats, buildings.Point— Draw point ROI labels for keypoint detection in objects.Line— Draw linear ROIs to label lines, such as lane boundaries.Projected Cuboid— Draw 3-D bounding box labels around objects in an image, such as vehicles, boats, buildings.Polygon— Draw polygon labels around objects. You can label distinct instances of the same class. Use the Segment Anything tool to automatically generate polygon ROI labels by clicking or bounding object regions. For more information on drawing polygon ROI labels for instance and semantic segmentation networks, see Label Objects Using Polygons for Instance Segmentation.Pixel— Draw pixels to label various classes, such as road or sky, for semantic segmentation. Use the Segment Anything tool to automatically generate pixel ROI labels by clicking or bounding object regions. For more information about pixel labeling, see Label Pixels for Semantic Segmentation. For an example of how to automatically select pixels to label, see Automatically Label Ground Truth Using Segment Anything Model.
For more details about these ROI label definitions, see ROI Labels, Sublabels, and Attributes.
In this example, you define a vehicle group for labeling types of
vehicles, and then create two Rectangle ROI labels,
Car and Truck. After creating labels, you
can use the Show ROI Labels drop-down menu under
VISUALIZATION tab to select On Hover,
Always, or Never to control how the
ROI label names appear during labeling. By default, the names will appear when you hover on
an ROI.
On the app toolstrip, under VIDEO LABELER tab, click Add Label.
Create a
Rectanglelabel namedCar.Optionally, change the label color by clicking the preview color.

From the
Groupdrop-down menu, selectNew Groupand name the groupVehicleClick OK.
The Vehicle group name appears in the ROI Labels Definitions pane with the label Car created. You can move a label in the list to a different position or group in the list by left-clicking and dragging the label up or down.
To add the second label, click Add Label. Name the label Truck and make sure the Vehicle group is selected. Click OK.
Use the mouse to draw rectangular Car ROIs around the two vehicles.

Create Sublabels
A sublabel is a type of ROI label that corresponds to a parent ROI label. Each sublabel must belong to, or be a child of, a specific label defined in the ROI Labels Definitions pane. For example, in a driving scene, a vehicle label might have sublabels for headlights, license plates, or wheels. For more details about sublabels, see ROI Labels, Sublabels, and Attributes.
Define a sublabel for headlights.
In the ROI Labels Definitions pane on the left, click the Car label.
Click Sublabel.
Create a
Rectanglesublabel namedheadlightand optionally write a description. Click OK.The headlight sublabel appears in the ROI Labels Definitions pane. The sublabel is nested under the selected ROI label, Car, and has the same color as its parent label.
You can add multiple sublabels under a label. You can also drag-and-drop the sublabels to reorder them in the list. Right-click any label for additional edits.

In the ROI Labels Definitions pane, select the headlight sublabel.
In the image frame, select the Car label. The label turns yellow when selected. You must select the Car label (parent ROI) before you can add a sublabel to it.
Draw headlight sublabels for each of the cars.
Repeat the previous steps to label the headlights of the other car. To draw the labels more precisely, use the pan and zoom options located in the upper-right corner of the labeling window.

Sublabels cannot be used with point and pixel ROI labels and cannot have their own sublabels. For more details on working with sublabels, see Use Sublabels and Attributes to Label Ground Truth Data.
Show or Hide Labels and Sublabels
You can show or hide the labels or sublabels in a labeled video by using the ![]() icon on the ROI Labels Definitions
pane. The
icon on the ROI Labels Definitions
pane. The ![]() appears only after you define a label or sublabel. By
default, the app displays all the labels and the sublabels.
appears only after you define a label or sublabel. By
default, the app displays all the labels and the sublabels.
To hide a label or sublabel, click on the ![]() icon along side the label or sublabel name. The app hides
the corresponding label or sublabel and displays the
icon along side the label or sublabel name. The app hides
the corresponding label or sublabel and displays the ![]() icon.
icon.
|
|
|


Create Attributes
An ROI attribute specifies additional information about an ROI label or sublabel. For example, in a driving scene, attributes might include the type or color of a vehicle. In the ocean scene, attributes might include the type of sailboat or number of sails. You can define ROI attributes of these types.
Numeric Value— Specify a numeric scalar attribute, such as the number of doors on a labeled vehicle or the number of sails on a sailboat.String— Specify a string scalar attribute, such as the color of a vehicle or boat.Logical— Specify a logical true or false attribute, such as whether a vehicle is in motion or a boat is making way.List— Specify a drop-down list attribute of predefined strings, such as make or model of a vehicle or boat.
For more details about these attribute types, see ROI Labels, Sublabels, and Attributes.
Add an attribute for the vehicle type.
In the ROI Labels Definitions pane on the left, select the Car label and click Attribute and then select
Listattribute type.In the Attribute Name box, type
carType.In the List Items section, type different types of cars, such as
Sedan,Hatchback,SUV, andWagon, each on its own line. Optionally give the attribute a description, and click OK. You can hover the information icon that appears next to the attribute field to display the added description.Select a Car ROI label in the image frame. In the View Labels, Attributes and Sublabels pane on the right, select the appropriate carType attribute value for that vehicle.
Repeat the previous step to assign a carType attribute to the other vehicle.

You can also add attributes to sublabels. Add an attribute for the headlight sublabel that tells whether the headlight is on.
In the ROI Labels Definitions pane on the left, select the headlight sublabel and click Attributeand then select
Logicalattribute type.In the Attribute Name box, type
isOn. Leave the Default Value set toEmpty, optionally write a description, and click OK.Select a headlight in the video frame. Set the appropriate isOn attribute value, or leave the attribute value set to
Empty.Repeat the previous step to set the isOn attribute for the other headlights.
To delete an attribute, right-click an ROI label or sublabel, and select the attribute to delete. Deleting the attribute removes attribute information from all previously created ROI label annotations.
Create Scene Labels
A scene label defines additional information for the entire scene. Use scene labels to describe conditions, such as lighting and weather, or events, such as lane changes.
Create a scene label to apply to an image.
In the left pane of the app, select the Scene Labels Definitions pane below to the ROI Labels Definitions pane.
On the app toolstrip, under VIDEO LABELER tab, click Add Label.
Click Scene, and in the Label Name box, enter a scene label named
daytime.Change the color of the label definition to light blue to reflect the nature of the scene label. Under the Color parameter, click the color preview and select the standard light blue colors. Then, click OK to close the color selection window.

Leave the Group parameter set to the default of
Noneand click OK. The Scene Labels Definitions pane shows the scene label definition.
Click Add Label to apply the
daytimelabel to the scene. A checkmark appears next to the scene label.To edit or delete a scene label, select the scene label, click Edit Label or Delete Label from the app toolstrip and select either Edit Scene Label or Delete Scene Label.
Label Ground Truth
So far, you have labeled only one frame in the video. To label the remaining frames, choose one of these options.
Label Ground Truth Manually
When you click the right arrow key to advance to the next frame, the ROI labels from the previous frame do not carry over. Only the daytime scene label applies to each frame, because this label was applied over the entire time range.
Advance frame by frame and draw the label and sublabel ROIs manually. Also update the attribute information for these ROIs.
Label Ground Truth Using Automation Algorithm
To speed up the labeling process, you can use an automation algorithm within the app. You can either define your own automation algorithm, see Create Custom Automation Algorithm for Labeling and Temporal Automation Algorithms, or use a built-in automation algorithm. In this example, you label the ground truth using a built-in point tracking algorithm.
In this example, you automate the labeling of only the Car ROI labels. The built-in automation algorithms do not support sublabel and attribute automation.
Select the labels you want to automate. In the first frame of the video, press Ctrl and click to select the two Car label annotations. The labels are highlighted in yellow.

From the app toolstrip, select Select Algorithm > Point Tracker. This algorithm tracks one or more rectangle ROIs over short intervals using the Kanade-Lucas-Tomasi (KLT) algorithm.
(optional) Configure the automation settings. For example, make sure that Import selected ROIs is selected so that the Car labels you selected are imported into the automation session.

Click Automate to open an automation session. The algorithm instructions appear in the right pane, and the selected labels are available to automate.
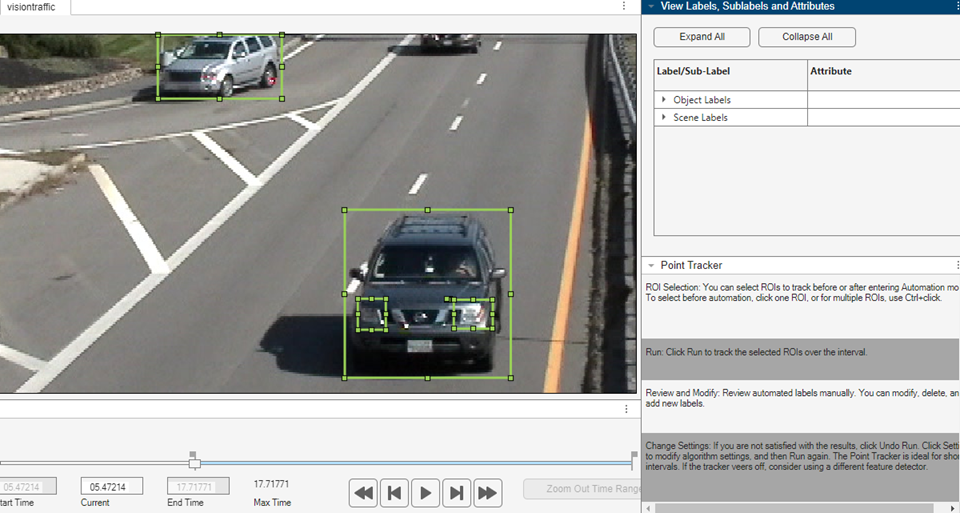
Click Run to track the selected ROIs over the interval.
Examine the results of running the algorithm.
The vehicles that enter the scene later are unlabeled. The unlabeled vehicles did not have an initial ROI label, so the algorithm did not track them. Click Undo Run. Use the slider to find the frames where each vehicle first appears. Draw vehicle ROIs around each vehicle, and then click Run again.
Advance frame by frame and manually move, resize, delete, or add ROIs to improve the results of the automation algorithm.
When you are satisfied with the algorithm results, click Accept. Alternatively, to discard labels generated during the session and label manually instead, click Cancel. The Cancel button cancels only the algorithm session, not the app session.
Optionally, you can now manually label the remaining frames with sublabel and attribute information.
To further evaluate your labels, you can view a visual summary of the labeled ground truth. From the app toolstrip, select View Label Summary. Use this summary to compare the frames, frequency of labels, and scene conditions. For more details, see View Summary of Ground Truth Labels. This summary does not support sublabels or attributes.
Export Labeled Ground Truth
You can export the labeled ground truth to a MAT file or to a variable in the MATLAB workspace. In both cases, the labeled ground truth is stored as a groundTruth object. You can use this object to train a deep-learning-based computer
vision algorithm. For more details, see Training Data for Object Detection and Semantic Segmentation.
Note
If you export pixel data, the pixel label data and ground truth data are saved in separate files but in the same folder. For considerations when working with exported pixel labels, see How Labeler Apps Store Exported Pixel Labels.
In this example, you export the labeled ground truth to the
MATLAB workspace. From the app toolstrip, select Export > To Workspace. The exported MATLAB variable is gTruth.
Display the properties of the exported groundTruth object. The information in
your exported object might differ from the information shown here.
gTruth
gTruth =

  groundTruth with properties:

          DataSource: [1×1 groundTruthDataSource]
    LabelDefinitions: [3x6 table]
           LabelData: [531×3 timetable]
Data Source
DataSource is a groundTruthDataSource object containing the path
to the images or video and timestamps. Display the properties of this
object.
gTruth.DataSource
ans =

groundTruthDataSource for a video file with properties

        Source: ...matlab\toolbox\vision\visiondata\visiontraffic.avi
    TimeStamps: [531×1 duration]
Label Definitions
LabelDefinitions is a table containing
information about the label definitions. This table does not contain information about the
labels that are drawn on the video frames. To save the label definitions in their own MAT
file, from the app toolstrip, select Export > To File. You can then import these label definitions into another app session by
selecting Import Files.
Display the label definitions table. Each row contains information about an ROI label
definition or a scene label definition. If you exported pixel label data, the
LabelDefinitions table also includes a PixelLabelID
column containing the ID numbers for each pixel label
definition.
gTruth.LabelDefinitions
ans =
  3×6 table

      Name         Type        LabelColor        Group       Description     Hierarchy
    _________    _________    ____________    ___________    ___________    ____________

    {'Car'  }    Rectangle    {1×3 double}    {'Vehicle'}    {0×0 char}     {1×1 struct}
    {'Truck'}    Rectangle    {1×3 double}    {'Vehicle'}    {0×0 char}     {0×0 double}
    {'daytime'}  Scene        {1×3 double}    {'None'}       {0×0 char}     {0×0 double}
Within LabelDefinitions, the Hierarchy column stores information about the sublabel and attribute definitions of a parent ROI label.
Display the sublabel and attribute information for the Car
label.
gTruth.LabelDefinitions.Hierarchy{1}ans =
struct with fields:
carType: [1×1 struct]
Headlight: [1×1 struct]
Type: Rectangle
Description: ''Display information about the Headlight
sublabel.
gTruth.LabelDefinitions.Hierarchy{1}.Headlightans =
struct with fields:
Type: Rectangle
Description: ''
Color: [0.5862 0.8276 0.3103]
isOn: [1×1 struct]Display information about the carType attribute.
gTruth.LabelDefinitions.Hierarchy{1}.carTypeans =
struct with fields:
ListItems: {3×1 cell}
Description: ''ans =
struct with fields:
ListItems: {4×1 cell}
Description: ''Label Data
LabelData is a timetable containing information about the ROI labels drawn at each timestamp, across the entire video. The timetable contains one column per label.
Display the first few rows of the timetable. The first few timestamps
indicate that no vehicles were detected and that the daytime scene label is
false. These results are because this portion of the video was not labeled.
Only the time range of 5–10 seconds was labeled. This code shows the interval labeled with the
daytime scene
label.
labelData = gTruth.LabelData;
gTruthInterval = labelData(timerange('00:00:05','00:00:10'),:);
head(gTruthInterval)
ans =

  8×3 timetable

       Time           Car            Truck        daytime
    __________    ____________    ____________    _____

    5.005 sec     [1×2 struct]    [1×0 struct]    true
    5.0384 sec    [1×2 struct]    [1×0 struct]    true
    5.0717 sec    [1×2 struct]    [1×0 struct]    true
    5.1051 sec    [1×2 struct]    [1×0 struct]    true
    5.1385 sec    [1×2 struct]    [1×0 struct]    true
    5.1718 sec    [1×2 struct]    [1×0 struct]    true
    5.2052 sec    [1×2 struct]    [1×0 struct]    true
    5.2386 sec    [1×2 struct]    [1×0 struct]    true
Display the first few timetable rows from the 5-10 second interval that contains labels.
gTruthInterval = labelData(timerange('00:00:05','00:00:10'),:);
head(gTruthInterval)
ans =

  8×3 timetable

       Time           Car            Truck        daytime
    __________    ____________    ____________    _____

    5.005 sec     [1×2 struct]    [1×0 struct]    true
    5.0384 sec    [1×2 struct]    [1×0 struct]    true
    5.0717 sec    [1×2 struct]    [1×0 struct]    true
    5.1051 sec    [1×2 struct]    [1×0 struct]    true
    5.1385 sec    [1×2 struct]    [1×0 struct]    true
    5.1718 sec    [1×2 struct]    [1×0 struct]    true
    5.2052 sec    [1×2 struct]    [1×0 struct]    true
    5.2386 sec    [1×2 struct]    [1×0 struct]    true
For each Car label, the structure includes the position of the bounding box and information about its sublabels and attributes.
Display the bounding box positions for the vehicles at the start of the time range. Your bounding box positions might differ from the ones shown here.
gTruthInterval(1,:).Car{1}.Position % [x y width height], in pixelsans = 1×4 single row vector 415.8962 82.4737 130.8474 129.3805 ans = 1×4 single row vector 235.2182 1.0000 117.0611 55.3500
Save App Session
From the app toolstrip, under Save Project drop-down, select Save and save a MAT file of the app session. The saved session includes the data source, label definitions, and labeled ground truth. It also includes your session preferences, such as the layout of the app. To change layout options, from app toolstrip, click the VISUALIZATION tab and select Layout.
At any time during a session, you can select New Project to start a new session. You have the option of saving the current session or cancelling.
The app session MAT file is separate from the ground truth MAT file that is exported when you
select Export > From File. To share labeled ground truth data, as a best practice, share the ground
truth MAT file containing the groundTruth object, not the app session MAT
file. For more details, see Share and Store Labeled Ground Truth Data.
See Also
Apps
Objects
labelDefinitionCreator|groundTruth|groundTruthDataSource|vision.labeler.mixin.Temporal|vision.labeler.AutomationAlgorithm
Topics
- Use Custom Image Source Reader for Labeling
- Keyboard Shortcuts and Mouse Actions for Video Labeler
- Use Sublabels and Attributes to Label Ground Truth Data
- Label Pixels for Semantic Segmentation
- Create Custom Automation Algorithm for Labeling
- View Summary of Ground Truth Labels
- Share and Store Labeled Ground Truth Data
- Training Data for Object Detection and Semantic Segmentation
- Automatically Label Ground Truth Using Segment Anything Model