Managing Requirements for Fault-Tolerant Fuel Control System in IBM DOORS
This example shows how to link Simulink model elements to requirements stored in IBM® DOORS®.
Configure Requirements Toolbox
Configure your DOORS installation for communication with Requirements Toolbox. Run MATLAB® in administrator mode and execute rmi("setup"). If Requirements Toolbox detects the DOORS client installation, Requirements Toolbox prompts you to install the required API files. You only have to do this once after reinstalling either DOORS or MATLAB. For more information, see Configure Requirements Toolbox for Interaction with Microsoft Office and IBM DOORS.
Open Model
Open the slvnvdemo_fuelsys_doorsreq.slx, which models a fault-tolerant fuel control system.
open_system("slvnvdemo_fuelsys_doorsreq");You can use a temporary DOORS module for the basic link creation examples below, and you can use the included DemoRMI.dpa archive for a more advanced exercise of Surrogate Module Synchronization.
Set Up the Requirements Manager for Linking
In the Apps tab, click Requirements Manager.
In the Requirements Browser, set View to
Links.

Create Links by Using the Outgoing Links Dialog
You can link Simulink model elements to requirements stored in a DOORS database. You do not need to modify DOORS documents when creating links. You can create new links by using the Outgoing Link dialog and manually filling-in link attribute fields.
In the Simulink model, locate the
Metered FuelScope block.
rmidemo_callback('locate','slvnvdemo_fuelsys_doorsreq/Metered Fuel');
Right-click the block and, in the Requirements Manager app section, click the Outgoing Links Editor button
 . The Outgoing Link dialog opens.
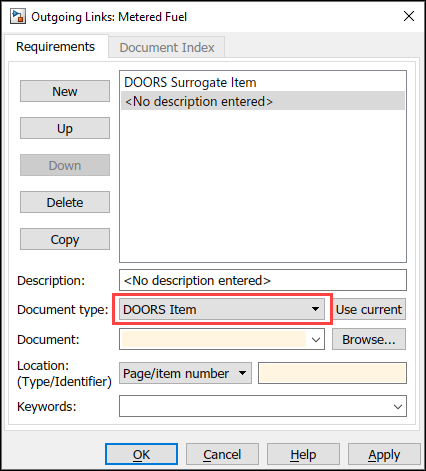
Click New to create a new requirement.
Set Document type to
IBM DOORS.
Specify a unique target module ID in the Document input field or use the Browse button to select the target module in DOORS database.
Enter the target object ID in the Location Identifier field, or use the Document Index tab to select an object in a module.
Click Apply or OK to store the new requirement link.
Right-click the Metered Fuel block. The new link label appears at the top of the context menu.
Create Links by Using the Context Menu
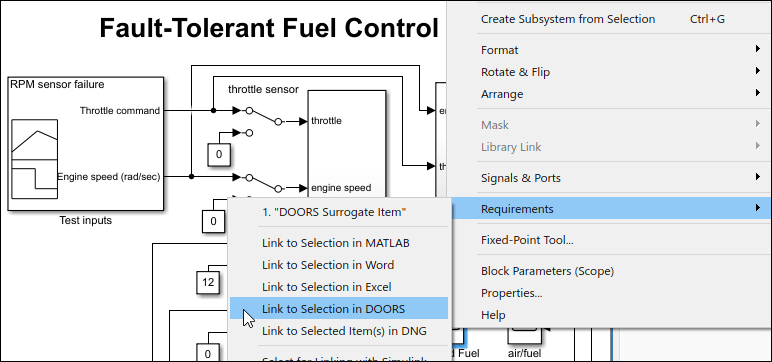
You can also create links between Simulink model elements and requirements in IBM DOORS by using the context menu. Right-click a block and, in the Requirements Manager app section, select Link to Selected Requirement > Link to Selection in IBM DOORS.
Links created by using the context menu do not require any manual input. Requirements Toolbox links the selected block to the current selection in DOORS, and sets the Description field to the corresponding object heading or, if there is no heading, to the DOORS object text. Requirements Toolbox uses the Description field for navigation shortcuts in the context menu.
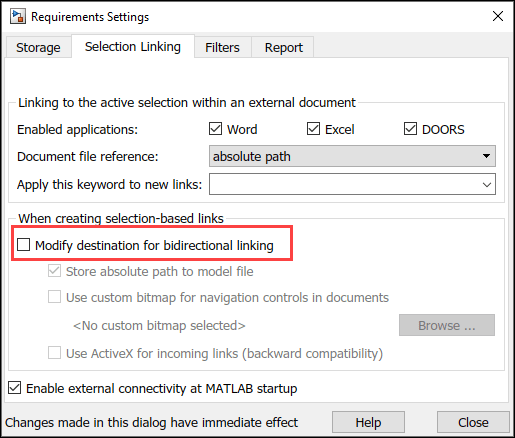
In the Requirements tab, select Link Settings > Linking Options. If the Modify destination for bidirectional linking option is selected, clear the option. The Modify destination for bidirectional linking option is disabled by default.
Alternatively, you can evaluate the following code.
rmipref('BiDirectionalLinking', false);Select an object in your test module in DOORS. Then, navigate to the throttle sensor block.
rmidemo_callback('locate','slvnvdemo_fuelsys_doorsreq/throttle sensor');
To create a link, right click the block and select Link to Selected Requirement > Link to Selection in IBM DOORS.
To confirm that you have created the link, right-click the throttle sensor block and locate the link label at the top of Requirements Manager app section of the context menu. You can use the Outgoing Links dialog to modify the description label or add User Tag keywords.
Create Links to the Current Selection by Using the Outgoing Links Dialog
You can also use the Outgoing Links dialog box to create links to IBM DOORS requirements. When you use the Outgoing Links dialog, you can modify the link labels and adjust the order that the labels appear in the context menu. To create a link to the current selection by using the Outgoing Links dialog:
Right-click a block in the model and, in the Requirements Manager app section, click the Outgoing Links Editor button
 .
.Click the New button to add another link item.
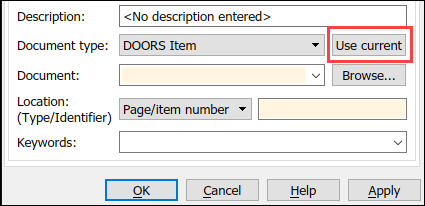
Select DOORS Item in the Document type drop-down.
In the DOORS module window, click on the object that you want to link from.
Click the Use current button to automatically fill in all the input fields with the data from the currently selected DOORS object.
Modify the Description as required.
Save the changes by clicking OK or Apply.
You can also use the Use current button to redirect an existing link:
Select the new target object in DOORS.
In the Outgoing Links dialog, click on the list item you want to update.
Click the Use current button to update link attributes.
Navigate from Simulink to DOORS
You can use the links in Simulink to navigate to the associated DOORS objects. To navigate to DOORS from Simulink:
In the Requirements tab, click Highlight Links to highlight all requirements in the example model. Alternatively, at the command line, enter:
rmi("highlightModel","slvnvdemo_fuelsys_doorsreq");
Make sure DOORS is running and that you are logged in.
Right-click one of the highlighted objects. The label of the link appears at the top of the Requirements Manager section of the context menu.
Click the link label. The test module opens in DOORS and selects the linked object.
Surrogate Module Workflow and Synchronization
Requirements Toolbox supports the surrogate module workflow for DOORS. The surrogate module workflow allows for two-way linking without the need to modify DOORS requirements modules.
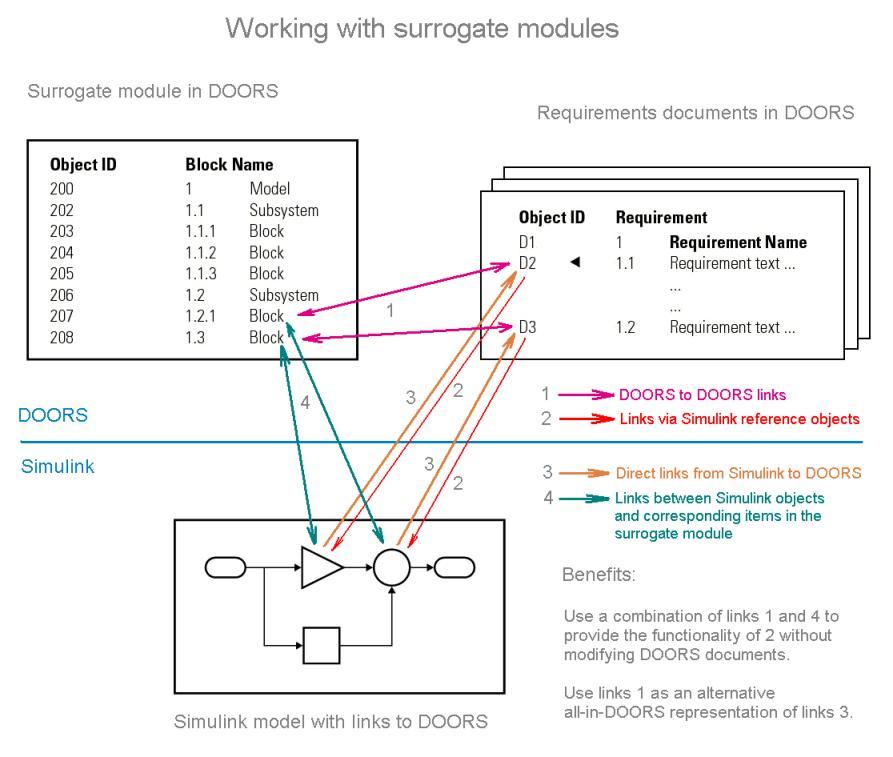
Simulink generates a new DOORS module, referred as a surrogate module, that you can use as a DOORS representation of the Simulink model. You can choose to map all the objects in your model, only those with links to DOORS, or pick an intermediate option.
Additionally, with the surrogate module present in DOORS, you can establish links within DOORS between the items in surrogate modules and requirements stored in DOORS, and navigate to and from Simulink by using the surrogate item links.
You can use the surrogate module workflow to:
Create bidirectional links without modifying documents in DOORS or the models in Simulink. The surrogate modules and corresponding link module store all of the required link information.
Manage and analyze links in the DOORS environment, and use the native reporting DOORS capabilities without running Simulink.
In the surrogate module, the DOORS hierarchy mirrors the structure of the originating Simulink model, and the DOORS object headers match the Simulink model element names.
Synchronize Simulink Model with a DOORS Database
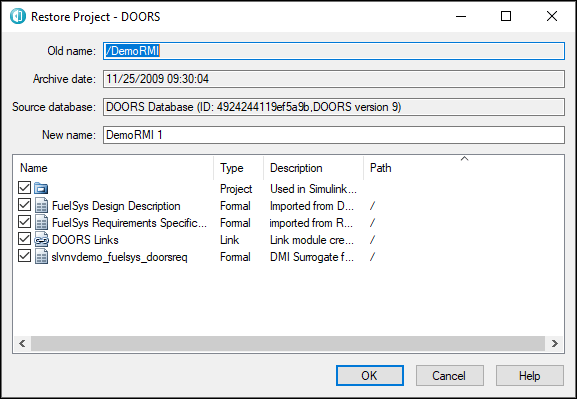
This example provides an existing DOORS project as an archive. The project includes the surrogate module with links to other modules. To try out the interactive features of this example, restore the project into your DOORS database, and then re-synchronize the example model. This archive was created in DOORS version 9.1 and may not work with earlier versions of DOORS.
In DOORS, click File > Restore and select
DemoRMI.dpa. If you already have a project namedDemoRMIin your DOORS database, DOORS appends a number to the project name. The project includes one link module and three formal modules. One formal module is the DOORS surrogate for theslvnvdemo_fuelsys_doorsreqmodel. The other two modules are example modules produced by importing Microsoft® Word documents.
Extract the included modules and open the surrogate module.
The two extracted modules contain red and orange link navigation triangles. Right-click to navigate between modules.
To navigate from the surrogate module to the corresponding object in Simulink from DOORS:
In the
slvnvdemo_fuelsys_doorsreqsurrogate module, click 1.11.4.1 fuel rate .In the main menu of the module window, click MATLAB > Select Item. The subsystem opens and highlights the corresponding input in Simulink.
You cannot navigate from Simulink model elements to the surrogate module, because the extracted modules have new numeric IDs in the DOORS database. To repair DOORS surrogate item links on all model elements in the slvnvdemo_fuelsys_doorsreq model after you have successfully restored the DemoRMI project, re-synchronize the Simulink model with the restored instance of the surrogate.
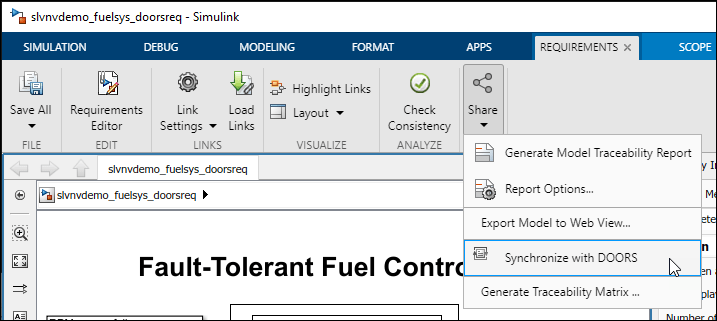
To open the Synchronization Settings dialog box, in the model window, select the Requirements tab and then click Share > Synchronize with DOORS.
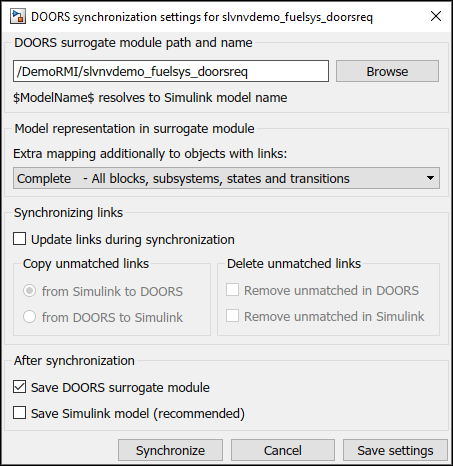
Set DOORS surrogate module path and name to the location of the restored project. Alternatively, make it a current project in DOORS and enter
./slvnvdemo_fuelsys_doorsreq.
Clear the Save Simulink model check box. You cannot save changes to the example model unless you use a writable copy.
If Simulink displays a message about the previous synchronization path, click Continue to proceed with the new path.
Navigate from a model element to the corresponding DOORS object in the surrogate module by right clicking the Simulink block and, in the Requirements Manager app section, selecting Implement: "DOORS Surrogate Item". DOORS highlights the corresponding item in the surrogate module.
Use Model Advisor for Consistency Checking
The example model includes links to the DOORS document, FuelSys Design Description module. The links are broken because the restored copy of the module has a new ID in your local database. For example, right-click the Airflow calculation subsystem in the model and select Implement "1.2.1 Mass Airflow estimation". To navigate to the Airflow calculation block, run the command:
rmidemo_callback('locate',['slvnvdemo_fuelsys_doorsreq/fuel rate controller/' ...
    'Airflow calculation']);
To fix the links by using Model Advisor:
In Simulink, in the Requirements tab, click Check Consistency.
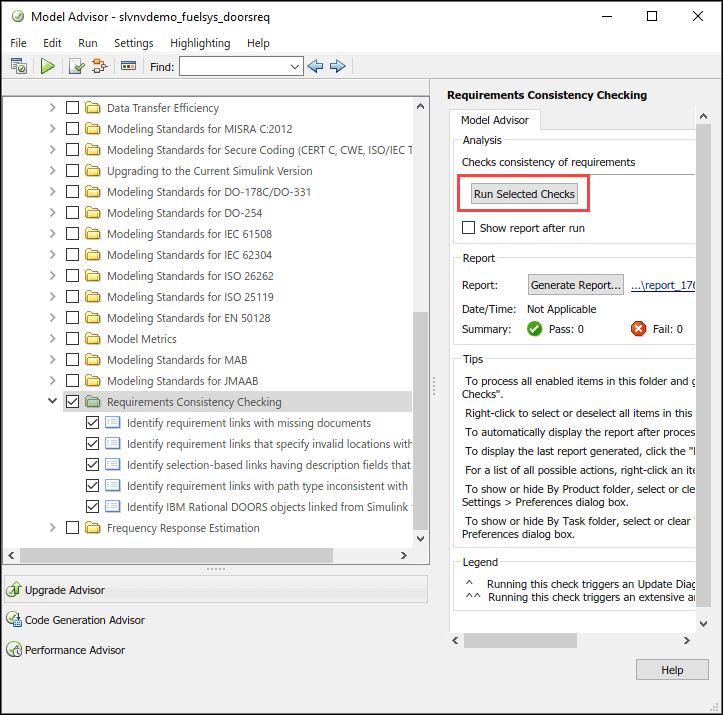
In the left pane of the Model Advisor, expand Requirements Consistency Checking and select Identify requirement links with missing documents.
In the right pane, click Run Selected Check. The Model Advisor lists the broken links. You can fix listed inconsistencies or click Fix All.
For this example, click Fix All.
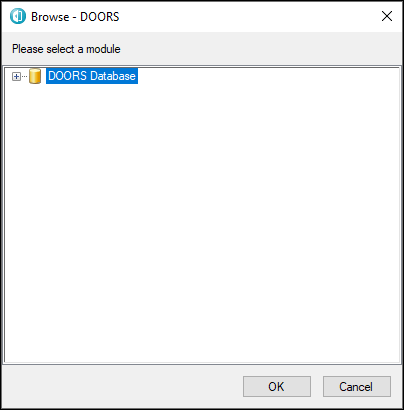
Select the FuelSys Design Description module in your database.
Click OK to close the DOORS database browser.
Click Run This Check. The check passes.
Right-click the
Airflow calculationsubsystem in the model and select Implement: "1.2.1 Mass Airflow estimation". DOORS highlights the corresponding object in the module.
Copy Link Information from Simulink to DOORS
After restoring the links from Simulink to DOORS, you can use synchronization to copy the link information into the DOORS database. Synchronization duplicates links in the DOORS project. Then, you can use native DOORS navigation, analysis, and reporting tools. You can reuse these links between the surrogate and other DOORS modules in a new copy of the model.
Open by the DOORS synchronization settings dialog. In the Requirements tab, select Share > Synchronize with DOORS.
Set DOORS surrogate module path and name to the location of the project.
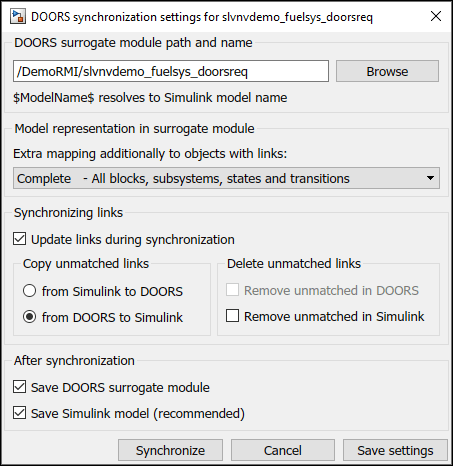
Select Update links during synchronization. Then, select from DOORS to Simulink.
Clear Remove unmatched in DOORS.
Select Save DOORS surrogate module and Save Simulink model (recommended).
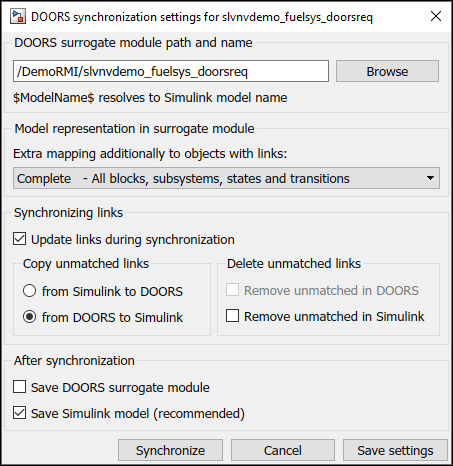
Click the Synchronize button.
When the synchronization completes, the surrogate module in DOORS displays more links. The new links are links to the
FuelSys Design Descriptionmodule, copied from Simulink.Navigate to the
Airflow calculationsubsystem.
rmidemo_callback('locate',['slvnvdemo_fuelsys_doorsreq/fuel rate controller/' ...
    'Airflow calculation']);
Navigate to the corresponding surrogate object by right-clicking the block and selecting Implement: 1. "DOORS Surrogate Item".
In DOORS, the red triangle shows an outgoing link for 1.12.5 Airflow calculation. Right-click the icon to navigate from this DOORS link to the to item 1.2.1 Mass airflow estimation in the
FuelSys Design Descriptionmodule.
Copy Link Information from DOORS to Simulink
You can use synchronization to propagate system requirement updates in DOORS to corresponding Simulink model elements.
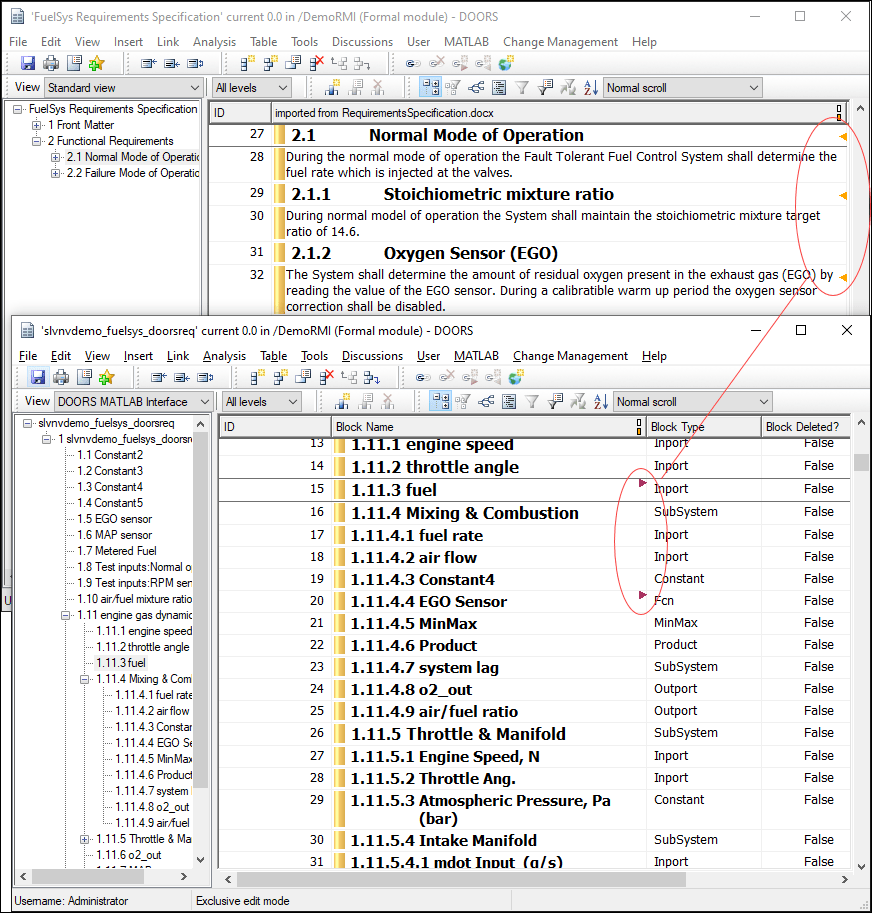
In this example, the restored project contains DOORS links from the surrogate module to the FuelSys Requirements Specifications DOORS module that are not present in the Simulink model. In DOORS, navigate back to the module that you restored in the section Synchronize Your Simulink Model with a DOORS Database.
In the FuelSys Requirements Specification module, navigate to 2.1 Normal Mode of Operation.
Right-click the yellow link in the DOORS module, and point to "1.11.3 fuel" in the context menu.
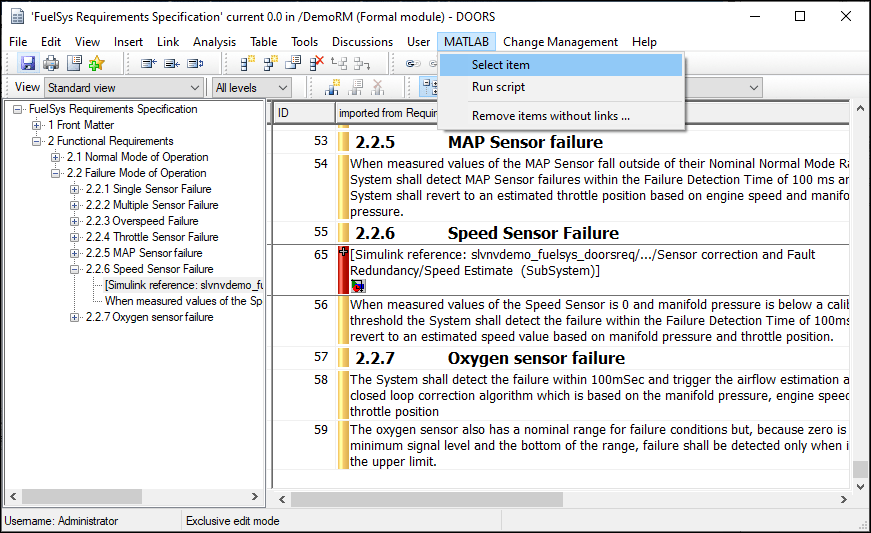
Select "1.11.3 fuel" and click MATLAB > Select Item in the surrogate module main menu to locate the corresponding source object in Simulink model.
Right-click the
fuelInport block in Simulink and check that, in the Requirements Manager app section of the context menu, Implement: "DOORS Surrogate Item" is the only available link.
To copy link information from DOORS to Simulink, re-synchronize with Update links during synchronization enabled, and select from DOORS to Simulink.
Open the DOORS synchronization settings dialog. In the Requirements tab, and select Share > Synchronize with DOORS.
Set the DOORS surrogate module path and name field.
In the Synchronizing links section, select Update links during synchronization. Then, select from DOORS to Simulink.
In the After synchronization section, select Save Simulink model (recommended).
Optionally, you can select Remove unmatched in Simulink check box because there are no unmatched links in Simulink.
Click Synchronize. The surrogate module does not display red markers, because there are no changes in DOORS.
Navigate back to the
fuelinput in Simulink, or run this command:
rmidemo_callback('locate','slvnvdemo_fuelsys_doorsreq/engine gas dynamics/fuel');
Right-click the block and check for the new link Implement: "->2.1 Normal Mode of Operation". The arrow prefix indicates that this requirement was copied from DOORS.
Click the new link to navigate to the corresponding requirement in DOORS.
Review Your Changes Using User Tags
You can apply the user tag filter to confirm the changes you made to the model. The DOORS requirements in the original version of the example model have the tag "design". To use this tag to highlight or hide these links:
Navigate to the
fuel rate controllersubsystem. In the Requirements tab, click Highlight Links.
rmidemo_callback('open_highlight','slvnvdemo_fuelsys_doorsreq/fuel rate controller');
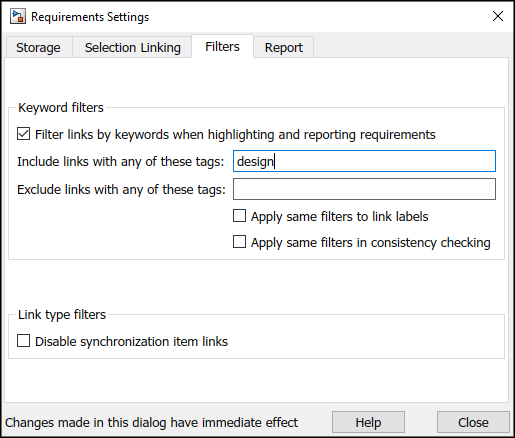
In the Requirements tab, click Link Settings > Linking Options to open the Requirements Settings dialog.
Click the Filters tab. Select Filter links by keywords when highlighting and reporting requirements. In the Include links with any of these tags field, enter
design.
Click Close. The model highlights links that have the
designtag.
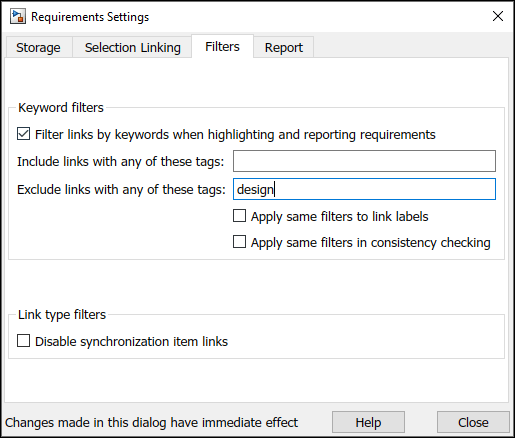
You can also hide links that have a certain tag by using the Exclude links with any of these tags property.
Removing Links in Simulink and DOORS
You can use synchronization to maintain consistency when links are removed:
Navigate to the
fuelblock.
rmidemo_callback('locate','slvnvdemo_fuelsys_doorsreq/engine gas dynamics/fuel');
Right-click the block and, in the Requirements Manager app section, click the Outgoing Links Editor button
 .
.Select the "->2.1 Normal Mode of Operation" item.
Click Delete.
Click OK to apply the changes.
Right-click and, in the Requirements Manager app section, confirm that the context menu does not display the link. In DOORS, the link connects 1.11.3 fuel in the surrogate module to "2.1 Normal Mode of Operation" in the FuelSys Requirements Specification module.
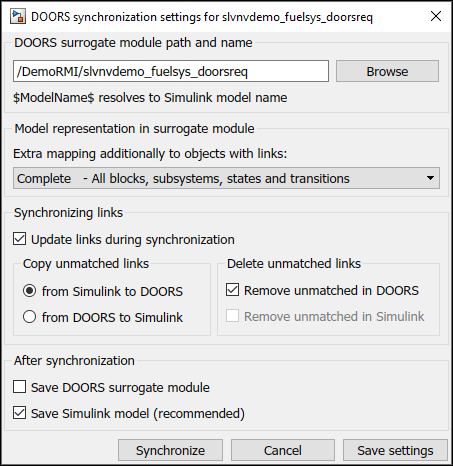
Open by the DOORS synchronization settings dialog box. In the Requirements tab, select Share > Synchronize with DOORS.
In the Copy unmatched links section, select from Simulink to DOORS. In the Delete unmatched links section, select Remove unmatched in DOORS.
Click Synchronize. DOORS removes the link.
If you remove a link in DOORS, you need to propagate the changes to Simulink. Select the DOORS to Simulink and Remove unmatched in Simulink options and synchronize the model.
Create Direct Links from DOORS to Simulink
When using selection linking with DOORS, you can automatically insert reference objects into DOORS documents to enable direct navigation from DOORS to Simulink without the need for the surrogate module. To modify the DOORS document:
In the Requirements tab, click Link Settings > Linking Options to open the Requirements Settings dialog box.
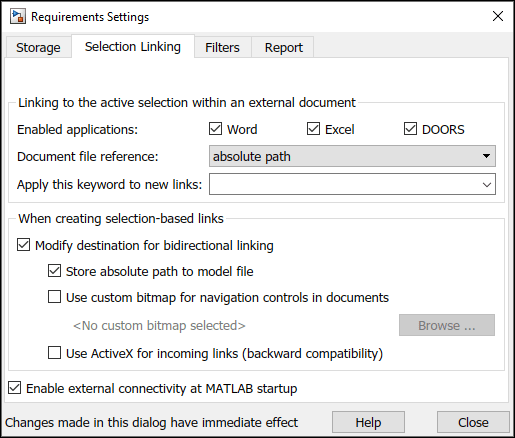
To create navigation objects when you use selection linking, in the Selection Linking tab, select Modify destination for bidirectional linking.

To insert new DOORS objects with a Simulink icon and a destination object label as DOORS Object Text, select Use ActiveX for incoming links (backward compatibility). To insert external hyperlinks, clear Use ActiveX for incoming links (backward compatibility).
In the FuelSys Requirements Specification module, select "2.2.6 Speed Sensor Failure".
In the Simulink model, navigate to
Speed Estimateblock.
rmidemo_callback('locate',['slvnvdemo_fuelsys_doorsreq/fuel rate controller/' ...
    'Sensor correction and Fault Redundancy/Speed Estimate']);
Right-click the
Speed Estimateblock and, in the Requirements Manager app section, click Link to Selection in IBM DOORS.View the new object that DOORS inserts as the first child of the target object.
If you selected the Use ActiveX for incoming links (backward compatibility) option, click the new navigation object in DOORS, or use MATLAB > Select Item from the main menu of the DOORS module window. If you did not select the Use ActiveX for incoming links (backward compatibility) option, right-click and navigate by using the MATLAB hyperlink in the expanded context menu.
The correct model opens in Simulink and Simulink highlights the linked block.
You have enabled navigation from DOORS to the Simulink model without needing to save any changes in the model. Consider this workflow when you need to avoid modifications to models.
When you save the Simulink model after creating links, two-way navigation is possible without the surrogate synchronization workflow. However, there is the disadvantage of cluttering DOORS documents with Simulink navigation objects.
To avoid making unintentional modifications to your DOORS documents, re-open the Requirements Settings dialog and, in the Selection Linking tab, clear the Modify destination for bidirectional linking checkbox.