parkingLot
Description
parkingLot(
specifies additional options using name-value arguments. For example, to define the parking
space used to populate one of the predefined parking lot layouts, use the
scenario,vertices,Name=Value)ParkingSpace name-value argument.
lot = parkingLot(___)ParkingLot object, lot, that stores the properties
of the created parking lot. To insert parking spaces into this parking lot, specify
lot as an input argument of the insertParkingSpaces function. You can return lot using
any of the previous syntaxes.
Examples
Create a driving scenario containing a short road that enters into a parking lot that is 50 meters long and 20 meters wide. Plot the parking lot and display the edge numbers along which you can insert parking spaces. Because edge 3 forms a junction with the road, its edge number does not display on the plot, but you can still insert spaces along it.
scenario = drivingScenario;
roadcenters = [25 30; 25 15];
road(scenario,roadcenters);

vertices = [0 0; 50 0; 50 20; 0 20];
lot = parkingLot(scenario,vertices);
plot(scenario,ParkingLotEdges="On")
Define the parking space type to add along one of the edges. Set an angle of 60 degrees. Plot the parking space.
space = parkingSpace(Angle=60);
plot(space)

Insert the angled spaces along edge 1 of the parking lot.
insertParkingSpaces(lot,space,Edge=1)

Insert angled spaces along edge 3: five above the junction and five below the junction. Offset these spaces by 3 meters and 30 meters from the bottom of edge 3, respectively. Reverse the angle of the spaces used along edge 1.
numSpaces = 5;
space = parkingSpace(Angle=120);
insertParkingSpaces(lot,space,numSpaces,Edge=3,Offset=3)
insertParkingSpaces(lot,space,numSpaces,Edge=3,Offset=30)

Explore the various parking lots that you can create by using predefined layouts as well as the options for configuring those layouts.
Define the parking space used to populate the parking lot. Modify the width, length, or angle of the space and the width and strength of its lane markings. Plot the parking space.
width =2.6; % m length =
5.5; % m angle =
90; % deg markingWidth =
0.15; markingStrength =
1; space = parkingSpace(Width=width, ... Length=length, ... Angle=angle, ... MarkingWidth=markingWidth, ... MarkingStrength=markingStrength); plot(space)

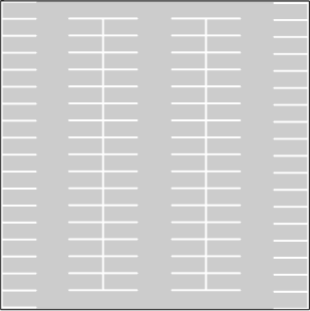
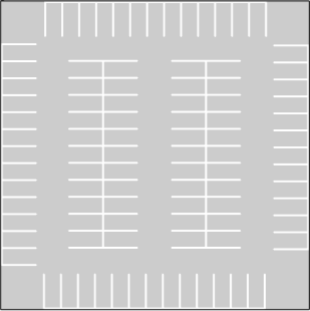
Create a driving scenario containing a 50-by-50 meter parking lot. Specify a predefined parking lot layout and a minimum driving lane width. The generated parking lot fills with as many parking spaces that fit the layout as possible given the minimum driving lane width constraint. Modify the parking space, layout type, and driving lane width, and observe the effects on the parking lot. For example:
As you increase the size of the parking space or the minimum driving lane width, the number of parking grids that fit in the middle of the parking lot decreases.
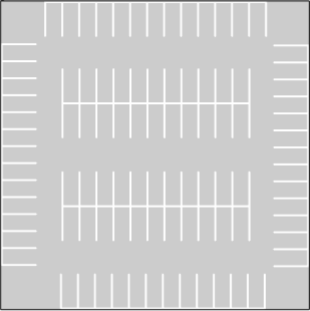
If you select the
HorizontalWithEdgesorVerticalWithEdgeslayout, one edge has fewer spaces than the others. This edge contains a driving lane of widthDrivingLaneWidththat enables vehicles to enter the parking lot.
scenario = drivingScenario; vertices = [0 0; 50 0; 50 -50; 0 -50]; parkingLayout ="Vertical"; drivingLaneWidth =
2.6; % m parkingLot(scenario,vertices, ... ParkingSpace=space, ... ParkingLayout=parkingLayout, ... DrivingLaneWidth=drivingLaneWidth); plot(scenario)

Create a driving scenario containing a 50-meter road and a 20-by-30 meter parking lot. Plot the scenario.
scenario = drivingScenario;
roadcenters = [0 50; 50 0];
road(scenario,roadcenters);

vertices = [40 10; 25 -5; 5 15; 20 30];
lot = parkingLot(scenario,vertices);
plot(scenario)

Insert a parking grid into the lot. Specify a grid with two rows of eight spaces. Use the default parking space dimensions, and place the grid at a 45-degree angle to align it with the road.
space = parkingSpace;
numSpaces = 8;
insertParkingSpaces(lot,space,numSpaces,Rows=2,Position=[15 20],Orientation=45)

Create a parking lot that contains a mixture of parking spaces, no-parking areas, and accessible spaces.
Define the parking space to use in the parking lot. Use the default settings. Plot the space.
space = parkingSpace;
plot(space,Origin="off")
Define the no-parking areas to use in the parking lot. Specify a color of white and a width that is one meter less than the width of the default parking space. Plot the space.
noSpace = parkingSpace(Type="NoParking",Width=(space.Width - 1),MarkingColor="White");
plot(noSpace,Origin="off")

Define the accessible parking space to use in the parking lot. Specify a width that is one meter more than the width of the default parking space. Plot the space.
accessibleSpace = parkingSpace(Type="Accessible",Width=(space.Width + 1));
plot(accessibleSpace,Origin="off")

Create a driving scenario containing a parking lot with a nonrectangular layout. Plot the parking lot and display the edge numbers along which you can add parking spaces.
scenario = drivingScenario;
vertices = [0 0; 32 -10.5; 32 -50.5; 25 -57.5; 0 -57.5];
lot = parkingLot(scenario,vertices);
plot(scenario,ParkingLotEdges="on")
Insert default parking spaces along the first three edges of the parking lot. To avoid overlapping parking spaces, make these adjustments to the insertions:
Along edge 1, insert only 10 spaces.
Along edge 2, offset the spaces by 5 meters from the first vertex of the edge.
Along edge 3, offset the spaces by 3 meters from the first vertex of the edge.
numSpaces = 10;
insertParkingSpaces(lot,space,numSpaces,Edge=1)
insertParkingSpaces(lot,space,Edge=2,Offset=5)
insertParkingSpaces(lot,space,Edge=3,Offset=3)

In the center of the parking lot, insert a 2-by-10 grid of parking spaces containing 8 columns of default spaces, 1 column of no-parking areas, and 1 column of accessible spaces.
insertParkingSpaces(lot,[space noSpace accessibleSpace],[8 1 1],Position=[12 -18],Rows=2)

Simulate a driving scenario in which a car drives in reverse to back into a parking space.
Create a driving scenario containing a parking lot.
scenario = drivingScenario;
vertices = [0 9; 18 9; 18 -9; 0 -9];
parkingLot(scenario,vertices,ParkingSpace=parkingSpace);
Create a car and define its trajectory. The car drives forward, stops, and then drives in reverse to back into the parking space. As the car enters the parking space, it has a yaw orientation angle that is 90 degrees counterclockwise from where it started.
car = vehicle(scenario,ClassID=1);
waypoints = [9 -5; 9 5; 6 -1.3; 2 -1.3];
speed = [3; 0; -2; 0];
yaw = [90 90 180 180];
smoothTrajectory(car,waypoints,speed,Yaw=yaw)
Plot the driving scenario and display the waypoints of the trajectory.
plot(scenario,Waypoints="on")
while advance(scenario)
    pause(scenario.SampleTime)
end

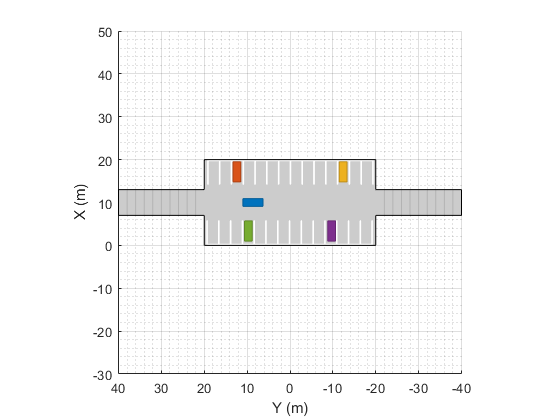
Generate detections of cars parked in a parking lot, and plot the detections on a bird's-eye plot.
Create a driving scenario containing a road and parking lot.
scenario = drivingScenario;
roadcenters = [10 40; 10 -40];
road(scenario,roadcenters);
vertices = [0 20; 20 20; 20 -20; 0 -20];
parkingLot(scenario,vertices,ParkingSpace=parkingSpace);
Add an ego vehicle and specify a trajectory in which the vehicle drives through the parking lot.
ego = vehicle(scenario);
waypoints = [10 35 0; 10 10 0];
speed = 5; % m/s
smoothTrajectory(ego,waypoints,speed)
Create parked cars in several parking spaces. Plot the scenario.
parkedCar1 = vehicle(scenario,Position=[15.8 12.4 0]);
parkedCar2 = vehicle(scenario,Position=[15.8 -12.4 0]);
parkedCar3 = vehicle(scenario,Position=[2 -9.7 0]);
parkedCar4 = vehicle(scenario,Position=[2 9.7 0]);
plot(scenario)

Create a vision sensor for generating the detections. By default, the sensor is mounted to the front bumper of the ego vehicle.
sensor = visionDetectionGenerator;
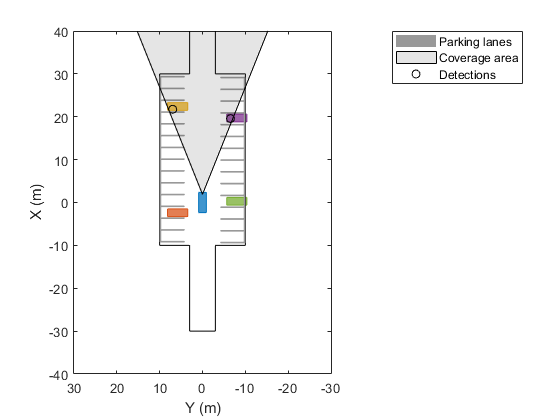
Create a bird's-eye plot and plotters for visualizing the target outlines, road boundaries, parking lane markings, sensor coverage area, and detections. Then, simulate the scenario and generate the detections.
bep = birdsEyePlot(XLim=[-40 40],YLim=[-30 30]);
olPlotter = outlinePlotter(bep);
lbPlotter = laneBoundaryPlotter(bep);
lmPlotter = laneMarkingPlotter(bep,DisplayName="Parking lanes");
caPlotter = coverageAreaPlotter(bep,DisplayName="Coverage area");
detPlotter = detectionPlotter(bep,DisplayName="Detections");

while advance(scenario)

    % Plot target outlines.
    [position,yaw,length,width,originOffset,color] = targetOutlines(ego);
    plotOutline(olPlotter,position,yaw,length,width)

    % Plot lane boundaries of ego vehicle.
    rbEgo = roadBoundaries(ego);
    plotLaneBoundary(lbPlotter,rbEgo)

    % Plot parking lane markings.
    [plmv,plmf] = parkingLaneMarkingVertices(ego);
    plotParkingLaneMarking(lmPlotter,plmv,plmf)

    % Plot sensor coverage area.
    mountPosition = sensor.SensorLocation;
    range = sensor.MaxRange;
    orientation = sensor.Yaw;
    fieldOfView = sensor.FieldOfView(1);
    plotCoverageArea(caPlotter,mountPosition,range,orientation,fieldOfView)

    % Generate and plot detections.
    actors = targetPoses(ego);
    time = scenario.SimulationTime;
    [dets,isValidTime] = sensor(actors,time);
    if isValidTime
        positions = cell2mat(cellfun(@(x)([x.Measurement(1) x.Measurement(2)]), ...
            dets,UniformOutput=false));
        plotDetection(detPlotter,positions)
    end

end
Input Arguments
Name-Value Arguments
Specify optional pairs of arguments as
Name1=Value1,...,NameN=ValueN, where Name is
the argument name and Value is the corresponding value.
Name-value arguments must appear after other arguments, but the order of the
pairs does not matter.
Example: ParkingSpace=parkingSpace,ParkingLayout="Horizontal"
populates a parking lot with the default parking space in a horizontal
layout.
Parking space used to populate the parking lot, specified as a parkingSpace object. To specify the type of layout used to populate the
parking lot with spaces, use the ParkingLayout name-value
argument.
You can specify ParkingSpace only for rectangular parking
lots. To add parking spaces to nonrectangular parking lots, use the insertParkingSpaces function.
Parking lot layout, specified as "Vertical",
"Horizontal", "VerticalWithEdges", or
"HorizontalWithEdges".
To use this argument, you must specify the ParkingSpace
name-value argument. The parkingLot function adds as many spaces
of space ParkingSpace that fit the layout as possible, given the
minimum driving width specified by DrivingLaneWidth.
This table describes the ParkingLayout options.
| Option | Description |
|---|---|
"Vertical" | Lay out parking spaces from top to bottom.
|
"Horizontal" | Lay out parking spaces from left to right.
|
"VerticalWithEdges" | Lay out parking spaces from top to bottom and also insert parking
spaces along the left and right edges. To enable vehicles to enter the
parking lot, the bottom edge contains a driving lane with a width of
|
"HorizontalWithEdges" | Lay out parking spaces from left to right and also insert parking
spaces along the top and bottom edges. To enable vehicles to enter the
parking lot, the right edge contains a driving lane with a width of
|

Data Types: char | string
Minimum width of driving lanes in the parking lot, in meters, specified as a real
scalar in the range [0, 50]. To use this argument, you must specify the
ParkingSpace name-value argument. The
parkingLot function uses DrivingLaneWidth
to determine the amount of space to add on either side of the parking grids. By
default, DrivingLaneWidth is equal to the width of the space
specified by ParkingSpace.
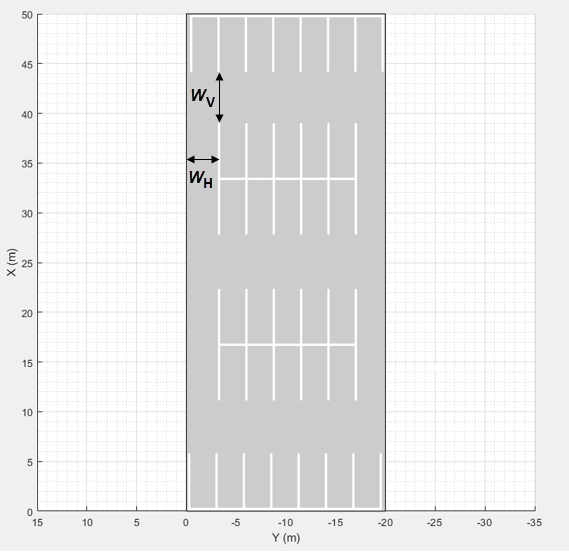
To enforce the symmetrical arrangement of the parking grids, the actual width of
driving lanes might be greater than DrivingLaneWidth. For
example, in this parking lot, the horizontal width,
WH, is equal to
DrivingLaneWidth, but the vertical width,
WV, is slightly greater than
DrivingLaneWidth. The extra vertical width enables the even
distribution of the parking grids in the lot along the vertical axis
Parking lot name, specified as a character vector or string scalar. This argument
sets the Name property of the parking lot. To view this property
in a parking lot, either access the ParkingLots property of
scenario or return the parking lot by specifying the
lot output argument.
Data Types: char | string
Output Arguments
Limitations
The importing of parking lot data from external sources by using the
roadNetworkfunction is not supported.The importing of parking lots into the Driving Scenario Designer app is not supported. If you open a scenario containing a parking lot in the app, the app omits the parking lot from the scenario.
The importing of parking lots into Simulink® is not supported. If you read a scenario containing a parking lot into Simulink by using the Scenario Reader block, the block omits the parking lot from the Simulink model.
Sensor detections of parking lane markings are not supported. However, you can visualize parking lane markings on a
birdsEyePlotobject by using theplotParkingLaneMarkingfunction.
Version History
Introduced in R2021b