Create Requirements Table Blocks Programmatically
You can create and manage Requirements Table blocks programmatically. In this example, you programmatically create a Requirements Table block in a new model, define block data, add requirements, and access requirement properties. For information on how to create and manage Requirements Table blocks with the graphical interface, see Use a Requirements Table Block to Create Formal Requirements.
Create a Requirements Table Block
Each Requirements Table block you add has an associated RequirementsTable object. Create a Requirements Table block
in a new model named myNewModel by using the slreq.modeling.create function, and assign the block to a
RequirementsTable object named
table.
table = slreq.modeling.create("myNewModel");If you have an existing model that you want to add a Requirements Table
block to, use the add_block (Simulink) function and retrieve the
RequirementsTable object by using slreq.modeling.find with the name of the
block.
add_block("reqmanage/Requirements Table",...
strcat(gcs,"/Requirements Table"));
table = slreq.modeling.find(gcs);
Specify Requirements Table Block Name and Column Headers
After you add a Requirements Table block to a model, use dot notation
to modify the Name and RequirementHeader
properties. When you create a new Requirements Table block, the block
uses the default name. Rename the block by modifying the Name
property to My
Requirements:
table.Name = "My Requirements";You can add Precondition, Postcondition, and
Action columns to the block by adjusting the
RequirementHeader property. In this example, specify that the
block contains two precondition columns and one postcondition column:
table.RequirementHeaders.Preconditions = ["input1","input2"];
table.RequirementHeaders.Postconditions = "output";
You can hide column types that you do not use in the Requirements
tab and the Assumptions tab with the hideRequirementColumn and hideAssumptionColumn functions. This example does not use actions or
durations. Hide the Action and Duration
columns with the hideRequirementColumn
function:
hideRequirementColumn(table,"Actions");
hideRequirementColumn(table,"Duration");
Note
To delete columns, use the Requirements Table block graphical interface.
Define Data
In addition to adding data to the preconditions and postcondition, you must resolve
the data by defining it. Currently, you have not defined input1,
input2, and output. To define the data
programmatically, use the addSymbol function on the RequirementsTable object.
addSymbol allows you to adjust some of the properties of the
data, including the data name, the scope, data type, and size. If you want to set
additional properties, use the Symbols pane and Property Inspector
in the graphical interface. For more information, see Define Data in Requirements Table Blocks.
Define data named input1, input2, and
output and specify them as input data. Because
output is the only data used in the postconditions, you must
enable the isDesignOutput property for it. See isDesignOutput and Treat as design model output for analysis. Specify
output as a design model
output.
addSymbol(table,Name="input1",Scope="Input");
addSymbol(table,Name="input2",Scope="Input");
addSymbol(table,Name="output",Scope="Input",isDesignOutput=1);
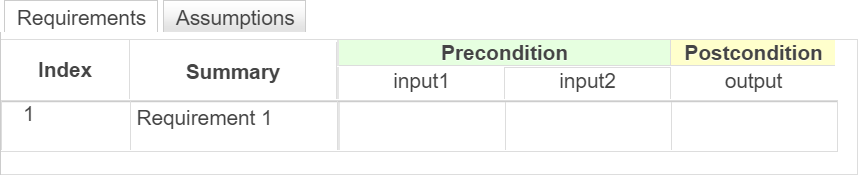
The Requirements Table block appears with one requirement, three columns, and the data in the column headers.
To modify the data, retrieve the Symbol object array with the
findSymbol function and use dot notation. See Retrieve Data and Change It.
Add and Modify Requirements
To add requirements to the block, use the addRequirementRow function. To add assumptions, use the addAssumptionRow function. Each function adds one row. To add multiple
rows, you can either repeat the entry or use a for loop and adjust
the properties after creating them.
Add a requirement to the block and specify the summary, preconditions, and postconditions.
addRequirementRow(table,Summary="Requirement 2",...
Preconditions={'> 0',''});
The first requirement is empty. Use dot notation to specify the properties of an
existing requirement. Retrieve the requirements as RequirementRow
objects from the table and modify the first
requirement.
rrow = getRequirementRows(table);
rrow(1).Summary = "Requirement 1";
rrow(1).Preconditions = {'0',''};
rrow(1).Postconditions = {'> 2'};
You can also add children to requirements or assumptions by using the addChild function. Add two children to the second requirement that
specify the preconditions and
postconditions.
addChild(rrow(2),Preconditions={'','> 0'},...
Postconditions={'> 5'});
addChild(rrow(2),Preconditions={'','<= 0'},...
Postconditions={'<= -1'});
To complete the requirement set, add a default row by using the
addRequirementRow function and specifying the
rowType as
"default".
addRequirementRow(table,rowType="default",...
Postconditions={'< 1'});
After you enter the above commands, the Requirements tab lists the new requirements:

If you close out of the block, you can reopen it with the
open_system
function:
open_system("myNewModel/My Requirements");Manage Requirement Rows as slreq.Requirement Objects
Adding a Requirements Table block to a model creates a slreq.ReqSet object for each block, and creating requirements creates
corresponding slreq.Requirement objects. To retrieve the objects from the table discussed
in this example, load the requirement set into Requirements Toolbox™ and retrieve the slreq.ReqSet object with the slreq.load
function:
[~,reqSet] = slreq.load("myNewModel.slx");slreq.open on the model, which loads the requirement set and opens the
requirement set in the Requirements Editor. After retrieving the slreq.ReqSet object, you can retrieve the
properties like other requirement sets. Retrieve the slreq.Requirement
objects with find.
requirements = find(reqSet,"Type","Requirement");
If you want to retrieve only the requirements at the highest hierarchy level, use the
children function on the slreq.ReqSet object. You can then
access the child requirements of each requirement by using the children
function on each slreq.Requirement object.
If the Requirements Table block is open, you can retrieve
slreq.Requirement objects by using the
slreq.getCurrentObject function. To retrieve the
slreq.Requirement object from the interface, select the requirement
in the block or the Requirements Editor and enter
slreq.getCurrentObject.
You can only adjust requirement hierarchy in the graphical interface. To add or remove
requirements, use addRequirementRow and removeRow.
See Also
RequirementsTable | Requirements
Table