Simulink Bus Capabilities
A bus represents a set of elements, analogous to a bundle of wires tied together. Buses reduce line complexity and clutter in a block diagram and make it easier to change a component interface incrementally. For example, if you must add or remove elements from a component interface, modifying a bus can be simpler than adding or removing ports.
This example introduces you to Simulink® bus capabilities that help you:
Organize block diagrams with buses.
Simplify component interfaces with bus element ports.
Streamline common bus workflows with smart editing.
Open and compile the BusCapabilities model. To compile the model, on the Modeling tab of the Simulink Toolstrip, click Update Model.
mdl = 'BusCapabilities';
open_system(mdl);
set_param(mdl,SimulationCommand="Update");
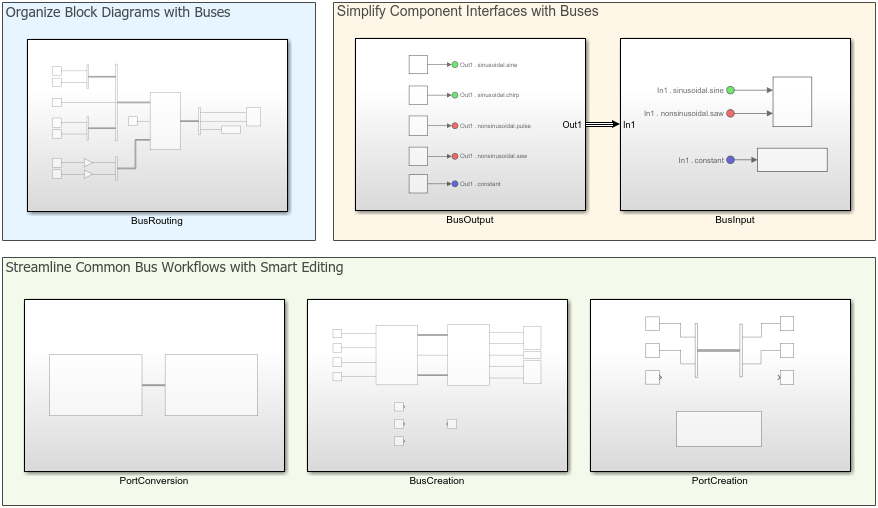
Compiling the model updates the line styles. When you open a model, buses have the same line style as scalar signals. After the model compiles, each bus has a line style with three parallel lines.
Organize Block Diagrams with Buses
The BusRouting subsystem demonstrates how to:
Create buses using Bus Creator blocks.
Replace elements in a bus using a Bus Assignment block.
Extract elements from a bus using a Bus Selector block.
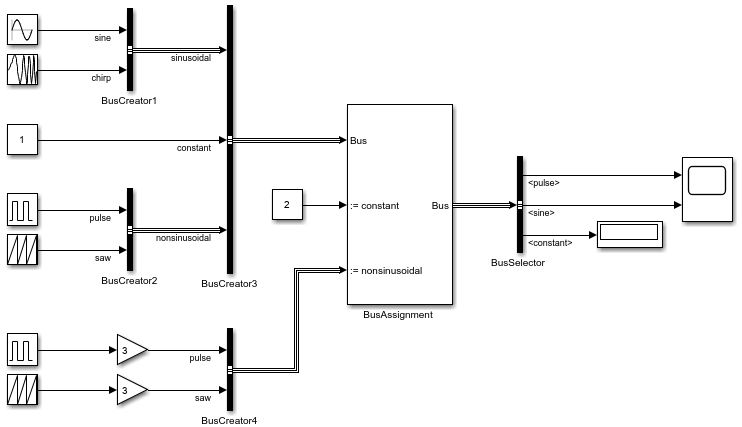
Each Bus Creator block groups its input into a bus.
BusCreator1creates a bus that contains signals namedsineandchirp. The output bus is namedsinusoidal.BusCreator2creates a bus that contains signals namedpulseandsaw. The output bus is namednonsinusoidal.BusCreator3creates a bus that contains the buses namedsinusoidalandnonsinusoidal. In the context of the new bus, these buses are called nested buses.BusCreator4creates a bus that contains different signals namedpulseandsaw.
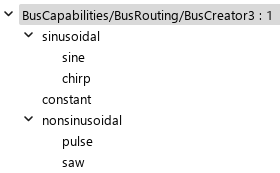
To view the hierarchy of a bus, click the bus. Then, on the Signal tab, select Signal Hierarchy. For example, inspect the hierarchy of the top-level bus created by BusCreator3.
A Bus Assignment block replaces one or more elements in the bus that connects to its Bus input port. In this example, the top-level bus connects to the Bus input port. The Bus Assignment block replaces the signal named constant with a different signal and the bus named nonsinusoidal with a different bus.
A Bus Selector block extracts one or more elements from the bus that connects to its input port. In this example, the Bus Selector block selects the signals identified as nonsinusoidal.pulse, sinusoidal.sine, and constant.
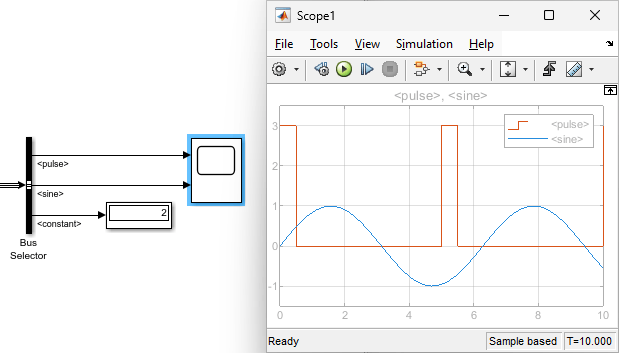
Each selected signal connects to a sink that displays the value of the signal. To display the value of constant on the Display block, simulate the model. To display the values of nonsinusoidal.pulse and sinusoidal.sine after simulation, double-click the Scope block.
sim(mdl);
Simplify Component Interfaces with Bus Element Ports
To create a bus hierarchy at an output port, the BusOutput subsystem uses Out Bus Element blocks.
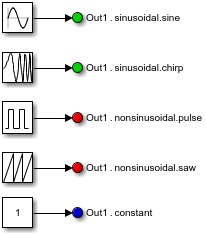
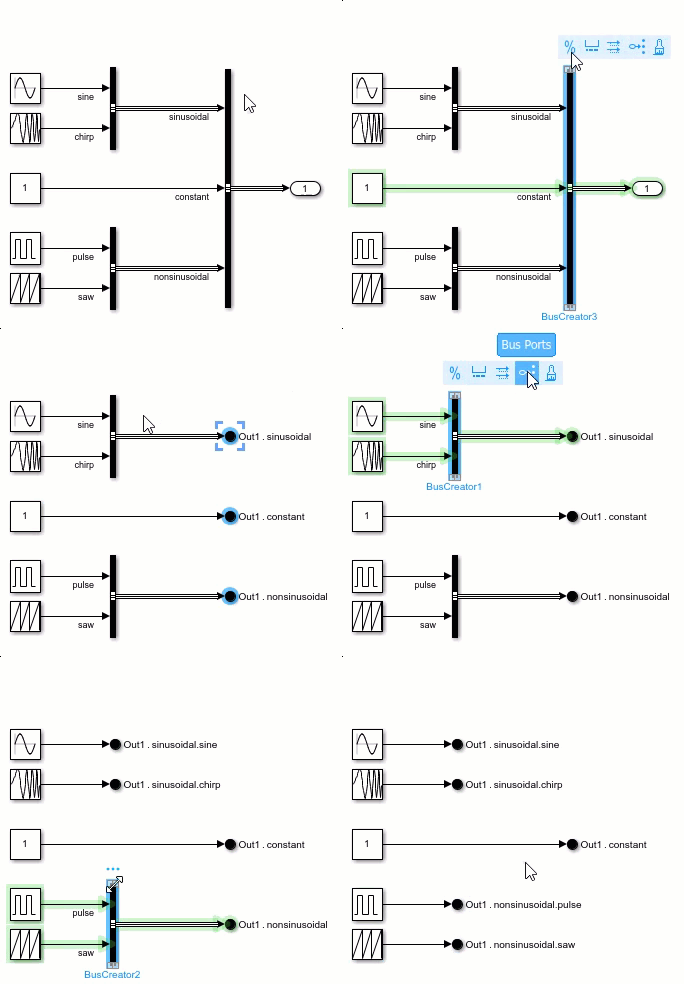
Out Bus Element blocks behave like a Bus Creator block connected to an Outport block. Each Out Bus Element block has a label that identifies the output. For example, the Out Bus Element block with the label Out1.sinusoidal.sine creates an element named sine in a nested bus named sinusoidal at the output port named Out1.
To extract bus elements from an input port, the BusInput subsystem uses In Bus Element blocks.
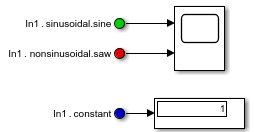
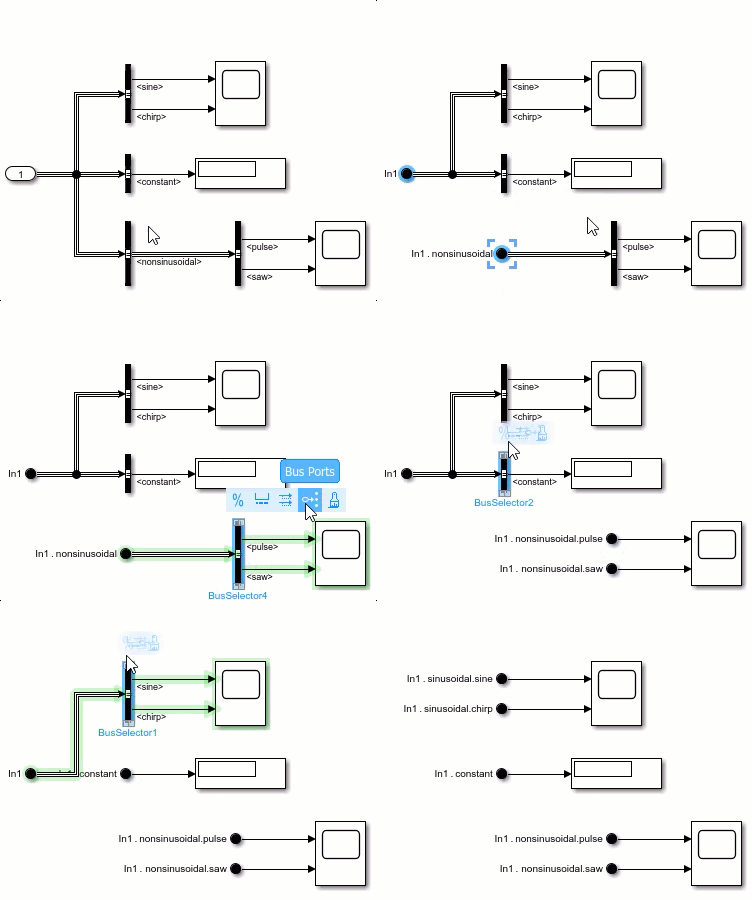
In Bus Element blocks are similar to an Inport block connected to a Bus Selector block. Each In Bus Element block has a label that identifies the input. For example, the In Bus Element block with the label In1.sinusoidal.sine selects an element named sine in a nested bus named sinusoidal from the input port named In1.
Bus element ports support partial selection. The input port of the subsystem receives a bus that contains five elements, but the subsystem uses only three elements. This flexibility lets you create variants that use different elements of the same input port.
To change the input or output that corresponds with an In Bus Element or Out Bus Element block, edit the block label. The first part of the label is the port name. The second part of the label is the element path, in which each dot indicates another level of hierarchy.

For a subsystem input port that receives a bus, select from the list of available elements.

To create a port or add a block for an existing port, right-click and drag an In Bus Element or Out Bus Element block. Then, select New Port, New Element, or Duplicate. To prevent overlapping writes to an output element, duplication is disabled for Out Bus Element blocks.
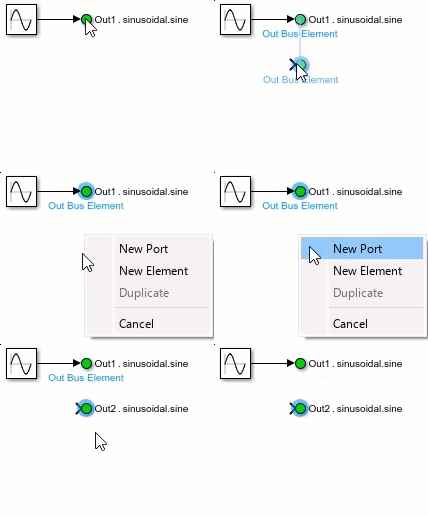
To create a port, you can also copy and paste an In Bus Element or Out Bus Element block.
To display the bus accessed by a group of In Bus Element blocks or the bus created by a group of Out Bus Element blocks, open the Property Inspector. Then, select one of the blocks. Alternatively, double-click one of the blocks.
From the Property Inspector or dialog box, you can perform multiple actions. For example, you can:
Rename the port.
Add elements with or without adding blocks.
Specify attributes of the bus and its elements.
Change the block colors individually, by bus, or by selection.
Reorder elements of an output port.
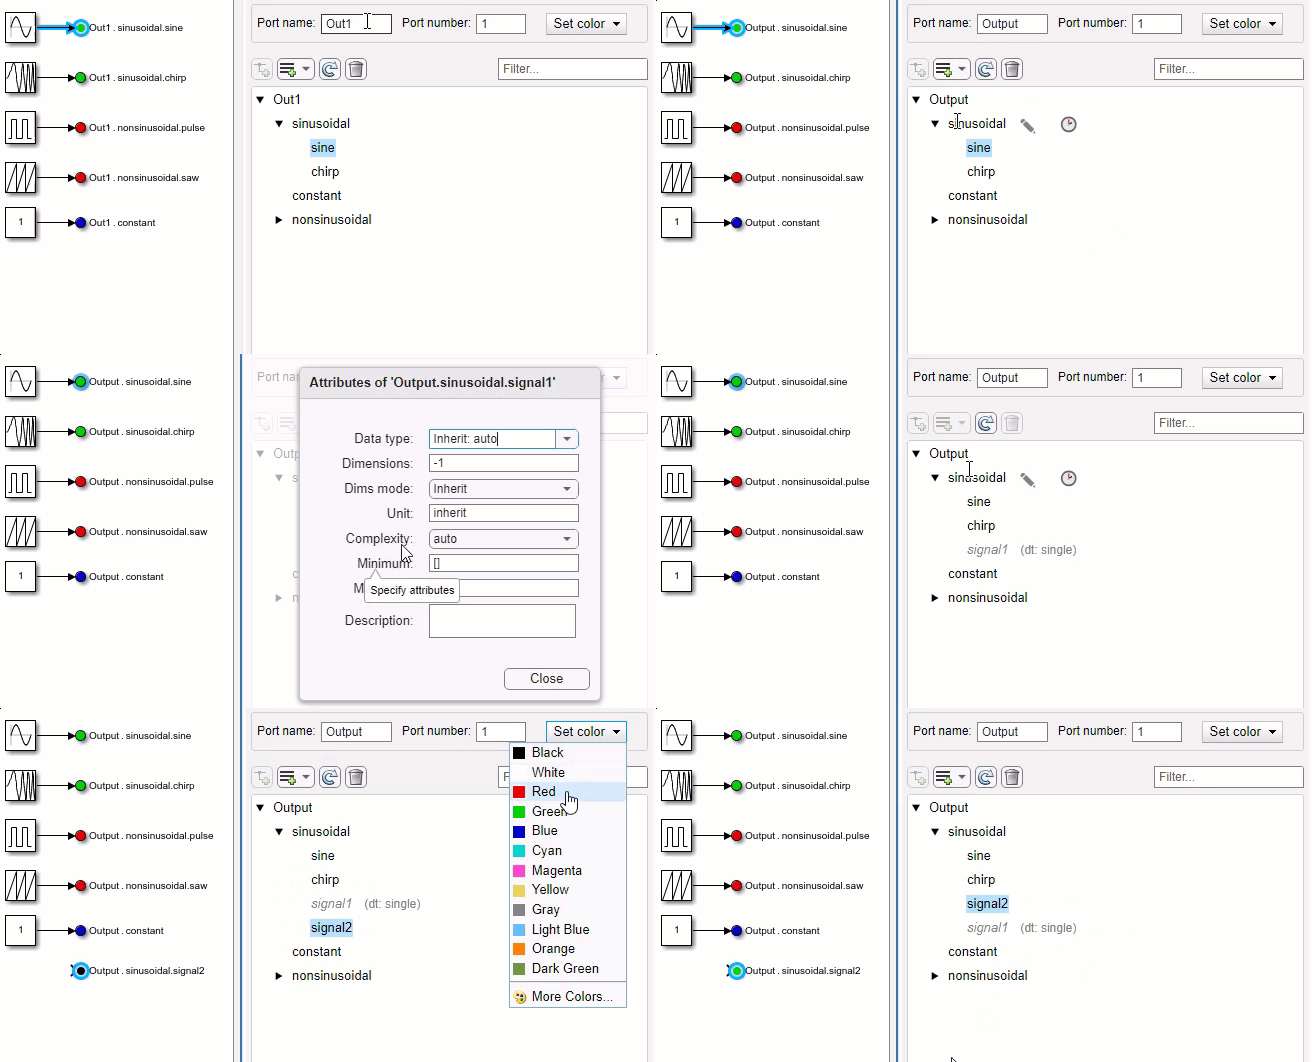
To change how the current block diagram displays In Bus Element and Out Bus Element block labels, click an In Bus Element or Out Bus Element block, pause on the ellipsis, and select one of these options:
Expanded Notation — The label displays the port name and element path, for example,
Out1.sinusoidal.sine.Compact Notation — The label displays only the leaf element name. For example,
Out1.sinusoidal.sinebecomessine. When you click the label, both parts of the label appear for editing.

While this example demonstrates In Bus Element and Out Bus Element blocks at a subsystem interface, the blocks behave similarly at model interfaces.
Streamline Common Bus Workflows with Smart Editing
Smart editing lets you quickly:
Convert input and output ports to bus element ports.
Create buses at input and output interfaces.
Create buses from block output.
Add ports to bus blocks.
Add bus element ports to subsystems and referenced models.
Quickly Convert Ports
The PortConversion subsystem contains two subsystems connected by a bus. The first subsystem contains Bus Creator and Outport blocks to convert into Out Bus Element blocks. The second subsystem contains Inport and Bus Selector blocks to convert into In Bus Element blocks.
In the first subsystem, click a Bus Creator block that connects to an Outport block. Pause on the ellipsis that appears. Then, from the action bar, select Bus Ports.
In the second subsystem, click a Bus Selector block that connects to an Inport block. Pause on the ellipsis that appears. Then, from the action bar, select Bus Ports.
Quickly Create Buses
The BusCreation subsystem is set up to create buses at subsystem interfaces and at block outputs.
To create a bus at a subsystem interface, drag a selection box around the corresponding lines. Pause on the ellipsis that appears. Then, from the action bar, select Create Bus.
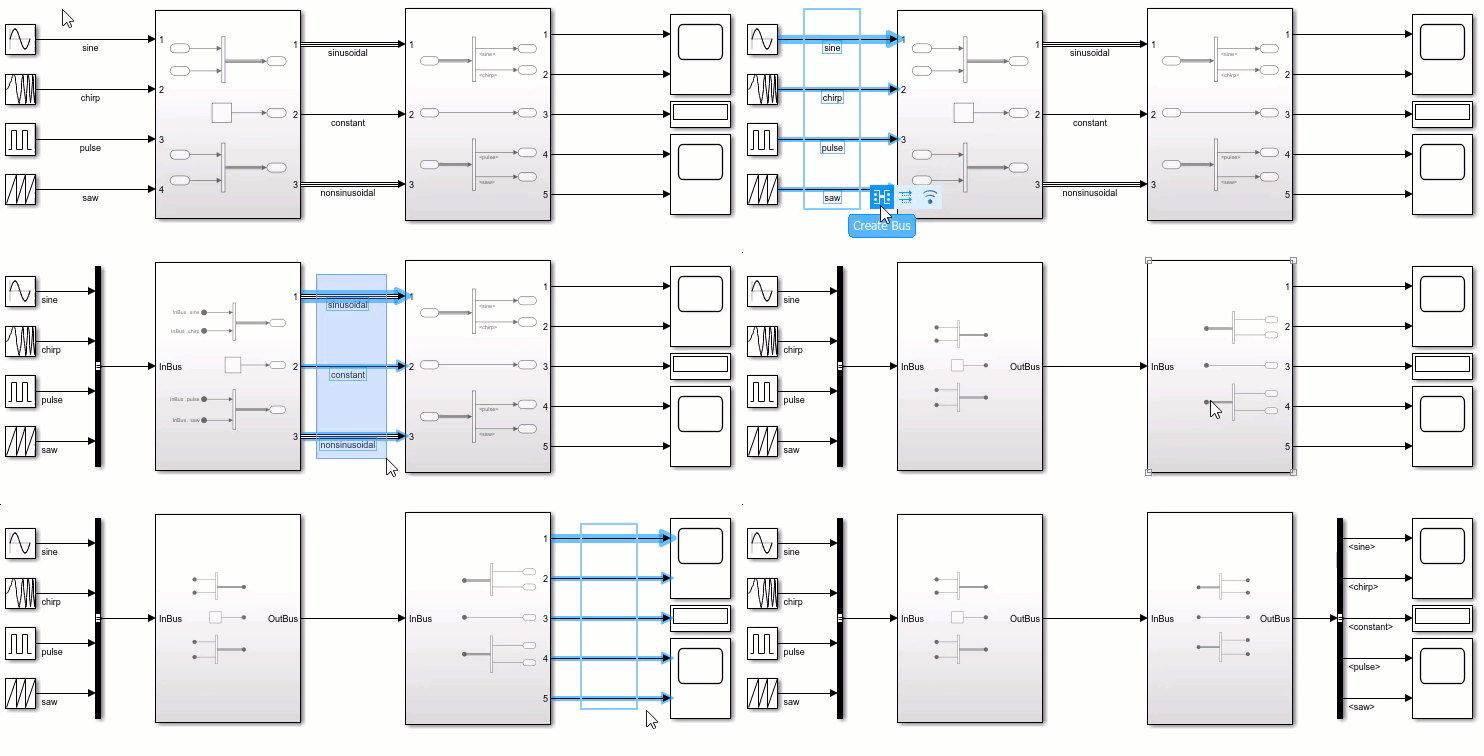
This action bundles the selected elements in a bus, replaces the Inport and Outport blocks with In Bus Element and Out Bus Element blocks in the subsystem, and adds Bus Creator and Bus Selector blocks to maintain connectivity outside of the subsystem.
To create a bus at block outputs, drag a selection box around the corresponding blocks. Pause on the ellipsis that appears. Then, from the action bar, select Create Bus.
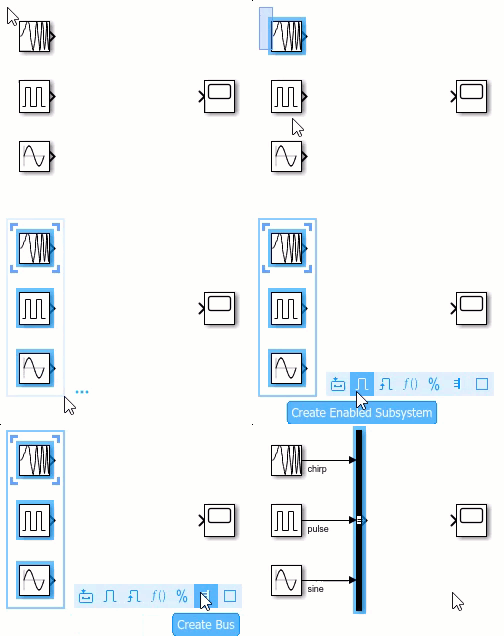
This action inserts a Bus Creator block that receives input from the selected blocks.
Quickly Create Ports
The PortCreation subsystem is set up to create an input port on a Bus Creator block, an output port on a Bus Selector block, and bus element ports on a Subsystem block.
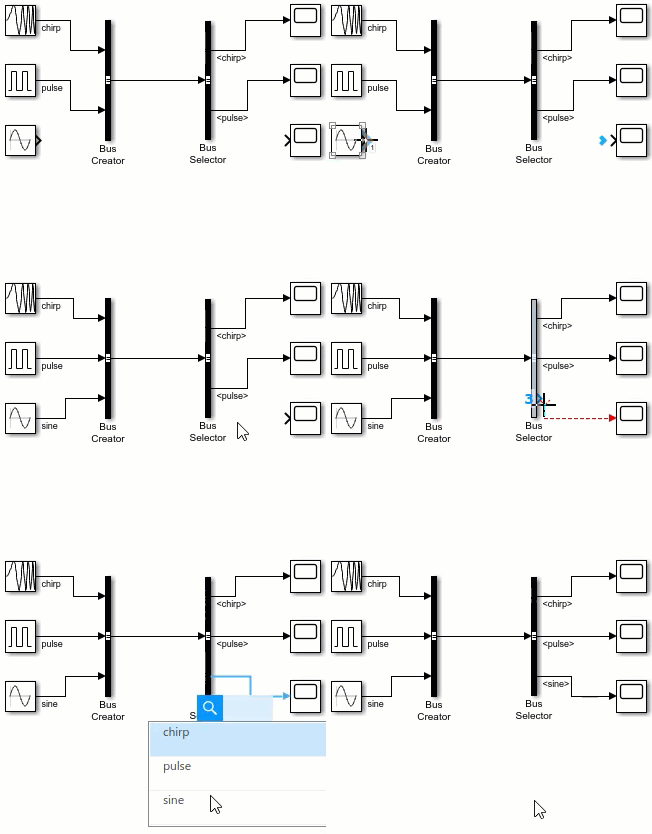
To add an element to a bus, drag a line to a Bus Creator block. To select an element from a bus, drag a line to a Bus Selector block and choose the element you want from the list of available elements.
To add a bus element port to a subsystem or model, click the edge of a Subsystem or Model block. Then, select Create in bus port or Create out bus port.

See Also
Bus Assignment | Bus Creator | Bus Selector | In Bus Element | Out Bus Element
