Upload Examples and Open Polyspace Access Interface
Prerequisites
To start using Polyspace® Access™, upload results to the Polyspace Access database and open the web interface to view those results.
Upload Examples
Upload Results from the Command line
To upload the examples provided with your Polyspace
Bug Finder™
Server™ or Polyspace
Code Prover™
Server installation, from the command line, go to the polyspaceroot\polyspace
bin\polyspace-access -host hostname -port port^
-upload examples\cxx\Bug_Finder_Example\Module_1\BF_Result
polyspaceroot is the path to your Polyspace installation. hostname is the fully qualified domain name (FQDN) of the machine that hosts Polyspace
Access. port is the port number that you specified when starting the admin-docker-agent binary. For more information on uploading results from the command line, see Upload Results at Command Line (Polyspace Bug Finder).After each command, you are prompted to enter your username and password. Enter the credentials that you use to log in to Polyspace Access.
You cannot use the command line to upload results from a Polyspace Desktop product analysis to the Polyspace Access database.
Upload Results from the Polyspace Platform User Interface
Before you can upload results from the Polyspace Platform user interface, you must configure Polyspace Platform to communicate with Polyspace Access. See Integrate Polyspace Platform User Interface with Polyspace Access.
To upload the demo examples provided with your Polyspace Bug Finder or Polyspace Code Prover installations:
Open an example in the Polyspace Platform user interface. On the start page, select any of the example projects. Double-click the results in the Results pane to open the results dashboard. Click Review in the toolstrip to open the Review perspective.
In the toolstrip, click Access > Upload Result.
In the Upload results to Polyspace Access repository window, fill out these fields:
Username — Your Polyspace Access username.
Password — The Polyspace Access password associated with your username.
Project name — The name of your project. The project name you set shows in Polyspace Access in the Project Explorer pane as well as the Project Details pane.
Parent Project path — The path to the project from within Polyspace Access. For example, if you want your project to be in the
examplefolder within thepublicfolder, set a parent project path ofpublic/example.
You are not able to edit the Server setting from this window. If the Server information is incorrect, edit your Polyspace Platform configuration. See Integrate Polyspace Platform User Interface with Polyspace Access.
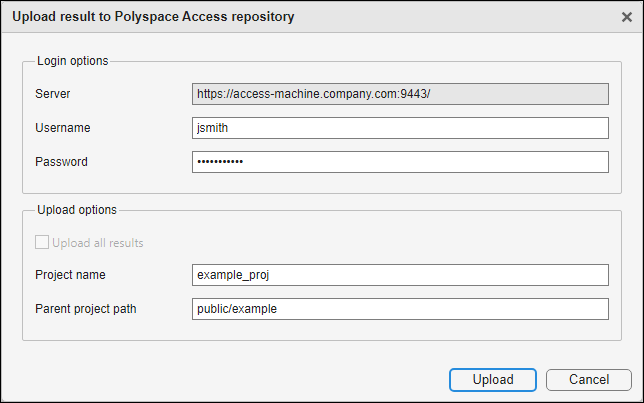
Click Upload. A status window appears and shows the progress of your upload. If the upload is unsuccessful, an error appears in the status window and provides details.
After you upload results to Polyspace Access, if you open a local copy of the uploaded results in the Polyspace Platform user interface, a dialog box appears that asks if you want to open the results in Polyspace Access or continue in the Polyspace Platform user interface. If you continue in the Polyspace Platform user interface, the review fields in the Result Details pane are read-only. You can edit the Status, Severity, and Comment fields only from Polyspace Access.
Note
To upload results from the classic desktop user interface for Polyspace Bug Finder, Polyspace Code Prover, and Polyspace Products for Ada, see Upload Results from the Desktop Interface (R2025b).
Open the Polyspace Access Web Interface
To open the Polyspace Access interface, click Open UI in the Cluster Dashboard.
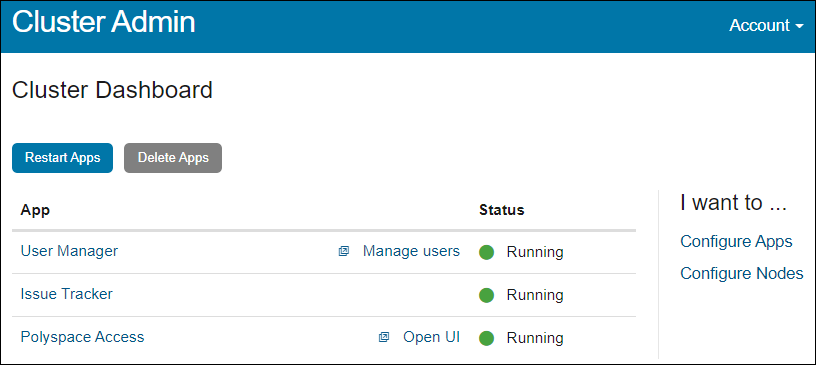
Copy the URL from the address bar, for instance https://access-machine.company.com:9443/metrics/index.html and share it with the Polyspace Access users. The URL allows users to open the Polyspace
Access interface from any machine connected to the server that hosts Polyspace
Access.
Once you complete the installation, close the Cluster Admin interface and stop the admin-docker-agent binary at the command line by pressing Ctrl+C. If you stop the binary before closing the interface, the app status is listed as Unknown state.