SLAM Map Builder
Build 2-D grid maps using lidar-based SLAM
Description
The SLAM Map Builder app loads recorded lidar scans and odometry sensor data to build a 2-D occupancy grid using simultaneous localization and mapping (SLAM) algorithms. Incremental scan matching aligns and overlays scans to build the map. Loop closure detection adjusts for drift of the vehicle odometry by detecting previously visited locations and adjusting the overall map. Sometimes, the scan matching algorithm and loop closure detection require manual adjustment. Use the app to manually align scans and modify loop closures to improve the overall map accuracy. You can also tune the SLAM algorithm settings to improve the automatic map building.
To use the app:
| To load rosbag log files, select Import > Import from rosbag. Select the rosbag file and click Open. This opens the Import tab. For more information, see Import and Filter a rosbag. To load data from the workspace, Import > Import from workspace. Select your Scans and
Poses variables using the drop downs provided. You
can also specify the variables in the |
| Use SLAM Settings to adjust the SLAM algorithm settings. Default values are provided, but your specific sensors and data may require tuning of these settings. The most important value to tune is the Loop Closure Threshold. For more information, see Tune SLAM Settings. |
| Click Build to begin the SLAM map building process. The building process aligns scans in the map using incremental scan matching, identifies loop closures when visiting previous locations, and adjusts poses. Click Pause at any time during the map building process to manually align incremental scans or modify loop closures. |
| Click Incremental Match to modify the relative pose of the currently selected frame and align the scan with the previous scan. Click Loop Closure to modify or ignore the detected loop closure for the current frame. Use the slider on the bottom to scroll back to areas where scan matching or loop closures are not accurate. You can modify any number of scans or loop closures. For more information, see Modify Increment Scans and Loop Closures. |
| After modifying your map, click Sync to update all the poses in the scan map. The two options under Sync are Sync, which searches for new loop closures, or Sync Fast, which skips loop closure searching and just updates the scan map. For more information, see Sync the Map. |
| When you are satisfied with how the map looks, click Export to
Occupancy Grid to either export the map to an m-file or save the map
in the workspace. The map is output as a 2-D probabilistic occupancy grid in an
occupancyMap object. |
| You can open existing app sessions you have saved using Open Session. When you are in the Map Builder tab, you can save your progress to an m-file using Save Session. |
Open the SLAM Map Builder App
MATLAB® Toolstrip: In the Apps tab, under ROBOTICS AND AUTONOMOUS SYSTEMS, click SLAM Map Builder.
MATLAB Command Window: Enter
slamMapBuilder
Examples
The SLAM Map Builder app helps you build an occupancy grid from lidar scans using simultaneous localization and mapping (SLAM) algorithms. The map is built by estimating poses through scan matching and using loop closures for pose graph optimization. This example shows you the workflow for loading a rosbag of lidar scan data, filtering the data, and building the map. Tune the scan map by adjusting incremental scan matches and modifying loop closures.
Load Lidar Scan Data
Load the example MAT file into the workspace, which contains a variable, scans, as a cell array of lidarScan objects.
load slamLidarScans.matOpen the App
In the Apps tab, under ROBOTICS AND AUTONOMOUS SYSTEMS, click SLAM Map Builder.
Also, you can call the slamMapBuilder function:
slamMapBuilder
Import Lidar Scans
Click Import > Import from workspace to load the scans. Data stored as a rosbag can be loaded with a ROS Toolbox license.

Select the scans variable in the Scans drop down.

In the tool bar, set Downsample to (%) to 10. Downsampling evenly samples from the data to reduce computation time for the SLAM algorithm. For this example, 10% is every 5th scan. Click Apply.
Use the slider or arrow keys at the bottom to preview the scans.
![]()
Once you are done importing, click Close.
Tune SLAM Settings
The SLAM algorithm can be tuned using the SLAM Settings dialog box. The parameters should be adjusted based on your sensor specifications, the environment, and your application. For this example, increase Loop Closure Threshold from 200 to 300. This increased threshold decreases the likelihood of accepting and using a detected loop closure. Set the Optimization Interval to 10. With every 10th loop closure accepted, the pose graph is optimized to account for drift.

Build the Map
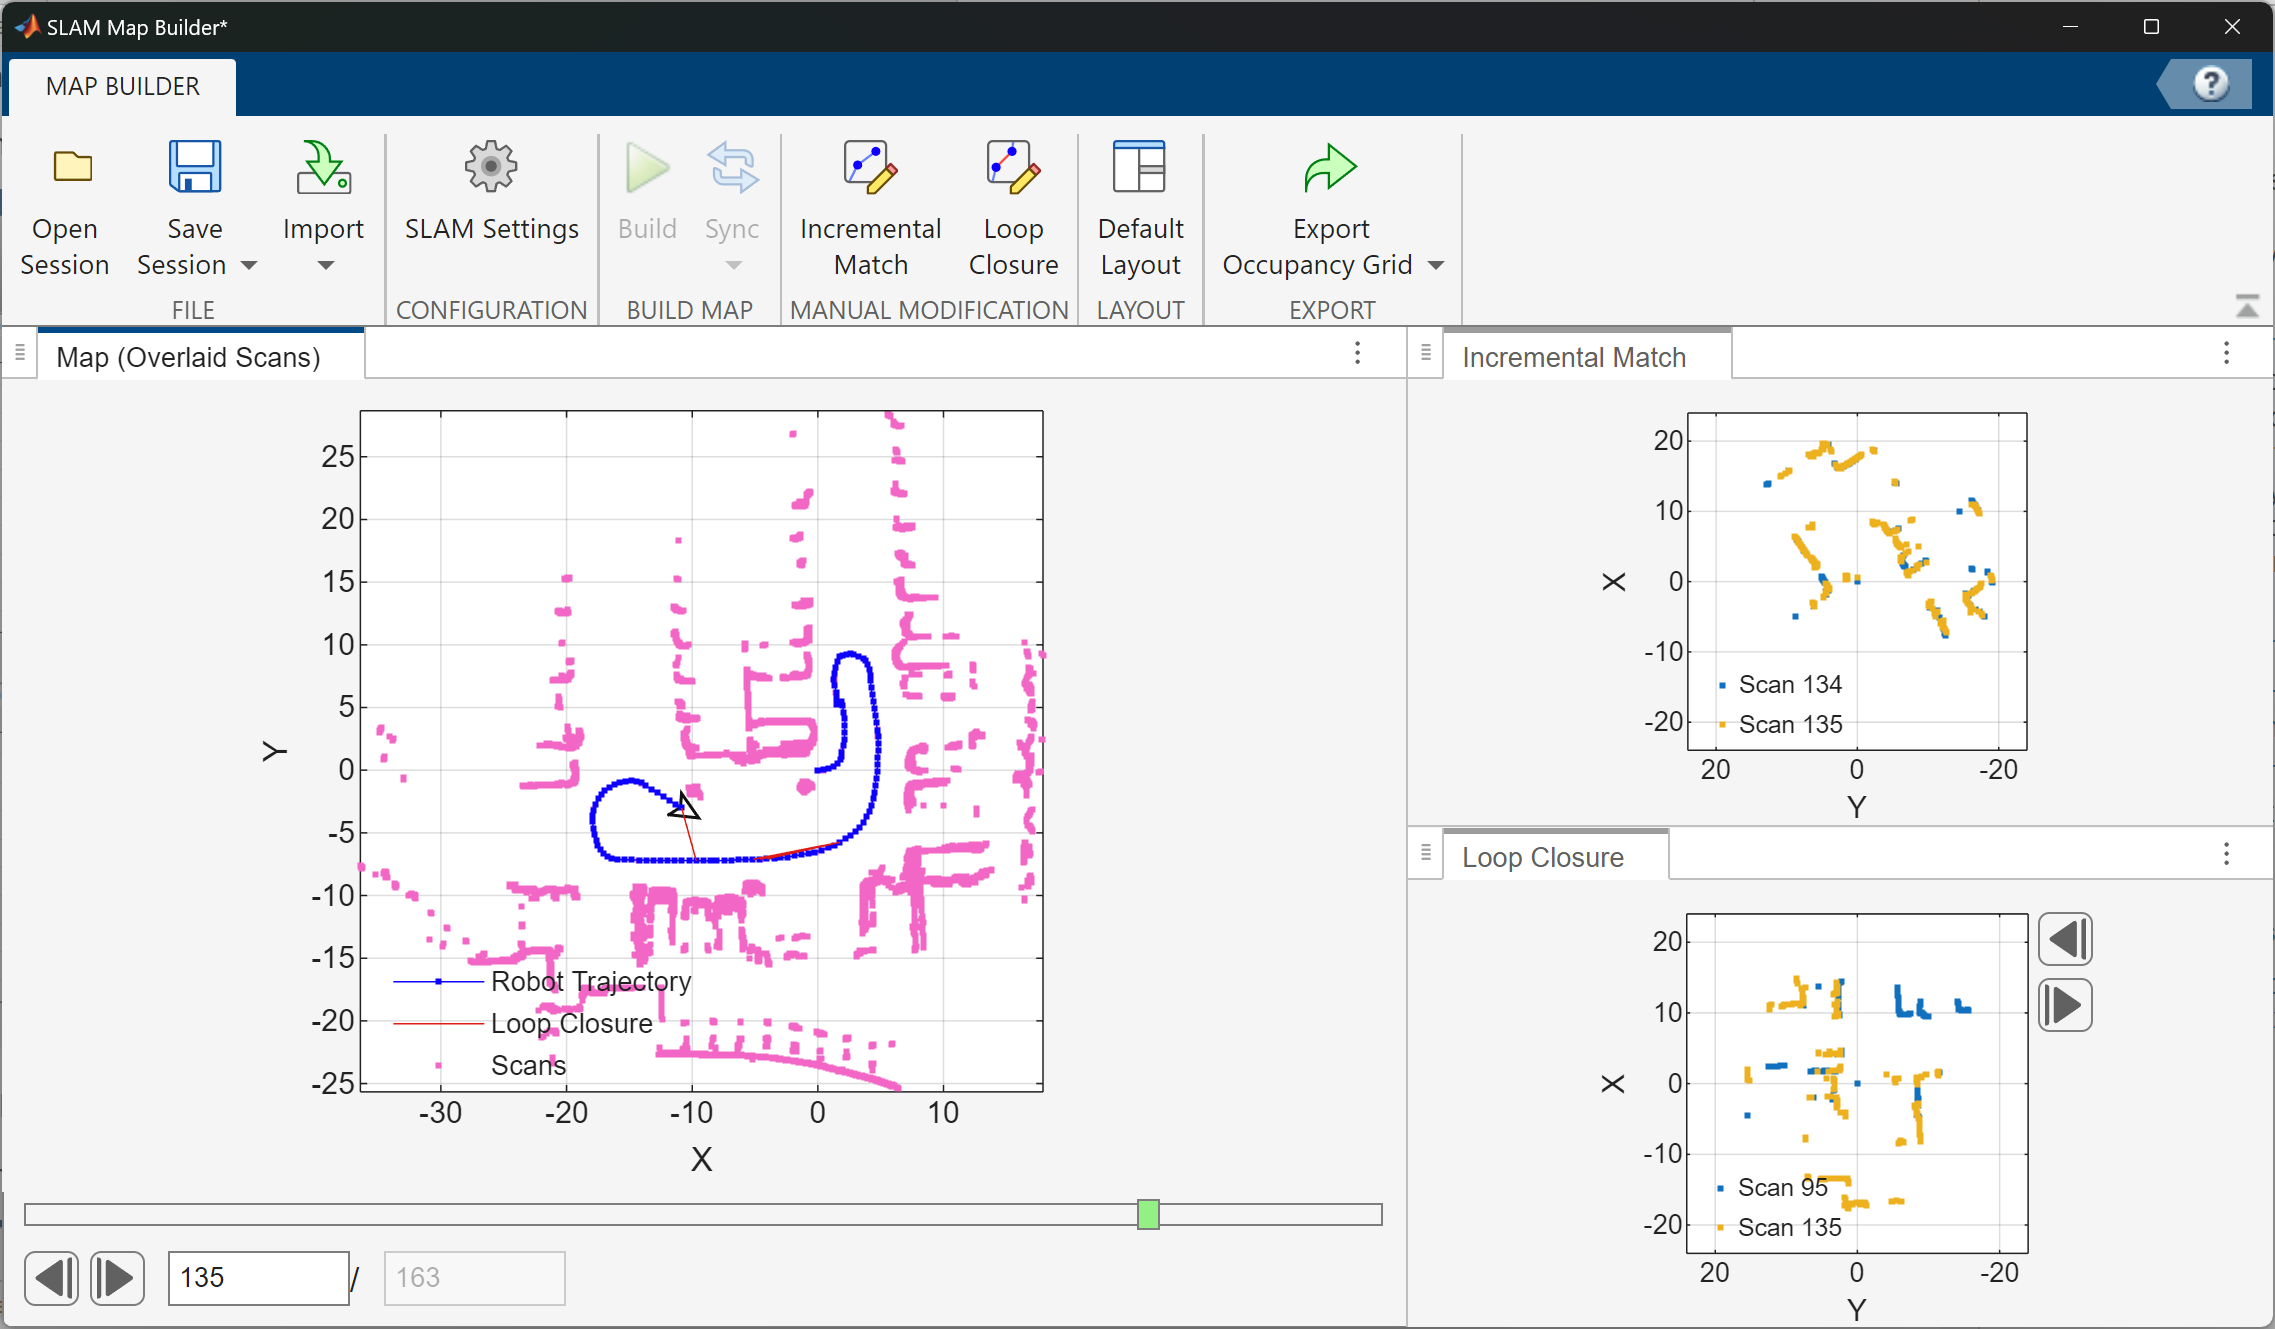
After filtering your data and setting the SLAM algorithm settings, click Build. The app begins processing scans to build the map. You should see the slider progressing and scans being overlaid in the map. The estimated robot trajectory is plotted on the same scan map. Incremental scan matches are shown in the Incremental Match pane. Whenever a loop closure is detected, the Loop Closure pane shows the two scans overlaid on each other.

Adjust Scan Matches or Loop Closures
At any time during the build process, if you notice the map is distorted or an incremental match or loop closure looks off, click Pause to select scans for adjustment. You can modify scans at the end of the build process as well. Navigate using the arrow keys or slider to the point in the file where the distortion first occurs. Click the Incremental Match or Loop Closure buttons to adjust the currently displayed scan poses. In this section, the bad loop closure is artificial and only for illustration purposes.
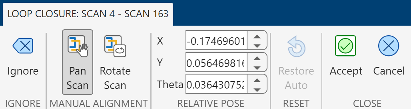
Click the Loop Closure button. This opens a tab for modifying the loop closure relative pose.

To ignore the loop closure completely, click Ignore. Otherwise, manually modify the relative scan pose until the scans line up.
Click Pan Scan or Rotate Scan, then click and drag in the figure to align the two scans. Click Accept when you are done. You can do this for multiple scans.

After you modify your scan poses for incremental matches and loop closures, click Sync to apply changes. SyncFast updates the map without searching for new loop closures and reduces computation time if you have already processed all the scans.

Export Occupancy Grid
Once you have synced your changes and finished building the map, you should see a fully overlaid scan map with a robot trajectory.

Click Export Occupancy Grid to get a final occupancy map of your environment as an occupancyMap object. Export the map to either the workspace or a MAT file. You can create a map from a subset of scans by scrolling back to the desired frame before exporting and selecting Up to currently selected scan.
Show the stored occupancy map.
load("slamMapBuilderOccMap.mat")
show(myOccMap)
title("Built Occupancy Map")
![Figure contains an axes object. The axes object with title Built Occupancy Map, xlabel X [meters], ylabel Y [meters] contains an object of type image.](../../examples/nav/win64/BuildAndTuneAMapUsingLidarScansWithSLAMExample_10.png)
You can also save a SLAM Map Builder app session using the Save Session button. The app writes the current state of the app to a .mat file that can be loaded later using Open Session.
Related Examples
Parameters
Programmatic Use
More About
This app allows you to manually modify incremental scans and adjust detected loop closures. If you notice scans are not properly aligned after you build the map, use the Incremental Match and Loop Closure buttons to open their modification tabs. Use the modification toolstrip buttons to adjust the relative pose between scans.
Ignore –– When modifying loop closures, you can simply ignore loop closures if they are inaccurate. The algorithm always discards ignored loop closure if detected in the same app session. You cannot ignore incremental scan matches.
Pan Scan –– Click this button to manually shift the pose. After selecting, click and drag inside the map to shift the scans and overlay them properly. Align all the points of the scans until you are satisfied. You can manually specify the X, Y location in the Relative Pose section as well.
Rotate Scan –– Click this button to manually rotate the pose. After selecting, click and drag inside the map to rotate the scans and overlay them properly. Align all the points of the scans until you are satisfied. You can manually specify the Theta location in the Relative Pose section as well.
Version History
Introduced in R2019b
See Also
Functions
buildMap|matchScans|matchScansGrid|rosbag(ROS Toolbox) |optimizePoseGraph