Collaborate on Multi-Labeler Medical Image Labeling Projects
This page shows how to work with a multi-person team to label large medical image data
sets using the Medical Image Labeler app. Use this workflow to label a data set
that consists of all 2-D images or all 3-D images and has the same set of target labels (for
example tumor, lung, and chest).
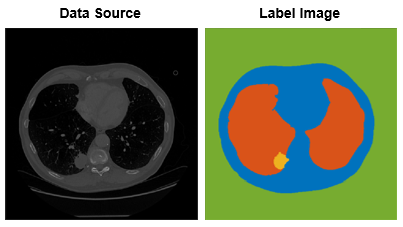
The original intensity images to be labeled are data source
images.
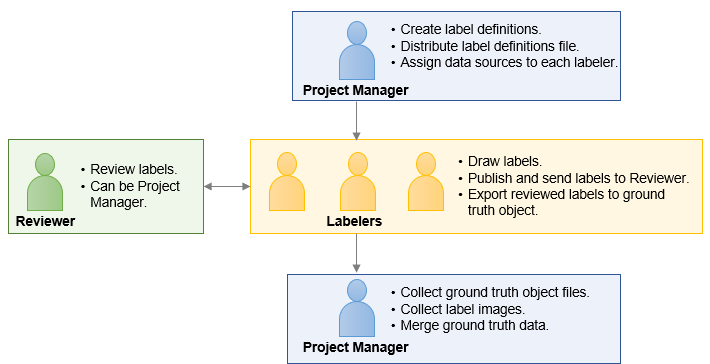
A labeling team consists of a project owner, individual label task owners, and one or more reviewers. The project owner creates the label definitions, assigns the images to be labeled by each label task owner, and collects and compiles the labeled data. The label task owners label the data source images using the label definitions provided by the project owner, request feedback from the reviewer, and send approved labels to the project owner. The reviewer, who can also be the project owner, checks labeled images and provides feedback to the label task owners. This figure illustrates the overall workflow and responsibilities of each role.
The multi-person labeling process consists of these steps:
Create Label Definitions and Assign Data to Label Task Owners (Project Owner)
Create Medical Image Labeler Session
Open the Medical Image Labeler app from the Apps tab on the MATLAB® toolstrip, or by using the
medicalImageLabelercommand.In the app toolstrip, click New Session. If the data set is 2-D, select New Image Session (2-D). If the data set is 3-D, select New Volume Session (3-D).
Create Label Definitions
Click Create Label Definition in the Label Definitions pane.
Click on the label to change the default name. The label name must be a valid MATLAB® variable name with no spaces. For details about valid variable names, see Variable Names.
To change the color associated with the label, click the colored square in the label identifier and select a color from the Color dialog box.
Click Create Label Definition to create additional labels. Create all of the labels required for the labeling project. When labels are nested within one another, such as tumors within an organ within the chest cavity, create the labels in order from outermost to innermost (
chest, thenlung, thentumor).
Click Export and, under Label Definitions, select To File to export the label definitions to a MAT file.
Distribute Labeling Assignments
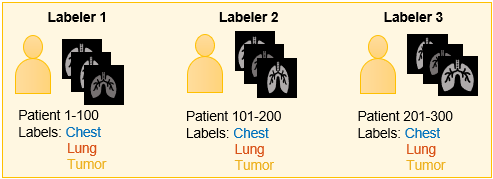
Assign each label task owner a subset of images in the data set to label. For
example, for a data set of 300 chest CT scans, label task owner 1 might label the
tumor, lung, and chest
cavity in scans 1–100, and label task owner 2 might label the
tumor, lung, and chest
cavity in scans 101–200. To ensure you can merge the ground truth data after
labeling, you must assign each label task owner a unique set of data source images
to label, and use the same label definitions for each set. Send this information to
each label task owner:
Label definitions, saved as a MAT file.
List of data source files to label. Each label task owner must have access to their assigned images, either in a shared network location or on their local machine.
Label Data and Publish Labels for Review (Label Task Owners)
Create Medical Image Labeler session
Open the Medical Image Labeler app from the Apps tab on the MATLAB toolstrip, or by using the
medicalImageLabelercommand.In the app toolstrip, click New Session. If the data set is 2-D, select New Image Session (2-D). If the data set is 3-D, select New Volume Session (3-D).
Import Label Definitions File
On the app toolstrip, click Import.
Under Import Label Definitions, select From File.
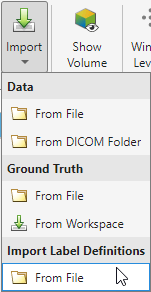
Select the label definitions MAT file provided by the project owner. The imported labels appear in the Label Definitions pane.
Import Data to Label
Load the data source images assigned to you by the project owner into the app. To load an image, click Import on the app toolstrip and select an option under Data. Select one or more files to import in the Import Image dialog box.
For a volume session, you can import an image from a file, from a directory of DICOM files corresponding to one volume, or from a
medicalVolumein the workspace.For an image session, you can import an image or image series from a file or from a
medicalImageobject in the workspace.
You can check that the app has successfully imported the files by reading the list of filenames in the Data Browser pane.
Label Images
Select an image in the Data Browser to begin labeling. The Has Labels column in the Data Browser indicates which image files have not been labeled.
Draw pixel labels using the labels in the Label Definitions pane. For an example showing how to label 3-D medical images, see Label 3-D Medical Image Using Medical Image Labeler. For an example showing how to label a 2-D image series, see Label 2-D Ultrasound Series Using Medical Image Labeler. The labels are saved as label images, which contain a mask of the drawn labels for a data source image.
Publish Label Overlay Images for Review
To get feedback from the reviewer, you can publish and share label overlay images, which show the data source image with its corresponding label image as an overlay. You can publish label overlay images as individual PNG files or as a single PDF, which the reviewer can inspect without opening MATLAB. To publish label overlay images, follow these steps:
The published images match the current settings in the app. Configure the app display settings as desired by using these steps:
You can change the visibility of an individual label by clicking the
 icon next to the label name
in the Label Definitions pane.
icon next to the label name
in the Label Definitions pane.On the Labeler tab of the app toolstrip, use the Label Opacity slider to set the transparency of the labels.
On the Labeler tab of the app toolstrip, use the Window Level tool to set the contrast of 2-D slice images.
To include a 3-D snapshot in the published images, on the Labeler tab of the app toolstrip, select Show Volume. The 3-D snapshot matches the current rotation, zoom, and display markers in the 3-D Volume pane. On the Labeler tab, click Display Markers to change the visibility of the scale bar and orientation axes display markers.
In the Data Browser, select the data source image file for which you want to publish label overlay images. You can publish label overlay images for only one data source at a time.
On the app toolstrip, click Publish to open the Publish pane.
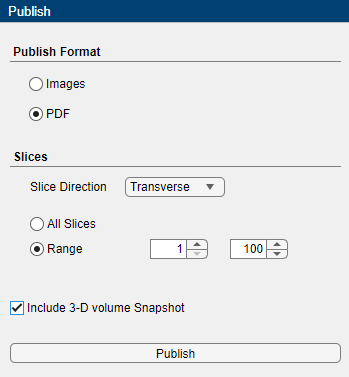
Under Publish Format, select either Images or PDF. Selecting Images publishes individual PNG files for each frame of an image series, or slice of a volume. Selecting PDF publishes one PDF file for the entire image file.
Specify the Slices information. For an image session, you can specify a range of slices for a multi-frame image sequence.
For a volume session, select the Slice Direction (coronal, sagittal, or transverse) along which to publish images and select either All Slices or Range. If you select Range, specify a range of slices. To include a 3-D snapshot, select Include 3-D volume Snapshot.
Click Publish and specify the export location.
Inspect Labeled Images (Reviewer)
Collect published label overlay images from each label task owner. You can open the published PDF or PNG files using a PDF or image viewer without using MATLAB. Inspect the labeled images, and send feedback to the label task owners if necessary. The label task owners can update the labels and publish a new set of images for additional review. When the labels are satisfactory, the label task owner exports the ground truth data and sends it to the project owner.
Export Ground Truth Data and Send to Project Owner (Label Task Owners)
Export Ground Truth Object
When you receive approval from the reviewer, export the labeled data as a
groundTruthMedical object to share with the project owner. On
the Labeler tab, click Export and, under
Ground Truth, select To File.
Send Ground Truth Data to Project Owner
Send these files to the project owner:
MAT file containing the
groundTruthMedicalobject.Label images containing the label masks for the data source images specified in the ground truth object. You can access the complete path to the label images in the
LabelDataproperty of the exportedgroundTruthMedicalobject. Access theLabelDataproperty by loading the ground truth MAT file into the MATLAB workspace by using theloadfunction. Share a copy of the label images with the project owner by sending them directly or by saving a copy in a shared network location.
Collect, Merge, and Create Training Data (Project Owner)
Collect Labeled Ground Truth Data
Collect these files from each label task owner:
MAT file containing a
groundTruthMedicalobject.Label images containing the label masks for the data source images specified in the
groundTruthMedicalobject.
You can load each object into the workspace by using the load
function. Because the Medical Image Labeler always saves the ground truth
object as gTruthMed in the exported MAT file, you must specify
unique variable names when loaded each file to avoid overwriting data. For example,
this code loads ground truth objects from two exported MAT files,
gTruth1.mat and gTruth2.mat, that each
contain a groundTruthMedical object,
gTruthMed.
matFile1 = load("gTruth1.mat");
gTruthMed1 = matFile1.gTruthMed;
matFile2 = load("gTruth2.mat");
gTruthMed2 = matFile2.gTruthMed;
The groundTruthMedical object contains file paths in the
DataSource and LabelData properties
that point to the location of the data source images and the label images,
respectively, on the local machine of the associated label task owner.
Update File Paths
To merge the ground truth objects and create training data, you must update each ground truth object to point to the data source and label image file locations on your machine. Even if the files are saved in a shared network location, if a label task owner maps a different drive letter to the shared network folder, the file path can be incorrect.
To update these paths, use the changeFilePaths object function. Specify the ground truth object as
an input argument to this function. If the directory paths have changed, but the
filenames have not, specify a string vector containing the folder names for the old
and new paths. The function updates all file paths in the
groundTruthMedical object at the specified original path. The
function returns any paths that it is unable to resolve. For example, this code
shows how to change the drive letter for a
directory.
alternativePaths = ["C:\Shared\ImgFolder","D:\Shared\ImgFolder"];
unresolvedPaths = changeFilePaths(gTruthMed1,alternativePaths);
alternativePaths = ...
{["C:\Shared\ImgFolder\Img1.png","D:\Shared\ImgFolder\Img1_new.png"], ...
["C:\Shared\ImgFolder\Img2.png","D:\Shared\ImgFolder\Img2_new.png"], ...
.
.
.
["C:\Shared\ImgFolder\ImgN.png","D:\Shared\ImgFolder\ImgN_new.png"]};
unresolvedPaths = changeFilePaths(gTruthMed1,alternativePaths);
changeFilePaths updates both the data source and the
label image file paths. To update the paths stored in the
DataSource and LabelData properties
separately, use the propertyName argument.Merge Ground Truth Data
Merge the updated groundTruthMedical objects into one object by
using the merge object function. For example, this code merges two objects,
gTruthMed1 and
gTruthMed2.
gTruthMerged = merge(gTruthMed1,gTruthMed2);
Create Training Data
You can use the merged labeled ground truth data to train a semantic segmentation
network. To create training data, load the data source images into an imageDatastore. Load the label
images into a pixelLabelDatastore (Computer Vision Toolbox). For more details about creating training data
for semantic segmentation from a groundTruthMedical object, see Create Datastores for Medical Image Semantic Segmentation.
See Also
groundTruthMedical | changeFilePaths | merge