Setting Up Your Test
Note
The MATLAB® instrument driver functions makemid,
midedit, and midtest will be removed
in a future release. Use the ividev interface from the Instrument Control Toolbox™ Support Package for
IVI® and VXIplug&play Drivers instead. For more information, see IVI and VXIplug&play Drivers.
Test File
You can specify a test file to load when you start midtest,
open a test file after the MATLAB Instrument Driver Testing Tool
is already up, or create a new test. You may find it convenient to
keep the driver and test file together in the same directory. For
easy use in the MATLAB Command Window, you can put that directory
in the MATLAB path with the addpath command.
Note
MIDTEST and the Instrument Driver Testing Tool are unable to open MDDs with non-ascii characters either in their name or path on Mac platforms.
Providing a Name and Description
The Name field allows a one-line text definition for your test. This name appears in the header of the test results in the Output Window.
The Description field allows a full definition of the text with as much descriptive text as you need.
Specifying the Driver
In the Driver text field, you
specify the driver to be tested. This is any MATLAB instrument
driver, usually with the .mdd extension. Enter
the full path to the driver, or click Browse to
navigate to the driver's directory.
Specifying an Interface
You specify the interface with the instrument for the testing
of the driver. The instrument object type may be GPIB, VISA, TCPIP, UDP,
or serial port. Depending on the type you choose,
the New Object Creation dialog box
prompts you for further configuration information.
The tool then creates a device object based on interface and driver.
Setting Test Preferences
The Test Preferences dialog box allows you to set certain behaviors of the tool when running a test.
Run Mode
This specifies whether the test runs all the steps or only one step in the test.
Fail Action
This specifies what happens if a step within the test fails. The test may stop after the failed step or continue, with or without resetting the instrument.
No-error String
This field specifies the expected string returned from the instrument when
there is no error. If you indicate that a step passes when
no error is returned from the instrument, the tool compares the string
returned from the instrument via the geterror function,
to the string given here in the Preferences dialog box. If the strings
match, then the tool assumes there is no error from the instrument.
Number of Values to Test
A double-precision property can be tested using all supported values. You can request this when testing it as a single step, or the tool does it automatically when the property is tested as part of a property sweep step. This field specifies how many values are tested for such a property.
The number of values includes the defined minimum and maximum for the property, and integer values equally spaced between these limits.
If your property requires noninteger values for testing, then create a separate test step for that property instead of including it in a sweep.
Setting Up a Driver Test
This example identifies the driver to be tested, and defines global setup information for the test. You will be testing the driver created in the examples of MATLAB Instrument Driver Editor Overview.
Open the MATLAB Instrument Driver Testing Tool from the command line with the command
midtest.
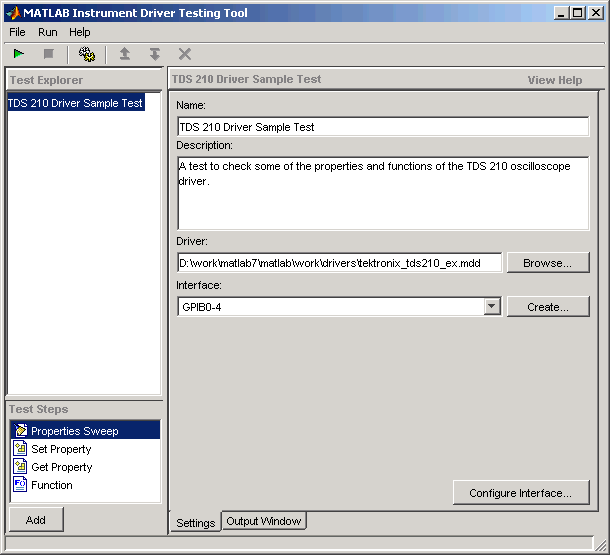
In the Name text field, enter
TDS 210 Driver Sample Test.In the Description text field, enter
A test to check some of the properties and functions of the TDS 210 oscilloscope driver.In the Driver field, enter the name of the driver you created in MATLAB Instrument Driver Editor Overview. The text field will display the whole pathname, with the driver file
tektronix_tds210_ex.mdd.Click the Create button to create an instrument interface.
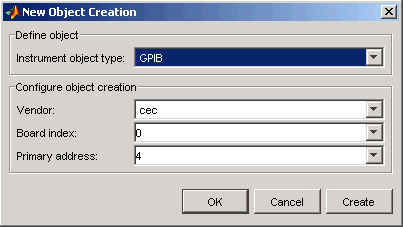
In the New Object Creation dialog box,
Select your Instrument object type, Vendor, Board index, and Primary address of your instrument.
The example illustrations in this chapter use a GPIB board with index 0 and the instrument at address 4. Your configuration may be different.
Click OK.
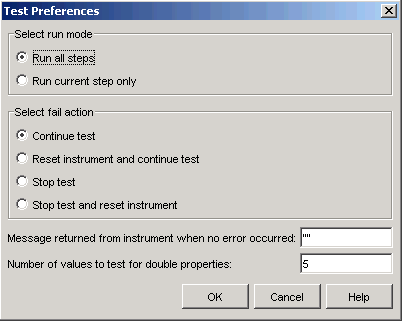
Click the File menu and select Test Preferences.
In the Test Preferences dialog box,
For Select run mode, click Run all steps.
For Select fail action, click Continue test.
For Message returned from instrument when no error occurred, enter
"". (This is an empty string in double quotes.)For Number of values to test for double properties, enter
5.Click OK.
The MATLAB Instrument Driver Testing Tool now displays all your setup information.
Click File and select Save. Enter
tektronix_tds210_ex_testas the filename for your test. The tool automatically adds the.xmlfile extension.