Getting Started with Connected IO
In this example, you will learn how to connect the Simulink® model directly to supported hardware for live I/O data exchange and blink an LED using connected IO in C2000™ Microcontroller Blockset.
Connected IO creates a communication interface that enables the Simulink model and the IO Server to communicate with each other. The model communicates with the hardware and no code generation is required.
Simulation with Connected IO is an intermediate step in the Model-Based Design workflow that bridges the gap between simulation and code generation by enabling Simulink to communicate with the hardware before deploying the model on the hardware.
Prerequisites
We recommend that you complete the following tutorials:
Run
c2000setupat the MATLAB® command prompt to complete the hardware setup.Getting Started with Texas Instruments C2000 Microcontroller Blockset
Required Hardware
Any TI™ C2000™ board (This example is configured with TI Delfino F28379D Launchpad)
You can use the input and output hardware peripherals corresponding to the respective source or sink blocks of the C2000™ Microcontroller Blockset that supports connected IO in Normal mode of simulation.
USB cable
Connecting wires
Hardware Setup
1. Connect the TI™ C2000™ board to the host computer.
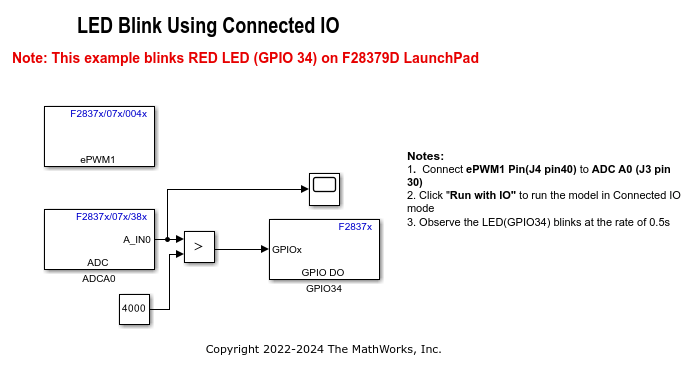
2. Connect ePWM1 pin (J4 pin 40) to ADC A0 pin (J3 pin 30)
Simulink Model for Connected IO
This example uses a preconfigured model from the C2000™ Microcontroller Blockset. In this model, the ePWM1 outputs a squared pulse of a particular duty ratio, which is being fed to an ADC channel. The ADC output in turn is fed to a digital output corresponding to the user LED(GPIO34) on the launchpad. On running the model in connected IO, you can observe the LED blink at the rate equal to the period of the ePWM output.
The LED on period is determined by the initial duty ration set in the ePWM block.
Open the c2837xconnectedio.slx model.


Configure Parameters and Hardware Setup
Configure these parameters in the Configuration Parameters dialog box.
1. Open the c2837xconnectedio.slx Simulink® model.
2. On the Modeling tab, select Model Settings.
3. In the Configuration Parameters dialog box, select Hardware Implementation.
4. Set the Hardware board parameter to TI Delfino F28379D Launchpad. This selection populates the Hardware board settings parameters with the default values for the hardware.
5. Navigate to the Hardware Implementation > Target Hardware Resources > Connected IO.

Select the Communication Interface as serial.
Select the SCI module. By default SCI_A module is selected for controlCARD and LaunchPad. For custom boards, select other serial modules to connect to FTDI.
Select the Serial port in MATLAB preference with the COM port number associated with your target hardware.
The Verbose option enables viewing the execution progress of the simulation on the Diagnostic Viewer and on the MATLAB Command Window.
Navigate to SCI_A and specify the baud rate in Desired baud rate in bits/sec.
The default baud rate is 115200. You can increase the baud of the serial over USB of your Launchpad or controlCARD. On Launchpads and controlCARDs using FTDI 2232H, you can select any baud less than or equal to 6 Mbps, or exactly 9 or 12 Mbps. On controlCARDs using FTDI 2232D, you can select any baud less than or equal to 1.5 Mbps, or exactly 2 or 3 Mbps.
Run Simulink Model
1. On the Hardware tab of the Simulink model, in the Mode section, select Connected IO.

2. Click Run with IO.

3. Observe the output in the Scope or SDI block.
4. Observe the LED blinking.