Post Temperature Data and Read from Channel
This example shows how to collect environmental data from a device and post it from your device to a ThingSpeak™ channel. The example uses an ESP8266 and the ThingSpeak Communication Library to post data and retrieve data from a channel.
Supported Hardware
ESP8266-12
ESP8266-12E
This example uses an analog thermistor and the built-in ADC of an ESP8266-12 to read the voltage and convert it to temperature. A thermistor is a device with a resistance that is inversely proportional to temperature. The calibration data for the thermistor is stored in your channel and read by the device. Calibration data is based on a fit to the Steinhart-Hart model. Some manufacturers provide this calibration data with the device. You can fit the parameters yourself by measuring the resistance of the thermistor at three distinct temperatures. For more information, see Calibrate Temperature Coefficients.


Setup
Create a ThingSpeak Channel, as shown in Collect Data in a New Channel.
Enable at least two fields: one field for reading and one field for writing. Data is written to fields 1, 2, and 3. Fields 6, 7, and 8 are used to store the temperature calibration coefficients. This image shows the Channel Settings view for a single channel setup.

Record your read API key and write API key, which you can find on the API Keys tab of the Channel Settings view.
Populate the calibration fields using a web browser address bar. The following values of
a,b, andcare estimates. You can start with these values, and then calibrate your thermistor as described in Calibrate Temperature Coefficients. Modify the following text with your write API key and paste it directly into the address bar of your browser.Set the
acoefficient:
https://api.thingspeak.com/update?api_key=YOUR WRITE API KEY&field6=0.002039
Set the
bcoefficient:
https://api.thingspeak.com/update?api_key=YOUR WRITE API KEY&field7=0.0000672
Set the
ccoefficient:
https://api.thingspeak.com/update?api_key=YOUR WRITE API KEY&field8=0.0000008929
The response is the number of entries in the channel. If the channel is newly created, the browser returns 1, 2, and 3 after you create the first, second, and third calibration fields, respectively.
Required Hardware
ESP8266. This example uses the ESP8266-12E on a NodeMCU development board. The ESP8266-01 does not expose the ADC pin. It is possible to use a digital interface temperature sensor with the ESP8266-01.
10 kΩ thermistor, such as Cantherm MF52A2103J3470.
10 kΩ resistor. A high-tolerance resistor, 1% or less, yields better results.
Breadboard.
Jumper wires (at least 3).
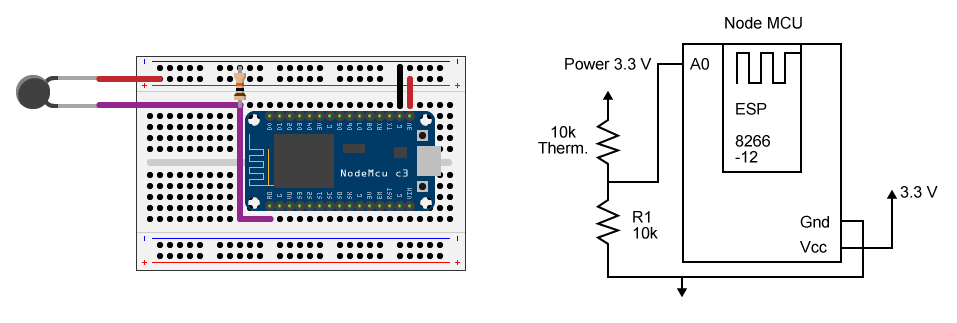
Schematic and Connections
Connect the following pins:
One pin of the thermistor to pin A0 on the NodeMCU
The second pin of the thermistor to a 10 kΩ resistor
The second resistor pin to ground, which must be common to the ESP8266
The NodeMCU board has a built-in voltage divider to convert the 1 V input range of the ESP8266 ADC to a 3.3 V range. Consider adding a 100 kΩ resistor to ground and 220 kΩ to power if you have a different board without a built-in voltage divider.
Program Your ESP8266
1) Download the latest Arduino® IDE.
2) Add the ThingSpeak Library for Arduino and ESP8266:
a. Select Sketch > Include Library > Manage Libraries.
b. Select ThingSpeak to add it to your sketch.
3) Add the ESP8266 Board Package.
a) Under File > Preferences, enter https://arduino.esp8266.com/stable/package_esp8266com_index.json into Additional Board Manager URLs.
b) Select Tools > Boards > Board Manager. Enter ESP8266 in the search bar and install the package.
4) Select the appropriate port and board in the Arduino IDE. The hardware used to generate this example used the Node MCU 1.0 (ESP 8266–12E) option.
5) Create the application. Open a new window in the Arduino IDE, and save the file. Add the code provided here. Be sure to change the wireless network information, the channel IDs (you can use a single channel), the read API key, and the write API key. You do not need to change the coefficients in the code because the program reads them from your channel. Once connected, the device measures the voltage across the thermistor every two minutes. It calculates the temperature based on the calibration stored in your channel, and posts the temperature to your channel.
Code
1) The first section initializes variables. Be sure to edit the read API key and write API key, channel numbers, and wireless network connection information.
#include <ThingSpeak.h>
#include <ESP8266WiFi.h>

// Network parameters
const char* ssid     = "SSSSSSS";
const char* password = "PPPPPPPPPP";

// ThingSpeak information
char thingSpeakAddress[] = "api.thingspeak.com";
unsigned long channelID = NNNNNN;
char* readAPIKey = "XXXXXXXXXXXXXXXX";
char* writeAPIKey = "YYYYYYYYYYYYYYYY";
const unsigned long postingInterval = 120L * 1000L;
unsigned int dataFieldOne = 1;                            // Field to write temperature data
unsigned int dataFieldTwo = 2;                       // Field to write temperature data
unsigned int dataFieldThree = 3;                     // Field to write elapsed time data
unsigned int aField = 6;                             //Field to hold first constant of the thermistor calibration
unsigned int bField = 7;                             //Field to hold second constant of the thermistor calibration
unsigned int cField = 8;                             //Field to hold third constant of the thermistor calibration

// Global variables
// These constants are device specific.  You need to get them from the manufacturer or determine them yourself.
float aConst = 2.25E-02;
float bConst = -0.003422894649;
float cConst = 0.00001518485044;

unsigned long lastConnectionTime = 0;
long lastUpdateTime = 0;
WiFiClient client;
2) In the setup function, start the serial monitor and read the calibration constants.
void setup() {

Serial.begin(9600);
Serial.println("Start");
connectWiFi();

// Read the constants at startup.
aConst = readTSData( channelID, aField );
bConst = readTSData( channelID, bField );
cConst = readTSData( channelID, cField );
}
3) The main loop continuously checks to see how long it has been since the temperature was read. If the set time period has elapsed, the device is read, the temperature is calculated, and the output is written to your channel.
void loop() {


 // Update only if the posting time is exceeded
    if (millis() - lastUpdateTime >=  postingInterval) {

        float fahrenheitTemperature, celsiusTemperature;

        lastUpdateTime = millis();

        float readValue = analogRead(A0);
        float logR = log( 10000 * ( 1024 / readValue - 1 ));                 // Separate the calculation for simplicity and debugging

        celsiusTemperature = 1 / ( aConst + bConst * logR + cConst * pow(logR,3) ) - 273.15;   // Calculate the temperature in Celsius
        fahrenheitTemperature = celsiusTemperature * 9 / 5 + 32;
        Serial.println("ADC =  " + String( readValue )+ " Temp = "+String( fahrenheitTemperature ));
        write2TSData( channelID , dataFieldOne , fahrenheitTemperature , dataFieldTwo , celsiusTemperature , dataFieldThree , millis() );      // Write the temperature in F, C, and time since starting.
    }
}
4) Connect your device to the wireless network using the connectWiFi function.
int connectWiFi(){

    while (WiFi.status() != WL_CONNECTED) {

        WiFi.begin( ssid, password );
        delay(2500);
        Serial.println("Connecting to WiFi");
    }

    Serial.println( "Connected" );
    ThingSpeak.begin( client );
}
5. Read data from a single field on a channel with readTSData. You can write a single value to ThingSpeak using writeTSDataand and write multiple values simultaneously with write2TSdata.
float readTSData( long TSChannel,unsigned int TSField ){

  float data =  ThingSpeak.readFloatField( TSChannel, TSField, readAPIKey );
  Serial.println( " Data read from ThingSpeak: " + String( data, 9 ) );
  return data;

}

// Use this function if you want to write a single field.
int writeTSData( long TSChannel, unsigned int TSField, float data ){
  int  writeSuccess = ThingSpeak.writeField( TSChannel, TSField, data, writeAPIKey ); // Write the data to the channel
  if ( writeSuccess ){

    Serial.println( String(data) + " written to Thingspeak." );
    }

    return writeSuccess;
}

// Use this function if you want to write multiple fields simultaneously.
int write2TSData( long TSChannel, unsigned int TSField1, float field1Data, unsigned int TSField2, long field2Data, unsigned int TSField3, long field3Data ){

  ThingSpeak.setField( TSField1, field1Data );
  ThingSpeak.setField( TSField2, field2Data );
  ThingSpeak.setField( TSField3, field3Data );

  int writeSuccess = ThingSpeak.writeFields( TSChannel, writeAPIKey );
  return writeSuccess;
}
Calibrate Temperature Coefficients
This example uses the Steinhart-Hart model to turn the measured resistance of the thermistor into a temperature. The model has the form:
You can determine the coefficients by measuring the resistance of the thermistor at three different temperatures. An ice water bath is very near 0 °C, and room temperature is generally 24-26 °C. If you have access to boiling water, you have 100°C. If you do not have boiling water, you can squeeze the thermistor between your fingers and use 33°C as an estimate of the surface temperature. You can use your device to calibrate the coefficients with this procedure.
1) Initialize the coefficients. Use the previously suggested values or some other guess.
2) Start your device and watch the serial monitor. The ADC value shown in the serial monitor is an accurate measure of the voltage, but yields an incorrect temperature before the calibration is complete.
3) Place your thermistor in an ice water bath (0 °C). Convert the ADC value to a resistance measurement with the following formula for thermistor resistance.
4) Record the temperature and ADC values for room temperature ( approximately 25 °C) and an elevated temperature. If boiling water is not available, 33 °C is a reasonable estimate if you squeeze your fingers on the thermistor.
5) Convert all ADC values to resistance. Use the Thermistor Calculator to solve for the coefficients for your thermistor. Upload your new coefficients to your channel and reset the device.