Detect Boundaries of Objects Within Video Using Raspberry Pi
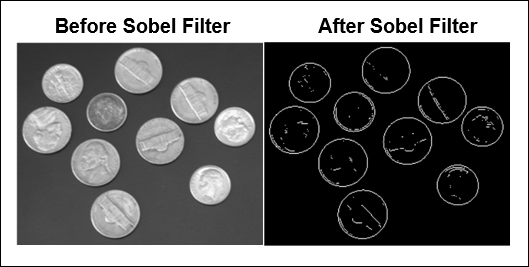
This example shows you how to identify the boundaries of objects in a live video stream on Raspberry Pi® hardware by using a MATLAB Function block with the Simulink® Support Package for Raspberry Pi Hardware. The process of identifying boundaries of objects is known as edge detection. This example implements the Sobel edge detection algorithm to identify the boundaries of the objects.
In this example, you will learn how to:
Acquire live video stream from a webcam or a camera module connected to the Raspberry Pi hardware.
Implement the Sobel edge detection algorithm on the acquired video using a MATLAB Function block.
Display the edge-emphasized objects on the Raspberry Pi hardware.
Required Products
Virtual network computing (VNC) viewer (optional)
Required Hardware
Raspberry Pi hardware (Model 3B or 3B+ recommended)
A supported USB webcam or a Raspberry Pi camera module
USB cable
Ethernet cable
A monitor connected to the Raspberry Pi hardware and an HDMI cable (optional)
Step 1: Connect Raspberry Pi Hardware
Tip: Before you start this example, we recommend you complete the Get Started with Simulink Support Package for Raspberry Pi Hardware example.
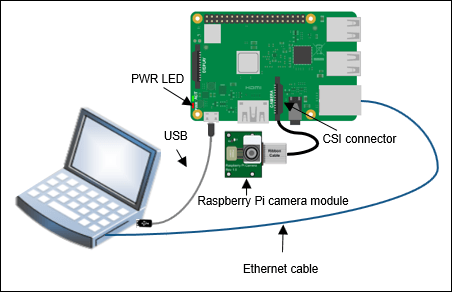
1. Connect the micro-USB end of the USB cable to the Raspberry Pi and the regular USB end of the USB cable to the computer. Wait until the PWR LED on the hardware starts blinking.
2. To connect a video device to the hardware, do any of the following:
If you have a webcam, connect the webcam to one of the USB ports on the hardware. Note that some webcams draw too much power and may require a powered USB hub for proper operation.
If you have a Raspberry Pi camera module, connect the camera module to the hardware by using a CSI cable. For information on how to connect the camera module to the hardware, follow the instructions in the manual provided by the manufacturer.
3. Using the Hardware Setup screen, configure the Raspberry Pi network.
Step 2: Open and Configure Edge Detection Simulink Model
Open the raspberrypi_edgedetect Simulink model.
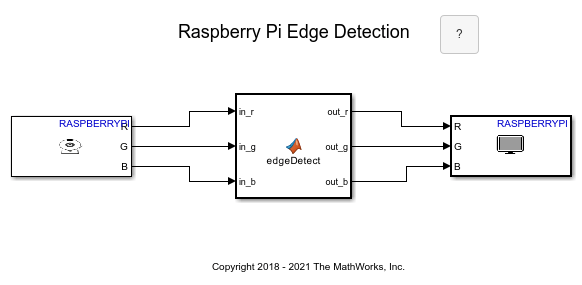
The model consists of these three blocks:
V4L2 Video Capture: This block captures live images from the video device connected to the hardware. The block outputs red, green, and blue components of the image pixel as an 8-bit value.
Double-click the block and specify the name of the device to capture the video in the Device name parameter. If you do not know the name of the device:
1. Open the hardware terminal and use the ls command. This command lists all the video devices connected to the hardware:
ls| -al /dev/video*
2. Copy the name of your device and paste the name in the Device name parameter.
MATLAB Function: This block implements the Sobel edge detection algorithm. The algorithm finds the edges in the image by approximating the gradient magnitude of the image. When you double-click the block, you can see that the algorithm comprises of two two-dimensional filters, one to calculate the gradient in the column direction and the other to calculate the gradient in the row direction. Both filters use a 3-by-3 kernel.
SDL Video Display: This block displays the edge-emphasized objects on the hardware.
Step 3: Change Model Configuration Parameters Settings
1. To open the Model Configuration Parameters dialog box, click the gear icon on the Simulink model toolbar.
2. In the Configuration Parameters dialog box, select Hardware Implementation.
3. Set the Hardware board parameter to Raspberry Pi. This selection automatically populates the parameters in the Hardware board settings with the default values for Raspberry Pi.
4. In the Hardware board settings pane, expand Target hardware resources and select Board Parameters. Specify these parameter values:
Device Address: The IP address or host name of the hardware.
Username: Specify the root user name of the Linux® system running on the hardware. The default user name of the Raspbian Linux distribution is
pi.
Password: Specify the root password of the Linux system running on the hardware. The default password of the Raspbian Linux distribution is
raspberry.
5. Click Apply. Click OK to save your changes.
Step 4: Deploy Edge Detection Simulink Model on Raspberry Pi Hardware
On the Hardware tab of the Simulink model, in the Mode section, select Run on board and then click Build, Deploy & Start. The lower-left corner of the model window displays status while the support package generates the code. After successfully generating the code, the support package loads and runs the code on the hardware. The executable starts acquiring live video from the video device, runs the Sobel algorithm on the acquired images, and then displays the edge-emphasized objects on the Raspberry Pi screen. To view the Raspberry Pi screen, use a VNC viewer and perform a remote session on the hardware to get the display. You can alternatively connect an HDMI cable between a monitor and the hardware.
You can also run this model in external mode to tune the threshold values in the model and observe the changes in the characteristics of the output during simulation. In external mode, the model runs on the computer, and edge-emphasized images are displayed in the SDL Video Display block.
Other Things to Try
Replace the edge detection algorithm with any other algorithm that has better performance as per your requirements.
See Also
You can also select a web site from the following list:
Americas
- América Latina (Español)
- Canada (English)
- United States (English)
Europe
- Belgium (English)
- Denmark (English)
- Deutschland (Deutsch)
- España (Español)
- Finland (English)
- France (Français)
- Ireland (English)
- Italia (Italiano)
- Luxembourg (English)
- Netherlands (English)
- Norway (English)
- Österreich (Deutsch)
- Portugal (English)
- Sweden (English)
- Switzerland
- United Kingdom (English)