Enable Component Reuse by Using Clone Detection
Clones are modeling patterns that have identical block types and connections. The Clone Detector app identifies clones across the model or in a subsystem boundaries. You can use the Clone Detector app or the MATLAB® commands programmatically to reuse components by creating library blocks from the clone patterns and replacing the clones with links to those library blocks. You can also replace clones with links from an existing library. See Identify and Replace Clones using Model Libraries.
Exact Clones and Similar Clones
Clones can be categorized into two types: exact clones and similar clones. Exact clones have identical block types, connections, and parameter values. Similar clones have the identical block types and connections, but they can have different block parameter values. For instance, in similar clones, the value of a Gain block can be different, and Sum blocks with different operations are also considered as similar clones, but they must be the same in exact clones.
Both exact clones and similar clones can have these differences:
Two clones can have a different sorted order.
The length of signal lines and the location and size of blocks can be different if the block connections are the same.
Blocks and signals can have different names.
After you identify clones, you can replace them with links to library blocks. Similar clones link to masked library subsystems.
Specify Where to Detect Clones
The Clone Detector app provides two options for identifying clones within a model. You can search for clones within a subsystem boundary or anywhere across the model using the clone detection settings.
Subsystem clones: Identifies clones only within subsystems.
Clones across model: Identifies clones across the whole model.
Identify Exact and Similar Clones
This example shows how to use the Clone Detector app to identify exact and similar subsystem clones, and then replace them with links to library blocks.
Open the model
ex_detect_clones.openExample("ex_detect_clones")
Save the model to your working folder. A model must be open to access the app.
On the Apps tab, click Clone Detector. Alternatively, on the MATLAB command line enter:
clonedetection("ex_detect_clones")The app opens the Clone Detector tab. This example takes you through each section.

Set Up panes for Clone Detection
The app displays information on multiple panes. You can select three of the panes under the View menu. The panes are:
Help - Select to access a help pane that contains an overview of the clone detection workflow.
Results - Select to view the Clone Detection Results and Actions pane.
Properties - Select to view the Detected Clone Properties pane.
Set Parameters for Clone Detection
You can set up the parameters for clone detection by using the Settings drop-down menu.
Select Ignore differences in > Signal Names to identify and classify clones when the signal names are different.
Select Ignore differences in > Block Properties to identify and classify clones when the block properties are different. For more information about block properties, see Specify Block Properties.
Click Replace Exact Clones With Subsystem References to find and replace exact clones with subsystem reference blocks. See Replace Exact Clones with Subsystem Reference.
Click Exclude Components to access the Exclude model references, Exclude library Links, and Exclude inactive and commented out regions options. Enabling the Exclude inactive and commented out regions option identifies variable number clones because of Variant Source block in the model. For more information, see Exclude Components from Clone Detection. Enabling the Exclude model references and Exclude library Links options will lead to identification of fewer clones, depending on the model.
Click Match Patterns with Libraries and select an external library to look for clones. See Identify Clones Using External Library.
The Maximum number of unmatched block parameters is
50by default. This represents the number of parameters that can vary among subsystems and still be classified as similar clones. You may reduce this number to identify and classify fewer similar clones. Setting the value to zero, will identify only exact clones.Click Detect Clones Across Model to enable detect clones anywhere across the model. You can choose the values of Minimum Region Size and Minimum Clone Group Size to detect the clones with these matching blocks. Minimum Region Size is the number of blocks per clone and Minimum Clone Group Size is the number of clones present in that clone group. The default size for each is
2. See Find Clones Across the Model.
Note
For faster clone detection across models, consider using larger values for Minimum Clone Group Size and Minimum Region Size.
Identify Subsystem Clones in the Model
To find clones within the model, click on the subsystem that you want to analyze. In the Detect section, the selected subsystem name appears under Find Clones in System tab if the pin is unlocked. Use the pin to remember the selection.

Click Find Clones to identify clones.
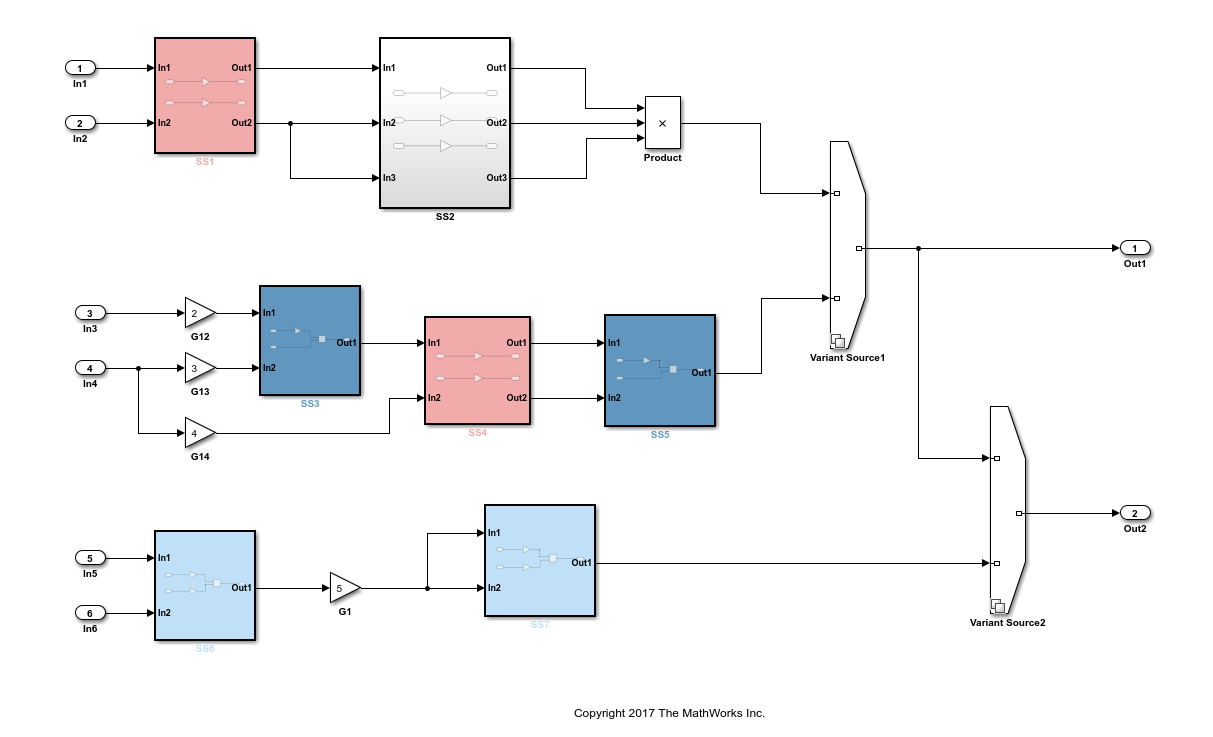
The color of the subsystems changes to reflect the similar and exact clones identified. The red highlighting represents exact clones and the different shades of blue highlighting represent similar clones.
Clone Detector app creates a backup folder in the working directory. The backup
folder name has the prefix m2m_<model
name>. It saves the clones data in a MAT file. You can also
find the backup of the original model in this folder after refactoring the model to
replace clones with links to library blocks.
Analyze Clone Detection Results
After identifying clones, you can analyze the results of the clone detection and make changes to the model as necessary. To analyze the results:
In the Clone Detection Results and Actions panel, on the Clone Results tab, a list of clone groups are displayed.
Click the
>symbol next toExact Clone Group 1to see all of the subsystems that are exact clones, the number of blocks, and the block differences. Repeat the same forSimilar Clone Group 1andSimilar Clone Group 2.In the Clone Detection Results and Actions pane, click the Logs tab. Click the hyperlink on the Logs pane.
The Clone Detection Report is generated in HTML and saved in the MATLAB current folder. The report opens in a new web browser window, showing a summary of clones, individual detection results with detailed information on clone groups, clone types, detection parameters, and exclusion configurations applied to the model.

Click the Model Hierarchy tab. Click the hyperlinks to highlight the particular subsystems in the model. To go back to highlighting all clones, on the Clone Results tab, click the Highlight all clones.
On the Clone Results tab, expand
Similar
                            Clone Group 1
and click the View Parameter Difference hyperlink.On the Detected Clone Properties panel, click the
ex_detect_clones/SS5/G9hyperlink, which opens the gain blockG9in the subsystemSS5, where you can access the parameter that are different from the baseline subsystem.Change value of the gain parameter from
AtoBand click Find Clones. This will reclassifySimilar Clone Group 1toExact Clone Group 2because you resolved the difference in the subsystems and converted it into an exact clone.Under the Refactor Benefits panel, you can evaluate the percentage of various types of clones present.
In the Clone Detection Results and Actions pane, in the Clone Results tab, select the clones you would like to refactor. Select all the clone groups for refactoring to reduce
22.5806%of the model reuse.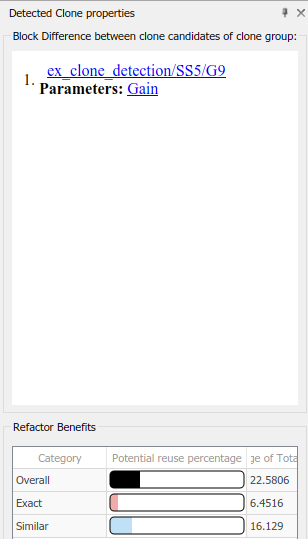
Replace Clones
You may use the default library name or change the name of the library file and its location on the Clone Results tab before replacing the clones.
Click Replace Clones.
The model is refactored and the clones are replaced with links to the
newLibraryFilelibrary file in your working directory.You can restore the model to its original state by clicking the Restore button in the Clone Results tab of the Clone Detection Results and Actions pane.
Check the Equivalency of the Model
If you have a Simulink® Test™ license, you can use Check Equivalency drop-down button and click on it. A window opens and displays that the current model has been successfully refactored into an equivalent model.

Limitations
Identifying clones within Configurable Subsystems is not supported.