Main Content

Combo Box

Select parameter value from drop-down menu

  • Combo Box block

Libraries:
Simulink / Dashboard

Description

The Combo Box block lets you set the value of a parameter to one of several values. You can define each selectable value and its label through the Combo Box block parameters. Use the Combo Box block with other Dashboard blocks to build an interactive dashboard of controls and indicators for your model.

Double-clicking the Combo Box block does not open its dialog box during simulation and when the block is selected. To edit the block's parameters, you can use the Property Inspector, or you can right-click the block and select Block Parameters from the context menu.

Connect Dashboard Blocks

Dashboard blocks do not use ports to connect to model elements. To connect a dashboard block, use connect mode. To enter connect mode on an unconnected block, pause on the block you want to connect and click the Connect button . To enter connect mode on a connected block, select the block, pause on the ellipsis that appears (…), and in the action menu that expands, click the Connect button.

To connect a control block to a parameter in your model or to change the connection of a control block, enter connect mode. Select the block to whose parameter you want to connect. From the list that appears, select the parameter to which you want to connect. Then, pause on the dashboard block and click the Done Connecting button .

The control block cannot connect to a parameter defined by a variable until you update the model diagram. To connect to a parameter defined by a variable or to modify the value of a variable that defines the value of a connected parameter when the simulation is not running, update the model diagram by pressing Ctrl+D.

You can connect to a parameter with a scalar value or to an element of a matrix or structure. For more information, see Connect Dashboard Blocks to Simulink Model.

You can also connect dashboard blocks to a Stateflow® chart. For more information, see Connect Dashboard Blocks to Stateflow (Stateflow).

This animation shows how to connect the Combo Box block to your model.
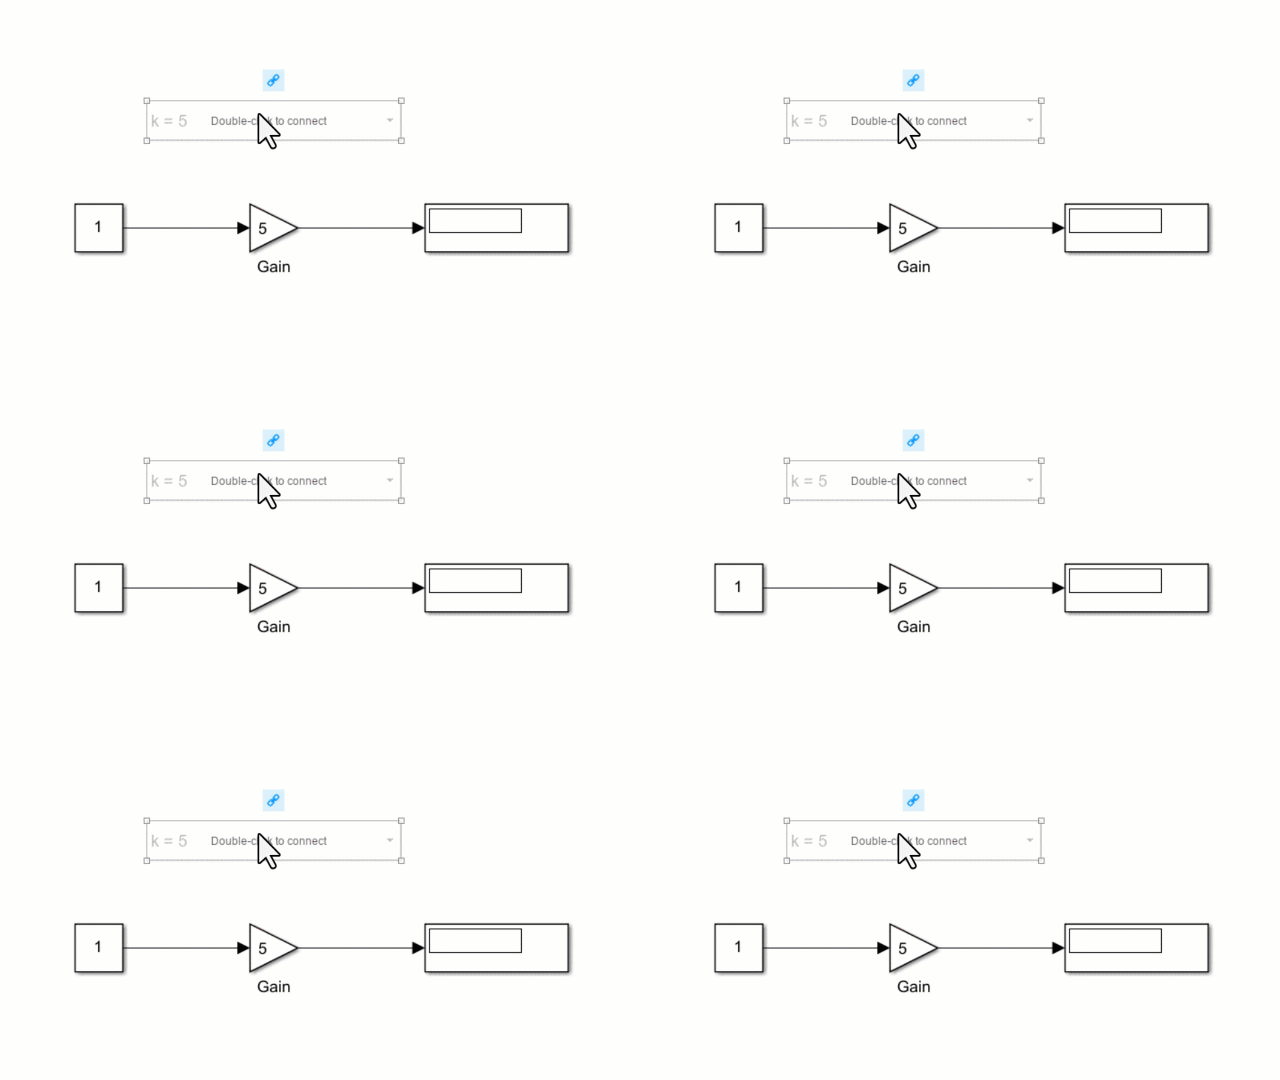
An unconnected Combo Box block connects to the Gain parameter of a Gain block.

Parameter Logging

Tunable parameters connected to dashboard blocks are logged to the Simulation Data Inspector, where you can view the parameter values along with logged signal data. You can access logged parameter data in the MATLAB® workspace by exporting the parameter data from the Simulation Data Inspector by using the UI or the Simulink.sdi.exportRun function. For more information about exporting data using the Simulation Data Inspector UI, see Export Data to Workspace or File. The parameter data is stored in a Simulink.SimulationData.Parameter object, accessible as an element in the exported Simulink.SimulationData.Dataset.

Examples

expand all

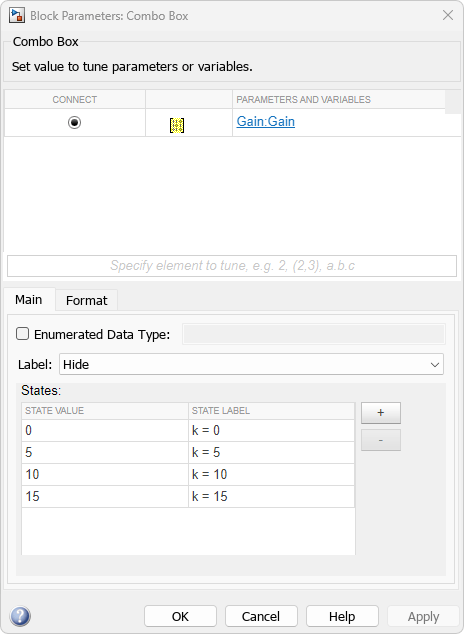
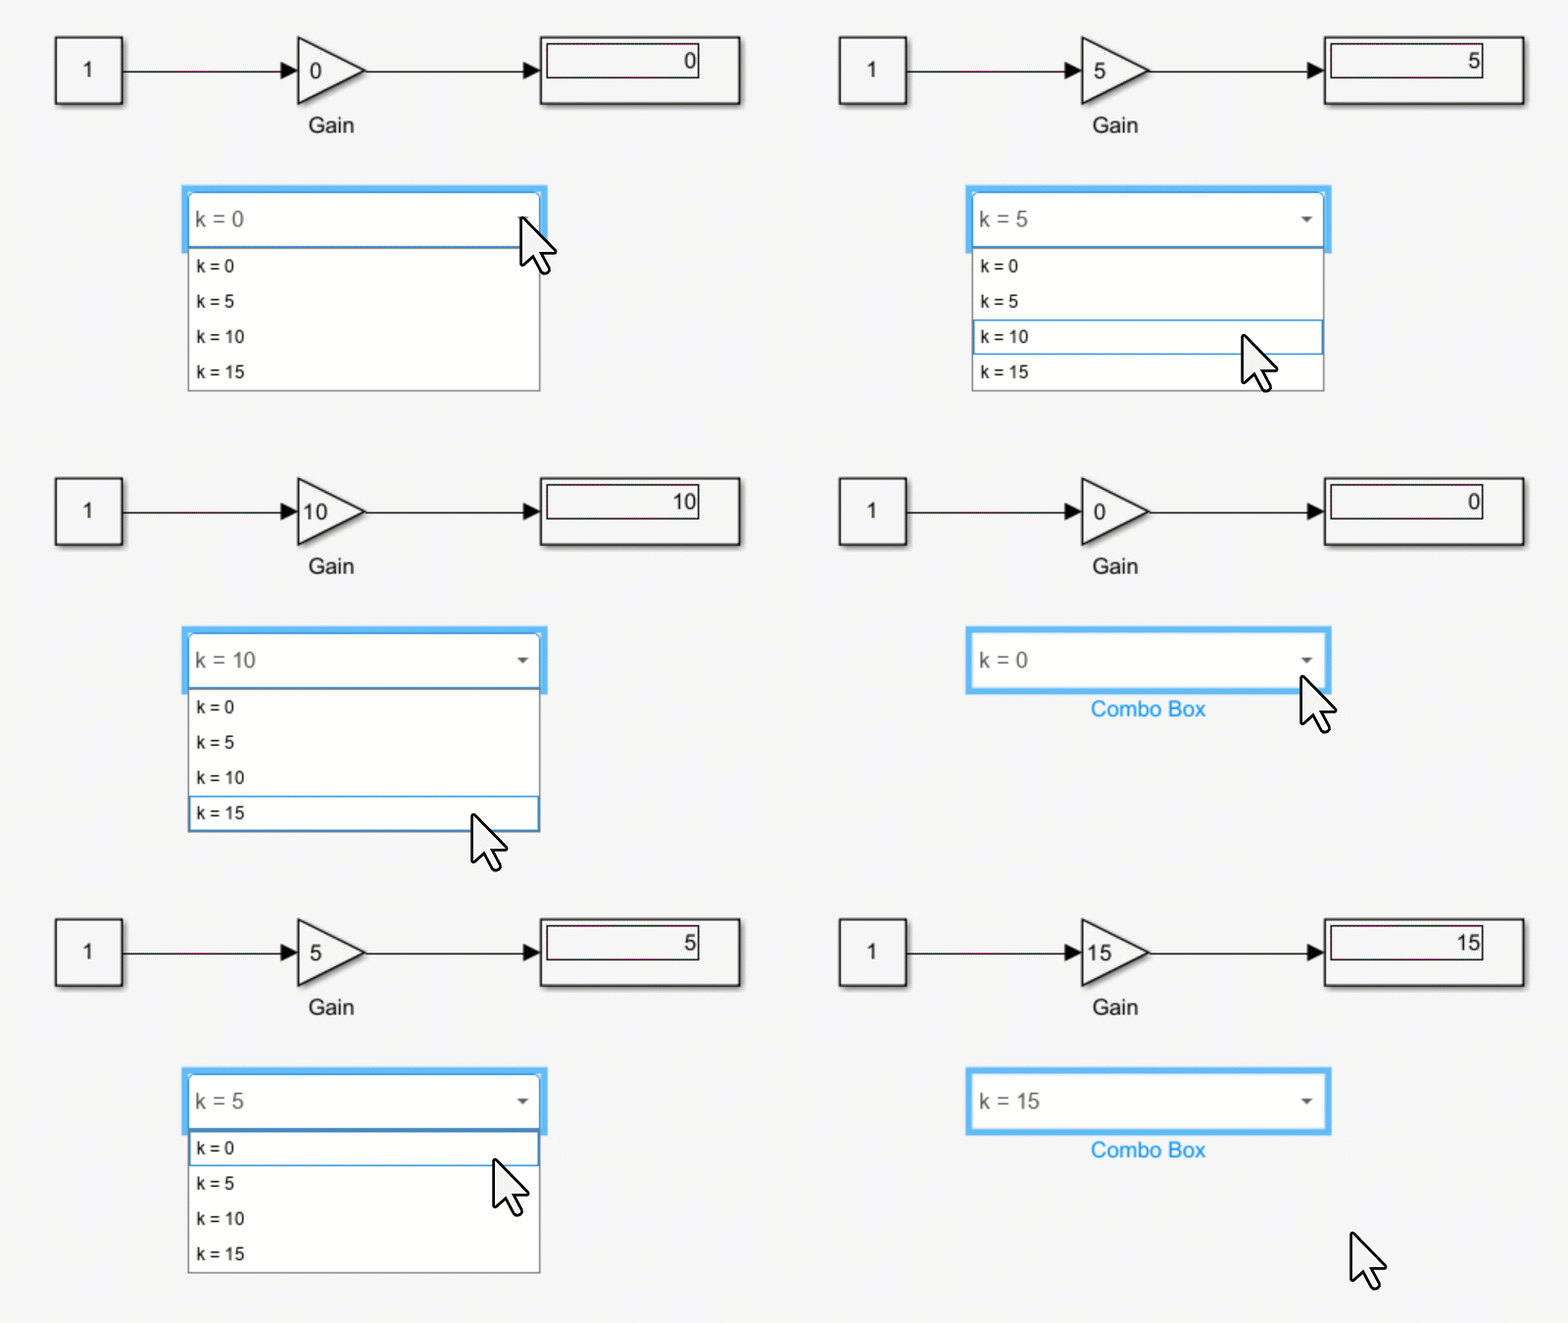
You can use a Combo Box block to set the value of a parameter to one of several choices before or during simulation. For example, in the model comboBoxGain, a Combo Box block is connected to the Gain parameter of a Gain block. The Combo Box block is configured such that you can choose a gain value of 0, 5, 10, or 15.

Block parameters dialog box for the Combo Box block.

Simulate the model. To change the gain value, click the Combo Box block, and select a value from the list.

Animation of the comboBoxGain model during simulation

Extended Examples

Limitations

  • Except for the Dashboard Scope block and the Display block, dashboard blocks can only connect to real scalar signals.

  • You cannot use the Connection table in the Block Parameters dialog box to connect a dashboard block to a block that is commented out. When you connect a dashboard block to a commented block using connect mode, the dashboard block does not display the connected value until the you uncomment the block.

  • Dashboard blocks cannot connect to model elements inside referenced models.

  • When you simulate a model hierarchy, dashboard blocks inside referenced models do not update.

  • Dashboard blocks do not support rapid accelerator simulation.

  • When you connect a dashboard block to a variable or parameter during simulation, the data for that variable or parameter is not logged to the Simulation Data Inspector. To log variable and parameter data to the Simulation Data Inspector, connect the dashboard block to the variable or parameter prior to simulation.

  • When you simulate a model in external mode with the Default parameter behavior set to Inlined, dashboard blocks can appear to change parameter and variable values. However, the change does not propagate to the simulation. For example, Gain blocks display changes made to the Gain parameter using the dashboard blocks, but the Gain value used in the simulation does not change.

Parameters

expand all

Connection

Dashboard blocks do not use ports to connect to model elements. To connect dashboard blocks to parameter values in your model, use connect mode, the Simulink® Toolstrip, or the Connection table in the Block Parameters dialog box. You can connect to a parameter with a scalar value, or to an element of a matrix. For information about connect mode and how to connect using the toolstrip, see Connect Dashboard Blocks to Simulink Model.

To connect a control block to a parameter with a scalar value or change the connection of a control block to a parameter with a scalar value using the Connection table:

  1. Select the block.

  2. To connect the block, in the Property Inspector, on the Parameters tab, click Connect. To change the connection of the block, click Change instead.

  3. Select the block to whose parameter value you want to connect.

  4. In the table, select the parameter to which you want to connect.

  5. Click Apply.

The control block cannot connect to a parameter defined by a variable until you update the model diagram. To connect to a parameter defined by a variable or to modify the value of a variable that defines the value of a connected parameter when the simulation is not running, update the model diagram by pressing Ctrl+D.

You can also connect dashboard blocks to a Stateflow chart. For more information, see Connect Dashboard Blocks to Stateflow (Stateflow).

Programmatic Use

To programmatically connect a dashboard block to a tunable parameter, use a Simulink.HMI.ParamSourceInfo object. The Simulink.HMI.ParamSourceInfo object contains four properties. Some properties apply to connecting dashboard blocks to parameters defined by values, and some apply to connecting dashboard blocks to parameters defined by variables. Not all fields have a value for a connection because a given dashboard block connects to either to a parameter defined by a value or to a parameter defined by a variable.

Block Parameter: Binding
Type: Simulink.HMI.ParamSourceInfo
Default: []

Main

You can use an enumerated data type that pairs a numeric value with each enumeration to configure the state values and labels for the block. To specify the states for the block using an enumerated data type, first select the Enumerated Data Type option. Then, specify the name of the enumerated data type in the text box. The definition for the specified enumerated data type must be saved on the MATLAB path or in the base workspace.

Example: myEnumType

Programmatic Use

To programmatically specify the state labels and values for the block using an enumerated data type, specify 'on' for the UseEnumeratedDataType parameter and the name of the enumerated data type for the EnumeratedDataType parameter.

Block Parameter: UseEnumeratedDataType
Type: string or character array
Values: 'on' | 'off'
Default: 'off'
Block Parameter: EnumeratedDataType
Type: string or character array
Default: ''

Position of the block label. When the block is connected to an element in the model, the label is the name of the connected element.

Programmatic Use

Block Parameter: LabelPosition
Type: character vector
Values: 'Hide' | 'Bottom' | 'Top'
Default: 'Hide'

Set of states from which to select a value for the connected parameter. Each State consists of a State Value and a State Label.

  • State Value — Value assigned to the connected variable or parameter when you select the state with the corresponding Label.

  • State Label — Label for each state. You can use the Label to display the value the connected parameter takes when the switch is positioned at the bottom, or you can enter a descriptive text label.

Click the + button to add additional States.

The default configuration for the block includes these States.

State ValueState Label
0Label1
1Label2
2Label3

Programmatic Use

To programmatically configure the States for a block, use an array of structures containing the fields Value and Label. Include a structure in the array for each state you want to configure on the block.

state1.Value = 1;
state1.Label = 'State 1';
state2.Value = 2;
state2.Label = 'State 2';
radioStates = [state1 state2];
Block Parameter: States
Type: structure
Default: 3x1 structure array

Format

Block background opacity, specified as a scalar value between 0 and 1.

Example: 0.5

Programmatic Use

Block Parameter: Opacity
Type: scalar
Default: 1

Block foreground color, including the text. You can select a color from a palette of standard colors or specify a custom color.

Programmatic Use

Specify the ForegroundColor parameter for the block as a string or a character vector that defines a 1-by-3 [r g b] vector with values between 0 and 1.

Block Parameter: ForegroundColor
Type: character vector | string
Values: [r g b] vector

Block background color. You can select a color from a palette of standard colors or specify a custom color.

Programmatic Use

Specify the BackgroundColor parameter for the block as a string or a character vector that defines a 1-by-3 [r g b] vector with values between 0 and 1.

Block Parameter: BackgroundColor
Type: character vector | string
Values: [r g b] vector

Block Characteristics

Data Types

double | half | integer | single

Direct Feedthrough

no

Multidimensional Signals

no

Variable-Size Signals

no

Zero-Crossing Detection

no

Extended Capabilities

Version History

Introduced in R2017b

expand all

Go to top of page