Create Variables and Filters Using the MBC Model Fitting App
R2026bUse the MBC Model Fitting app to create and manage variables and filters for the data you have collected. You can use the Variable Editor to define new variables or edit existing ones to perform calculations on recorded data parameters. You can also use the Filter Editor to create and apply filters to remove unwanted records or to focus on specific operating points.
This example shows how to open the Data Editor, load an example data set, and define a new variable and apply a filter based on that variable.
To open the Data Editor:
In the MATLAB® Toolstrip, on the Apps tab, under Automotive, click MBC Model Fitting.
In the MBC Model Browser window, to open the example case study and its associated data, in the left pane, double-click
SIMappedEngine - Torque Input.To open the Data Editor, in the MBC Model Fitting app toolstrip, select TestPlan > Edit Data
The Data Editor is where you define variables, apply filters, and inspect how
these expressions affect the imported data. This example uses the
SIMappedEngine - Torque Input to illustrate each
step.
Create and Edit Variables Using the Variable Editor
Use the Variable Editor to define new variables or modify existing ones. Variables perform calculations on recorded data parameters and are evaluated on a record‑by‑record basis.
Create New Variables
To create new variables in the Data Editor window:
In the toolstrip, click the Edit user-defined variables button
 . Alternatively,
select Tools > Variables, or right-click in the
Variables tab and select
Add.
. Alternatively,
select Tools > Variables, or right-click in the
Variables tab and select
Add. In the Variable Editor dialog box, you can enter an equation in the text box at the top. You can type the equation or double-click a variable name to add it to your equation. Variable names are case-sensitive. For this example, define a new variable called
AFRas the quotient of two existing variables representing air flow and fuel flow. EnterAFR = AirMassFlwRate / FuelMassFlwRate.To add the new variable to the current data set, click OK.
This variable is added to the data set and is available for plotting, filtering, and model fitting.
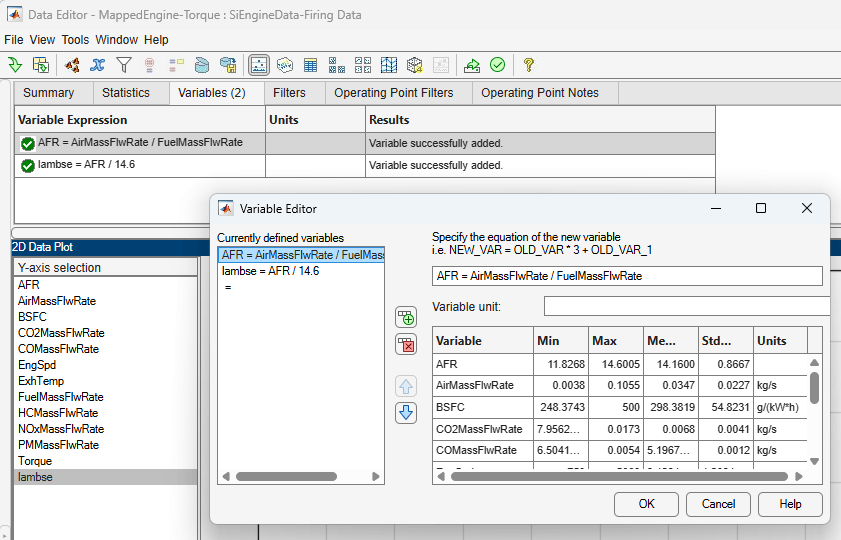
Edit Variables
The Variable Editor has several editing options for existing variables:
Rename a variable directly by selecting the variable name in the Variables tab.
To edit an equation, name, or units, double-click a variable in the Variables tab. Alternatively, select Tools > Variables to edit the equation, name, or units, or to reorder user-defined variables.
To sort user-defined variables in the Data Editor, select Tools > Sort Variables.
Delete variables by selecting them in the Variables tab and clicking Delete, or right-click the variable name and select Delete.
Note
The computation of variable values is vectorized and occurs prior to filtering and clustering. The result must be either a vector the same length as the data set, or a scalar, in which case the value is repeated for every record. Variables are used on a record-by-record basis.
Create and Apply Filters Using the Filter Editor
Use the Filter Editor to define constraints that exclude records or focus on specific operating conditions. Filters are defined using logical expressions based on existing variables.
Create New Filters
To create new filters, in the Data Editor window:
In the toolstrip, click the Edit filters button
 . Alternatively,
select Tools > Filters, or right-click in the
Filters tab and select
Add.
. Alternatively,
select Tools > Filters, or right-click in the
Filters tab and select
Add. You can define a new filter by entering an expression in the edit box at the top of the Filter Editor dialog box. You can also double-click a variable name to add it to your expression. For this example, create a filter that uses the previously defined
AFRvariable by enteringAFR > 12. This filter retains only records with an air-fuel ratio greater than 12.To apply the new filter to the current data set, click OK. The Filters tab shows how many data points were excluded.
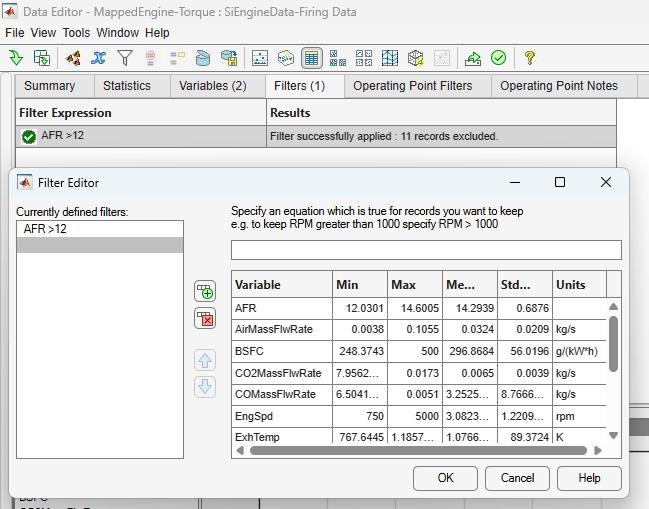
Edit Filters
The Filter Editor has several editing options for existing filters:
Rename a filter directly by selecting the filter name in the Filters tab.
To edit a filter in the Filter Editor, double-click a filter in the Filters tab. Alternatively, select Tools > Filters.
Delete a filter by selecting it in the Filters tab and clicking Delete.
Operating Point Filters and Operating Point Notes
If operating point groupings are defined, you can add operating point filters (to filter out entire operating points, instead of individual observations) and operating point notes (to mark every operating point that fulfills set criteria). You can access the Operating Point Filter Editor and Operating Point Notes Editor from the Tools menu. You can view these filters in the Data Editor in the same way as the other filters by selecting the Operating Point Filters or Operating Point Notes tab. You define, edit, store, delete, and import these filters in the same way.
Note
Operating point filters are deleted when fitting one-stage models.
Import Variables, Filters, and Editor Layout
You can store and import plot preferences, user-defined variables, filters, and operating point notes so that you can apply them to other data sets imported later in the session.
To import, use one of these methods:
Select Tools > Import Expressions.
Use the Import variables, filter, and editor layout button
 .
.
To use imported expressions in your current project, select items in the lists and click the Import variables, filter, and editor layout button to apply in the data editor.
In the Import Variables, Filters, and Editor Layout dialog box, use the toolbar buttons to import variables, filters, and plot layouts. Import from other data sets in the current project, from MBC project files, or from files exported from the Data Editor.
You can also store expressions in a file. In the Data Editor, select Tools > Export Expressions and select a filename.

