Format Text in Live Scripts
R2026bYou can add formatted text, tables, images, videos, hyperlinks, and equations to your live scripts and functions to create a presentable document that you can share with others. You also can check your text for spelling issues and change the font of the text.
Insert Text Items
To insert a text item, on the Insert tab, click
Text to add a blank text line. To return to code, click
Code. Adding text lines can affect code line numbering
depending on how you save the live script. When you save the live script using the
plain text live code file format (.m), each text line corresponds
to one or more code lines in the saved file. As a result, adding or removing text
lines changes the line numbers of any code that follows.
This table describes the text items that you can insert from the Insert tab.
| Option | Description | Additional Details |
|---|---|---|
Text | Insert a blank line of text. | A text line can contain formatted text, images, videos, hyperlinks, or equations. You can insert a text line before, after, or between code lines. |
Table of Contents | Insert a table of contents. | A table of contents contains a list of all the titles and headings in the document. If the document contains only one title, the title is not included in the table of contents. Only the title of the table of contents is editable. You can insert a table of contents only in text lines. If you insert a table of contents into a code line, MATLAB® places it directly above the current code section. When you export a live script containing a table of contents to Microsoft® Word, by default, the table of contents in the resulting document does not include page numbers. To add page numbers, click the table of contents in Word and select Update Table. |
Code Example | Insert a formatted code example. | A code example is sample code that appears as indented and monospaced text.
|
Table | Insert a table. | You can insert tables only in text lines. If you insert a table into a code line, MATLAB places the table in a new text line directly under the selected code line. To specify the table size,
select Table
After inserting the table, you can modify its rows and columns:
|
Image | Insert an image. | You can insert images only in text lines. If you insert an image into a code line, MATLAB places the image in a new text line directly under the selected code line. To change the alternative text, alignment, and size of an image after inserting it, right-click the image and select Edit Image from the context menu.
|
Video | Insert a YouTube® video or video file. | You can insert videos only in text lines. If you insert a video into a code line, MATLAB places the video in a new text line directly under the selected code line.
To resize the video, click an edge of the video to select it. Then, click and drag a corner or edge of the video to resize it. To return to the original video size, right-click a corner or edge of the selected video and select Reset Video Size. |
Hyperlink | Insert a hyperlink. | You can insert hyperlinks only in text lines. If you insert a hyperlink into a code line, MATLAB places the hyperlink in a new text line directly under the selected code line.
|
Equation | Insert an equation. | You can insert equations only in text lines. If you insert an equation into a code line, MATLAB places the equation in a new text line directly under the selected code line. For more information, see Insert Equations into Live Scripts. |

Format Text
To format existing text, use any of the options included in the Text section of the Live Editor tab:
| Format Type | Options |
|---|---|
| Text style | Normal Heading 1 Heading 2 Heading 3 Title Customize Styles For more information about customizing styles, see Change Fonts and Colors. |
| Text alignment | Align left Align center Align right |
| Lists | Bulleted list Numbered list To create multi-level lists, press the Tab key to indent a numbered or bulleted item. To decrease the indentation, press Shift+Tab. To change a sublist to a different list type, use the Bulleted list and Numbered list buttons. |
| Standard formatting | Bold Italic Underline Monospaced |
To convert selected text or code to all uppercase or lowercase, select the text, right-click, and select Change Case. You also can press Ctrl+Shift+A. If the text contains both uppercase and lowercase text, MATLAB changes the case to all uppercase.
Check Spelling
Since R2024a
You can check for spelling issues in text lines and comments in your live scripts and functions. Words with a potential spelling issue appear underlined in blue. To resolve the issue, click the word and select one of the suggested corrections. You also can choose to ignore the issue or add the flagged word to your local dictionary. To navigate between issues using the keyboard, use Alt+F7 and Alt+Shift+F7.
Spell checking is supported in US English for MATLAB code files (.m), live code files
(.m and .mlx), and Markdown files
(.md). To remove words from your local dictionary, go to your
MATLAB settings folder (the folder returned when you run prefdir) and edit the file
dict/en_US_userDictionary.tdi.
By default, spell checking is on. If a file contains many unrecognized words, such
as when not written in US English, MATLAB automatically turns spell checking off for that file. To manually turn
spell checking off for a file, go to the View tab, and in the
Review section, toggle the Spelling
button off. To turn spell checking off by default for all files, on the
Home tab, in the Environment section,
click
Settings. Select MATLAB > Editor/Debugger > Spelling and set Check spelling to
Off. To change what text to spell check, in the
Where to check spelling section, select or clear the
available options. For more information, see Editor/Debugger Spelling Settings.
Before R2026a: Spell checking is off by default. To turn spell checking on, go to the View tab, and in the Review section, toggle the Spelling button on. In addition, spelling settings are not available and spell checking in Markdown files is not supported.
Change Fonts and Colors
You can change the font, size, color, and formatting of text and code styles in live scripts and functions.
To customize a text or code style for the current document, go to the Live Editor tab, and in the Text section, click the text style drop-down list and select Customize Styles. Then, select the style that you want to customize and change the font, size, color, and formatting for the selected style. The Customize Styles dialog box shows a preview of each style.
The customized style applies only to the current document. To apply the customized style to all new live scripts as well, select the Use this configuration for new live scripts option.
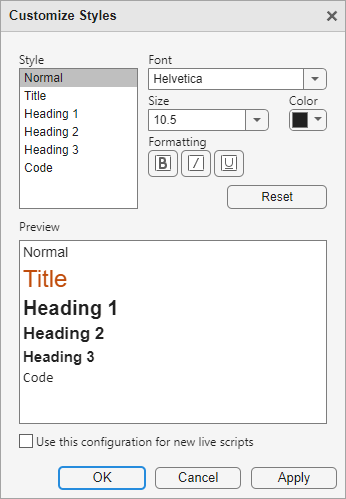
Alternatively, to customize a text or code style for all open documents and all new documents programmatically, use matlab.fonts Settings. All open live scripts and live functions update to show the selected fonts. When you create new live scripts or functions, the selected fonts are applied as well.
For example, this code changes the color and style of titles in live scripts and functions:
s = settings;
s.matlab.fonts.editor.title.Style.PersonalValue = "bold";
s.matlab.fonts.editor.title.Color.PersonalValue = [0 0 255 1];
Zoom
To increase or decrease the displayed font size in live scripts and functions, zoom in or out using the Ctrl+Plus (+) and Ctrl+Minus (-) keyboard shortcuts or by holding Ctrl and scrolling with the mouse. On macOS systems, use the Command key instead of the Ctrl key. The change in the displayed font size does not apply when you export the live script to PDF, Microsoft Word, HTML, LaTeX, Markdown, or Jupyter® notebooks.
Autoformatting
For quick formatting in live scripts and functions, you can use a combination of keyboard shortcuts and character sequences. Formatting appears after you enter the final character in a sequence.
This table shows a list of formatting styles and their available keyboard shortcuts and autoformatting sequences.
| Formatting Style | Autoformatting Sequence | Keyboard Shortcut |
|---|---|---|
| Title |
| Ctrl+Alt+L |
| Heading 1 |
| Ctrl+Shift+1 |
| Heading 2 |
| Ctrl+Shift+2 |
| Heading 3 |
| Ctrl+Shift+3 |
| Section break with heading 1 |
| With cursor at beginning of line with
Ctrl+Shift+1, then Ctrl+Alt+Enter |
| Section break |
| Ctrl+Alt+Enter |
| Bulleted list |
| Ctrl+Alt+U |
| Numbered list |
| Ctrl+Alt+O |
| Italic |
| Ctrl+I |
| Bold |
| Ctrl+B |
| Bold and italic |
| Ctrl+B, then Ctrl+I |
| Monospace |
| Ctrl+M |
| Underline | None | Ctrl+U |
| LaTeX equation |
| Ctrl+Shift+L |
| Hyperlink |
| Ctrl+K |
Trademark, service mark, and copyright symbols (™, ℠, ®, and ©) |
| None |
Note
Title, heading, section break, and list sequences must be entered at the beginning of a line.
Sometimes you want an autoformatting sequence such as *** to
appear literally. To display the characters in the sequence, escape out of the
autoformatting by pressing the Backspace key or by clicking
Undo
. For example, if you type ##
Enter, a heading in the Heading 1 style with the word
text +text appears. To undo the formatting style and display
## text, press the Backspace key. You can
escape out of a sequence only immediately after completing it. After you enter
another character or move the cursor, escaping is no longer possible.
To revert the autoformatting for LaTeX equations and hyperlinks, use the Backspace key at any point.
To force formatting to reappear after escaping out of a sequence, click the Redo button. You can redo an action only immediately after escaping it. After you enter another character or move the cursor, the redo action is no longer possible. In this case, to force the formatting to reappear, delete the last character in the sequence and type it again.
To disable all or certain autoformatting sequences, you can adjust the Editor/Debugger Autoformatting Settings.

