Image Acquisition Explorer Overview
Open the App
You can use the Image Acquisition Toolbox™ functionalities in the Image Acquisition Explorer app. Connect directly to your hardware from the app to preview and acquire image and video data. You can log the data to MATLAB® as a workspace variable or to your computer as an image or video file.
The Image Acquisition Explorer provides an interface that integrates a preview area with acquisition parameters, so that you can change settings and see the changes dynamically applied to your image data.
There are two ways to launch the app:
MATLAB Toolstrip: On the Apps tab, under Image Processing and Computer Vision, click the app icon.
MATLAB command prompt: Enter
imageAcquisitionExplorer.
Parts of the App
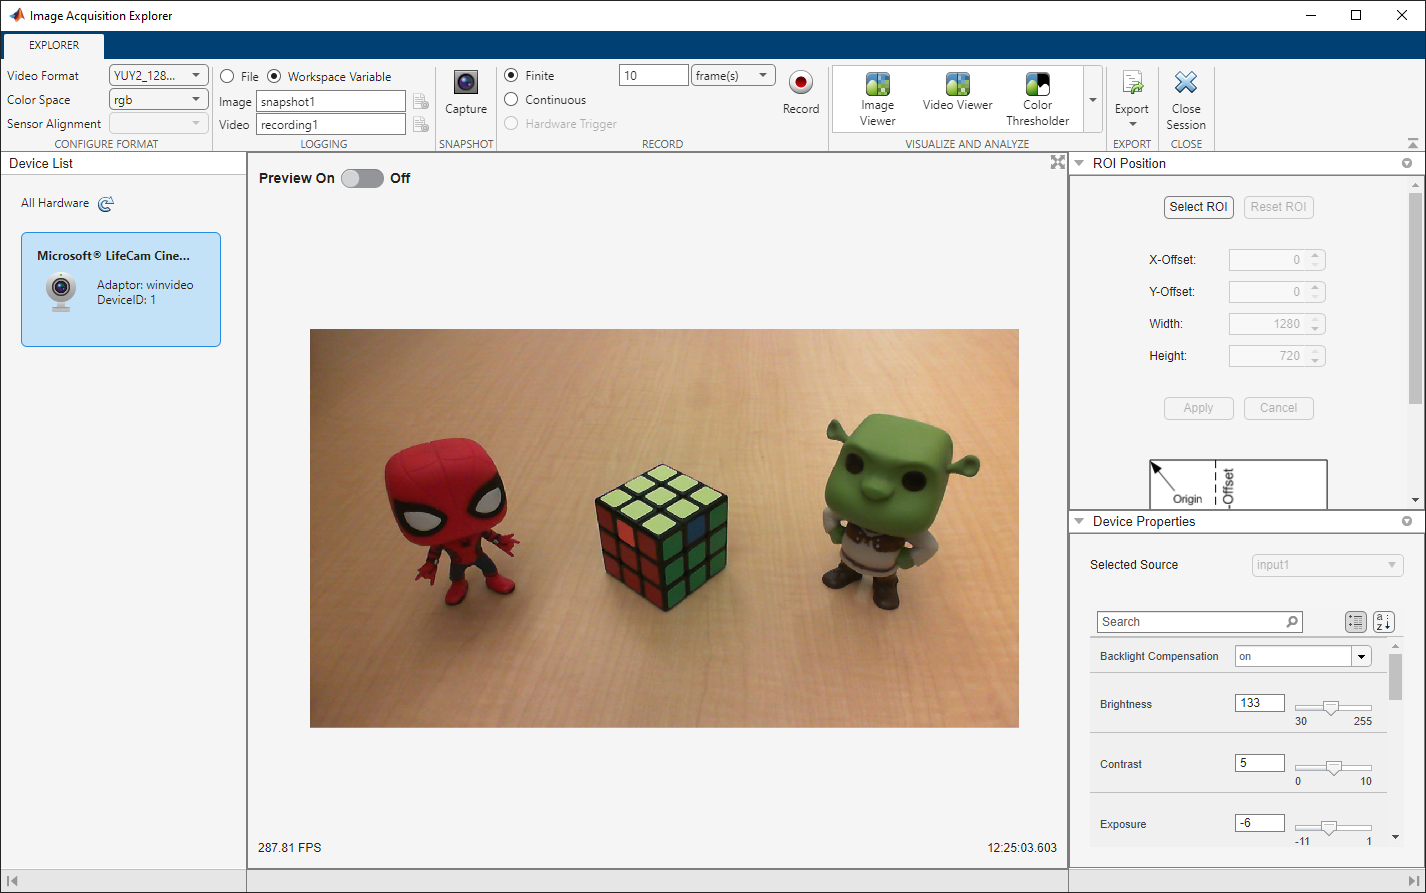
The Image Acquisition Explorer consists of the following components.
Preview — See a live preview from your selected image acquisition device. You can toggle the preview on and off by clicking the switch above the preview. The preview updates in real-time as you change device properties. The area below the preview displays the current frame rate and timestamp. The status bar below the preview displays status messages when you capture an image snapshot or record a video. If you select
grayscaleas the Color Space, you can set the colormap and color limits above the preview.
Panels
Device List — View a list of the image acquisition devices on your computer and available to connect to from the app. If you don't see your device, make sure you have the appropriate support package installed, make sure your device is plugged in, and click the refresh button. You can click on a different device to close your current device connection and switch to another device in the app.
ROI Position — Set your desired region of interest (ROI) for image acquisition. You can interactively select an ROI in the preview by clicking Select ROI. You can also manually specify ROI values for X-Offset, Y-Offset, Width, and Height in pixels. Click Apply after you set your desired ROI.
Device Properties — View and edit device properties. The specific list of properties that appear depends on your selected device. Changing properties here updates the preview in real-time.
Hardware Trigger — Set up hardware triggering options. This is only available if your device supports hardware triggering and you selected Hardware Trigger in the toolstrip. Specify the number of triggers and frames per trigger, as well as the trigger source and condition.
Toolstrip Sections
Configure Format — Specify the format of the images to acquire from your selected device. The options available for Video Format and Color Space depend on your device. These parameters define different resolutions and color spaces that your device supports, or different video standards or camera configurations for your device. If your device supports Bayer sensor alignment, you can set the Sensor Alignment. If your device supports camera files, the Select Camera File button appears here.
Logging — Choose whether you want to save your image data as a file or as a workspace variable. Your selection here determines how image data is logged when you click Capture or Record. After selecting the File or Workspace Variable option, you can edit the names and file locations for data logging. If you select File, you can specify additional file configuration settings by clicking the icon next to the file name.
Snapshot — Click the Capture button to immediately acquire and save an image snapshot using the current device properties and configuration.
Record — Select finite, continuous, or hardware triggered recording and click the Record button to start recording a video using the current device properties and configuration.
Visualize and Analyze — Open one of the Image Processing Toolbox™ apps and send it the most recently saved image or video data.
Export — Click the Export button and select one of the options to generate a MATLAB live script for capturing a snapshot or recording a video and open it in the Live Editor. The live script contains code for the current device configuration and code for saving data as a file or workspace variable.
See Also
Topics
- Get Started with Image Acquisition Explorer
- Select Your Device and Configure Format in Image Acquisition Explorer
- Set Acquisition Parameters in Image Acquisition Explorer
- Log Data in Image Acquisition Explorer
- Preview and Acquire Data in Image Acquisition Explorer
- Export Code from Image Acquisition Explorer