Code Generation for Object Detection Using YOLO v3 Deep Learning Network
This example shows how to generate CUDA® MEX for a you only look once (YOLO) v3 object detector. YOLO v3 improves upon YOLO v2 by adding detection at multiple scales to help detect smaller objects. The loss function used for training is separated into mean squared error for bounding box regression and binary cross-entropy for object classification to help improve detection accuracy. The YOLO v3 network in this example was trained on the COCO dataset. The tiny YOLO v3 network reduces large number of convolution layers of the YOLO v3 network. It is more suitable for real-time object detection as it requires less computing power requirements. For more information, see Getting Started with YOLO v3 (Computer Vision Toolbox) and Object Detection Using YOLO v3 Deep Learning (Computer Vision Toolbox).
Third-Party Prerequisites
Required
CUDA enabled NVIDIA® GPU and compatible driver.
Optional
For non-MEX builds such as static, dynamic libraries or executables, this example has the following additional requirements.
NVIDIA CUDA toolkit.
NVIDIA cuDNN library.
Environment variables for the compilers and libraries. For more information, see Third-Party Hardware and Setting Up the Prerequisite Products.
Verify GPU Environment
To verify that the compilers and libraries for running this example are set up correctly, use the coder.checkGpuInstall function.
envCfg = coder.gpuEnvConfig('host');
envCfg.DeepLibTarget = 'cudnn';
envCfg.DeepCodegen = 1;
envCfg.Quiet = 1;
coder.checkGpuInstall(envCfg);
Pretrained YOLO v3 Network
This example uses a pretrained YOLO v3 object detection network trained on the COCO dataset. The object detector can detect 80 different objects, including person, bicycle, car and so on. To use the YOLO v3 network, download and install the Computer Vision Toolbox Model for YOLO v3 Object Detection from Add-On Explorer. For more information about installing add-ons, see Get and Manage Add-Ons.
Specify a name for the network and save the yolov3ObjectDetector object to a MAT file. Save the yolov3ObjectDetector object to a MAT file and proceed.
name = "tiny-yolov3-coco";
vehicleDetector =  yolov3ObjectDetector(name);
matFile = 'tinyyolov3coco.mat';
save(matFile,'vehicleDetector');
net = vehicleDetector.Network;
inputLayerSize = net.Layers(1).InputSize;
disp(vehicleDetector.ClassNames(1:5))
     person
     bicycle
     car
     motorbike
     aeroplane
The tinyyolov3Detect Entry-Point Function
The tinyyolov3Detect entry-point function takes an image input and runs the detector on the image. The function loads the network object from the tinyyolov3coco.mat file into a persistent variable yolov3Obj and reuses the persistent object during subsequent detection calls.
type('yolov3Detect.m')function outImg = yolov3Detect(in,matFile)
% Copyright 2021-2022 The MathWorks, Inc.
persistent yolov3Obj;
if isempty(yolov3Obj)
yolov3Obj = coder.loadDeepLearningNetwork(matFile);
end
% Call to detect method
[bboxes,~,labels] = yolov3Obj.detect(in,Threshold = 0.6);
% Convert categorical labels to cell array of charactor vectors
labels = cellstr(labels);
% Annotate detections in the image.
outImg = insertObjectAnnotation(in,'rectangle',bboxes,labels);
Generate CUDA MEX
To generate CUDA code for the entry-point function, create a GPU code configuration object for a MEX target and set the target language to C++. Use the coder.DeepLearningConfig function to create a CuDNN deep learning configuration object and assign it to the DeepLearningConfig property of the GPU code configuration object. Run the codegen command specifying an input size of 416-by-416-by-3. This value corresponds to the input layer size of the YOLO v3 network.
cfg = coder.gpuConfig('mex');
cfg.TargetLang = 'C++';
cfg.DeepLearningConfig = coder.DeepLearningConfig('cudnn');
inputArgs = {coder.typeof(uint8(0),inputLayerSize),coder.Constant(matFile)};

codegen -config cfg yolov3Detect -args inputArgs -report
Code generation successful: View report
Test the Generated MEX on an Image
Load an input image. Call tinyyolov3cocoDetect_mex on the input image and display the detection results.
im = imread('highway.png');
im = preprocess(vehicleDetector,im);
outputImage = yolov3Detect_mex(im,matFile);
imshow(outputImage);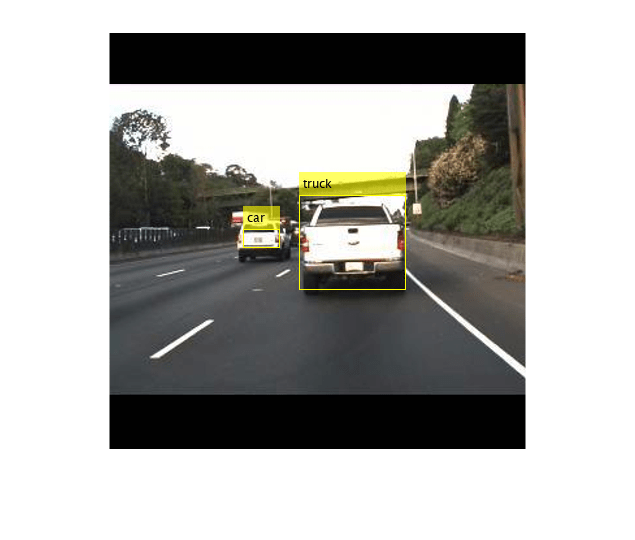
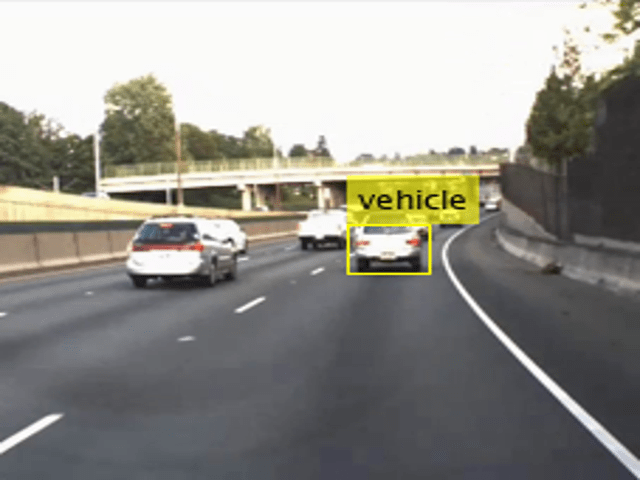
Test the Generated MEX on a Video
Set up the video file reader and read the input video. Create a video player to display the video and the output detections.
videoFile = 'highway_lanechange.mp4';
videoFreader = VideoReader(videoFile);
depVideoPlayer = vision.DeployableVideoPlayer('Size','Custom','CustomSize',[640 480]);
Read the video input frame-by-frame and detect the vehicles in the video using the detector.
cont = hasFrame(videoFreader);
while cont
    I = readFrame(videoFreader);
    in = imresize(I,inputLayerSize(1:2));
    out = yolov3Detect_mex(in,matFile);
    step(depVideoPlayer, out);
    % Exit the loop if the video player figure window is closed
    cont = hasFrame(videoFreader) && isOpen(depVideoPlayer);
end
References
1. Redmon, Joseph, and Ali Farhadi. “YOLOv3: An Incremental Improvement.” arXiv, April 8, 2018. http://arxiv.org/abs/1804.02767.
2. Lin, Tsung-Yi, Michael Maire, Serge Belongie, James Hays, Pietro Perona, Deva Ramanan, Piotr Dollár, and C. Lawrence Zitnick. “Microsoft COCO: Common Objects in Context.” In Computer Vision – ECCV 2014, edited by David Fleet, Tomas Pajdla, Bernt Schiele, and Tinne Tuytelaars, 8693:740–55. Cham: Springer International Publishing, 2014. https://doi.org/10.1007/978-3-319-10602-1_48.
See Also
Functions
Objects
coder.GpuCodeConfig|coder.gpuEnvConfig|coder.TensorRTConfig|coder.CuDNNConfig|dlarray(Deep Learning Toolbox) |dlnetwork(Deep Learning Toolbox)