Classify Images Using PyTorch Model Predict Block
This example shows how to use the PyTorch Model Predict block for image classification in Simulink®. The block accepts an image and passes it to a pretrained PyTorch™ neural network classification model that is executed in Python®. The predicted response for the image is then output to Simulink.
MATLAB® supports the reference implementation of Python, often called CPython. If you use a Mac or Linux® platform, you already have Python installed. If you use Windows®, you need to install a distribution, such as those found at https://www.python.org/downloads/. For more information, see Configure Your System to Use Python. Your MATLAB Python environment must have the torch module installed.
This example imports the MNASNet (Copyright© Soumith Chintala 2016) PyTorch model. MNASNet is an image classification model that is trained with images from the ImageNet database. Download the mnasnet1_0 file, which is approximately 17 MB in size, from the MathWorks website.
Open Provided Simulink Model
This example provides the Simulink model slexImagePyTorchModelPredictExample.slx, which includes the PyTorch Model Predict block. You can open the Simulink model or create a new model as described in the next section.
Open the Simulink model slexImagePyTorchModelPredictExample.slx.
open_system("slexImagePyTorchModelPredictExample");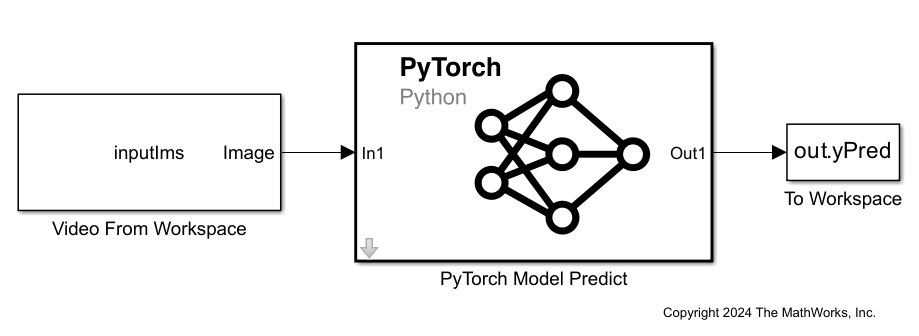
When you open the Simulink model, the software runs the code in the PreLoadFcn callback function before loading the Simulink model. The PreLoadFcn callback function of slexImagePyTorchModelPredictExample includes code to check if your workspace contains the inputIms variable for the image data. If the workspace does not contain the variable, PreLoadFcn loads the image data for the Simulink model. To view the callback function, in the Setup section on the Modeling tab, click Model Settings and select Model Properties. Then, on the Callbacks tab, select the PreLoadFcn callback function in the Model callbacks pane.
Create Simulink Model
To create a new Simulink model, open the Blank Model template and add the PyTorch Model Predict block from the Deep Learning Toolbox™ library. The block can be configured to accept input data in the form of an h-by-w-by-c-by-N numeric array, where h, w, and c are the height, width, and number of channels of the images, respectively, and N is the number of images.
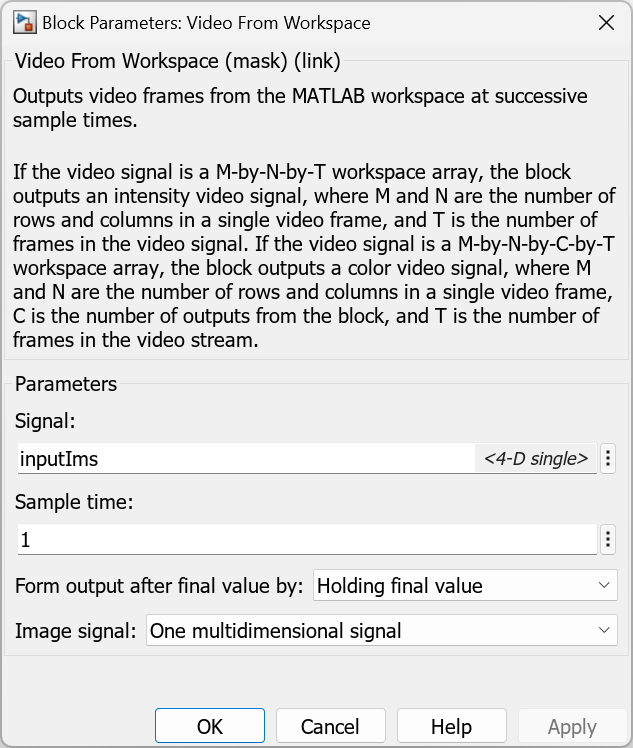
Insert a Video From Workspace block from the Computer Vision Toolbox™ library and connect it to the input port of the PyTorch Model Predict block. Double-click the Video From Workspace block to open the Block Parameters dialog box. Specify Signal as inputIms and Form output after final value by as Holding final value. Click OK.
Load five images of different sizes, included with Image Processing Toolbox™, into an image datastore. The imageDatastore function automatically labels the images based on the folder names, and stores the data as an ImageDatastore object.
fileNames = ["sherlock.jpg","peacock.jpg","lighthouse.png","llama.jpg", ...
    "trailer.jpg"];
filePath = fullfile(matlabroot,"toolbox","images","imdata")+filesep;
filePathNames = strcat(filePath,fileNames);
imds = imageDatastore(filePathNames);
The input images to the MNASNet PyTorch model require preprocessing. Rescale each image in the image datastore, and normalize each image by subtracting the training images mean and dividing by the training images standard deviation. Create the array of images displayIms, and display the images by using the montage (Image Processing Toolbox) function.
InputSize = [224 224 3];
meanIm = [0.485 0.456 0.406];
stdIm = [0.229 0.224 0.225];

for i = 1:5
    Im = imread(imds.Files{i});
    Im = imresize(Im,InputSize(1:2));
    Im = rescale(Im,0,1);
    Im = (Im - reshape(meanIm,[1 1 3]))./reshape(stdIm,[1 1 3]);
    displayIms(:,:,:,i) = Im;
end
montage(displayIms,size=[1 NaN]);
Convert the images in displayIms to single data type.
inputIms = single(displayIms);
Download the mnasnet1_0.pt file, which is approximately 17 MB in size, from the MathWorks website and copy it to the current folder.
mnasnetfile = matlab.internal.examples.downloadSupportFile("nnet", ...
    "data/PyTorchModels/mnasnet1_0.pt");
copyfile(mnasnetfile)
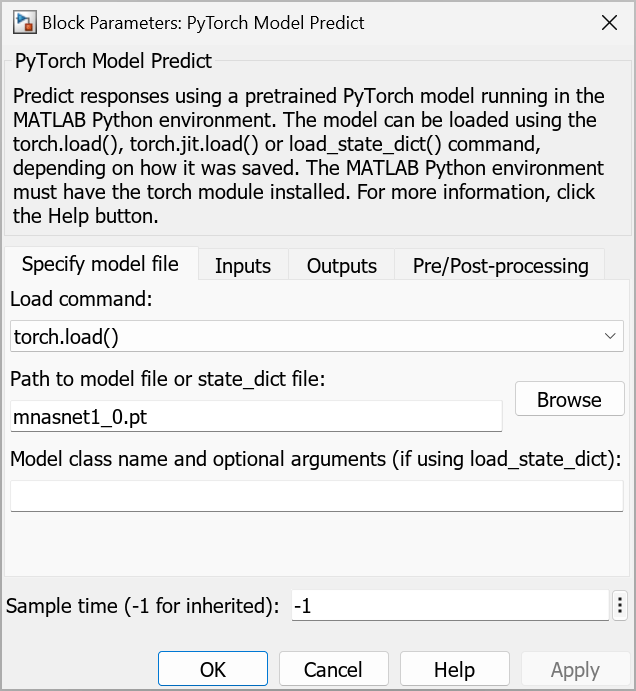
Double-click the PyTorch Model Predict block to open the Block Parameters dialog box. On the Specify model file tab, specify mnasnet1_0.pt.

The MNASNet model expects a four-dimensional signal with dimensions in a specific order. On the Inputs tab, the software auto fills the Permutation to Python as [4 3 1 2].
Add a To Workspace block to the model and connect it to the output port of the PyTorch Model Predict block. Double-click the To Workspace block to open the Block Parameters dialog box. Change the Variable name to yPred.
Open the Configuration Parameters dialog box. On the Modeling tab, click Model Settings to open the Configuration Parameters dialog box. On the left of the dialog box, click Solver. Under Simulation time, set Stop time to 4. Under Solver selection, set Type to Fixed-step, and set Solver to discrete (no continuous states). Click OK.
Save the model as slexImagePyTorchModelPredictExample.slx in Simulink.
Predict Using Simulink Model
Simulate the model and save the simulation output to modelOutput. The field modelOutput.yPred.Data contains the classification results. You might receive a warning message if your Python installation uses a torch version prior to 2.1.2.
modelOutput = sim("slexImagePyTorchModelPredictExample");Get the class names from squeezenet, which is also trained with ImageNet images.
[~,ClassNames] = imagePretrainedNetwork("squeezenet");Display the sequence of images and the classification results.
tiledlayout(1,size(inputIms,4),TileSpacing="none");
for i = 1:size(inputIms,4)
   nexttile
   imshow(displayIms(:,:,:,i))
   prob =(modelOutput.yPred.Data(:,:,i));
   [~,label_ind] = max(prob);
   title([ClassNames{label_ind}],FontSize=12)
end

See Also
TensorFlow Model Predict | PyTorch Model Predict | ONNX Model Predict | Custom Python Model Predict